Braised Chicken and Tomato with Rice

Standard

Image

Image

One lovely thing about writing a blog is hearing from other bloggers. One day I hope to meet Meredith who writes a very stimulating blog The Key to the Door, but in the mean time I’m thoroughly enjoying trying some recipes she has sent in along with her stamp of approval for their ease of use when having people over. When I tried this delicious chicken dinner, I didn’t have much time or energy for cooking but the quickness and ease of it meant we got through another arsenic hour scenario and it wasn’t too taxing. Originally from the $120 Food Challenge website, I’ve adapted this a little to serve more people by cooking it in the oven rather than on the stove. Everyone in our family loved this and it’s such a versatile recipe: next time I make it, I’m planning to add a jar of drained and pitted Kalamata Olives and might then call it Oven-baked Chicken Cacciatore! Using the quantities below, this recipe serves 8 and costs around $16 to make. Thanks for sharing, Meredith.

  • 8 chicken thigh fillets, (could also use drumsticks)
  • 4 tablespoon oil
  • 4 brown onions, diced
  • 4 cloves garlic, diced
  • 1 packet French onion soup mix
  • 2x 440g tin diced tomatoes
  • 1 cup water
  • 4 tablespoons soy sauce
  • salt and pepper to taste
  • 4 tablespoons chopped parsley (optional)
  1. Heat oil in a heavy based saucepan or large frying pan and sauté chicken pieces until brown and then place in a large oven-proof casserole dish.
  2. Add onions and garlic and fry until translucent. Add tomatoes and juices, the soup mixture, water, soy sauce, and season with salt and pepper and a teaspoon of sugar.
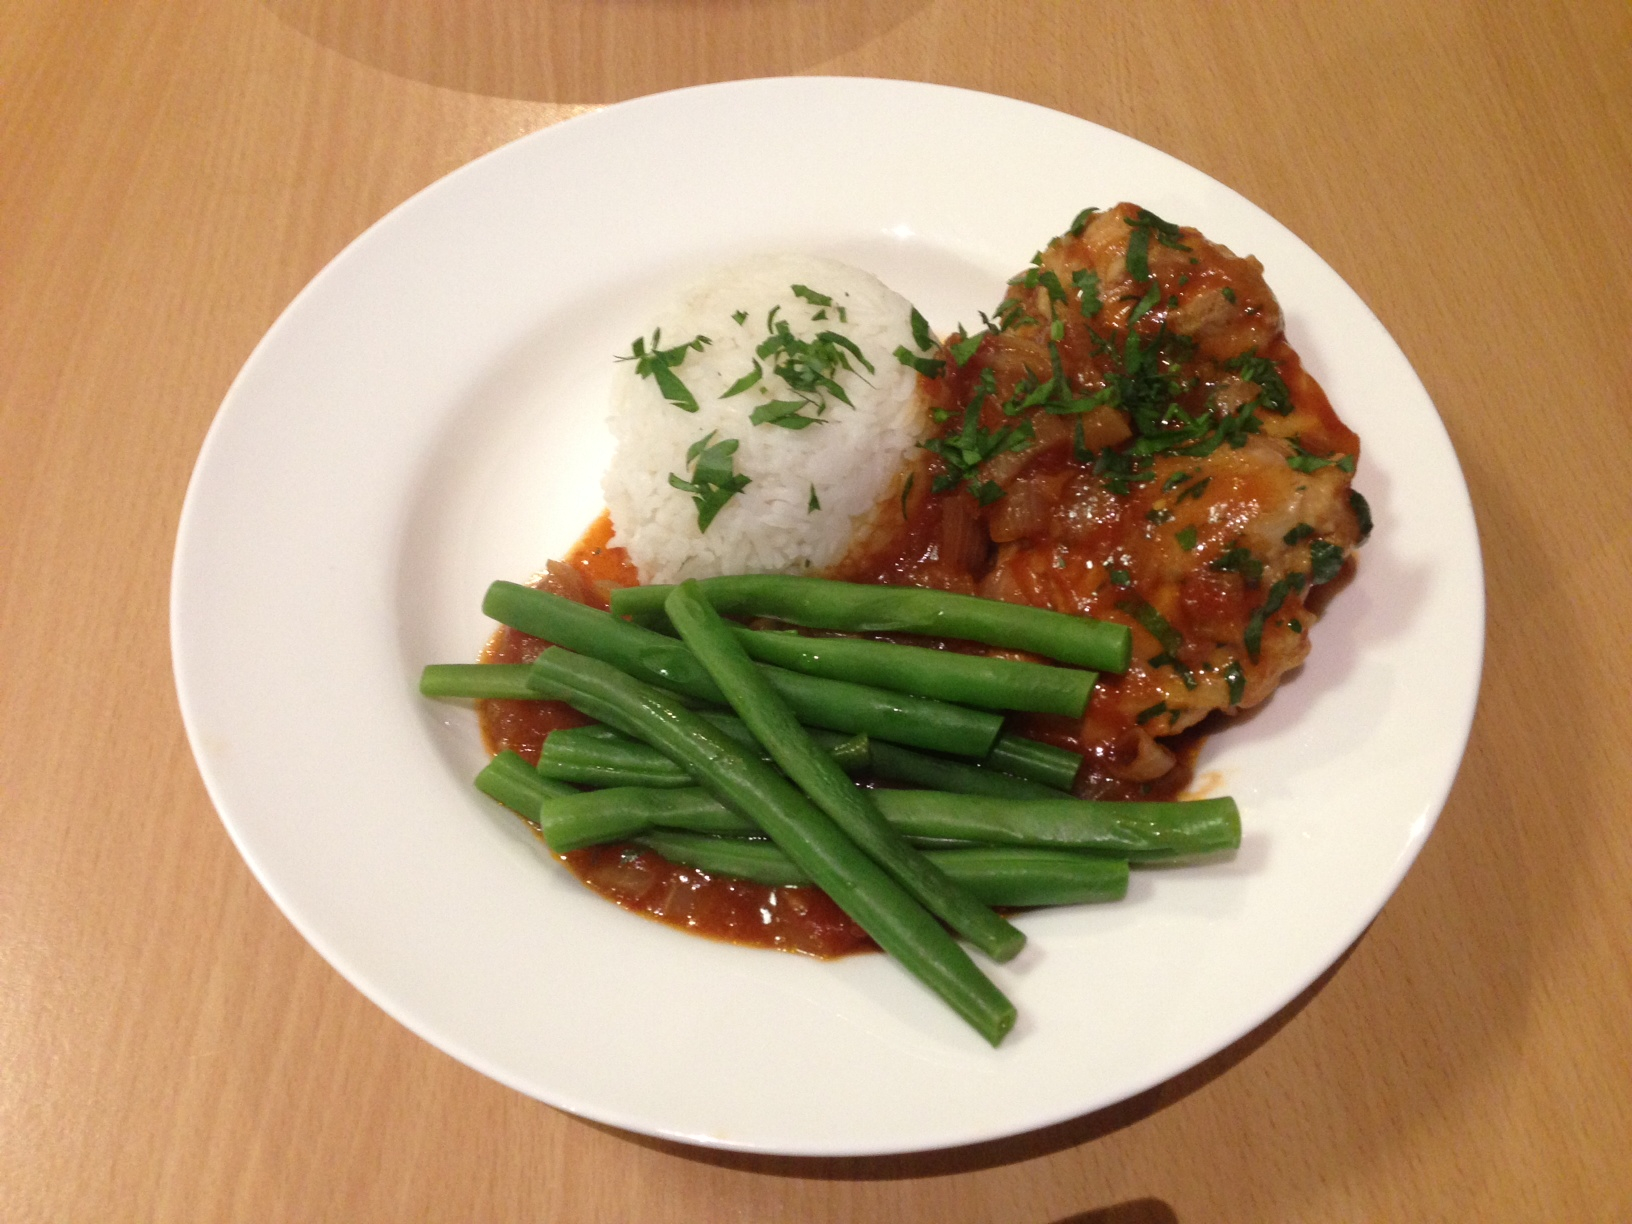
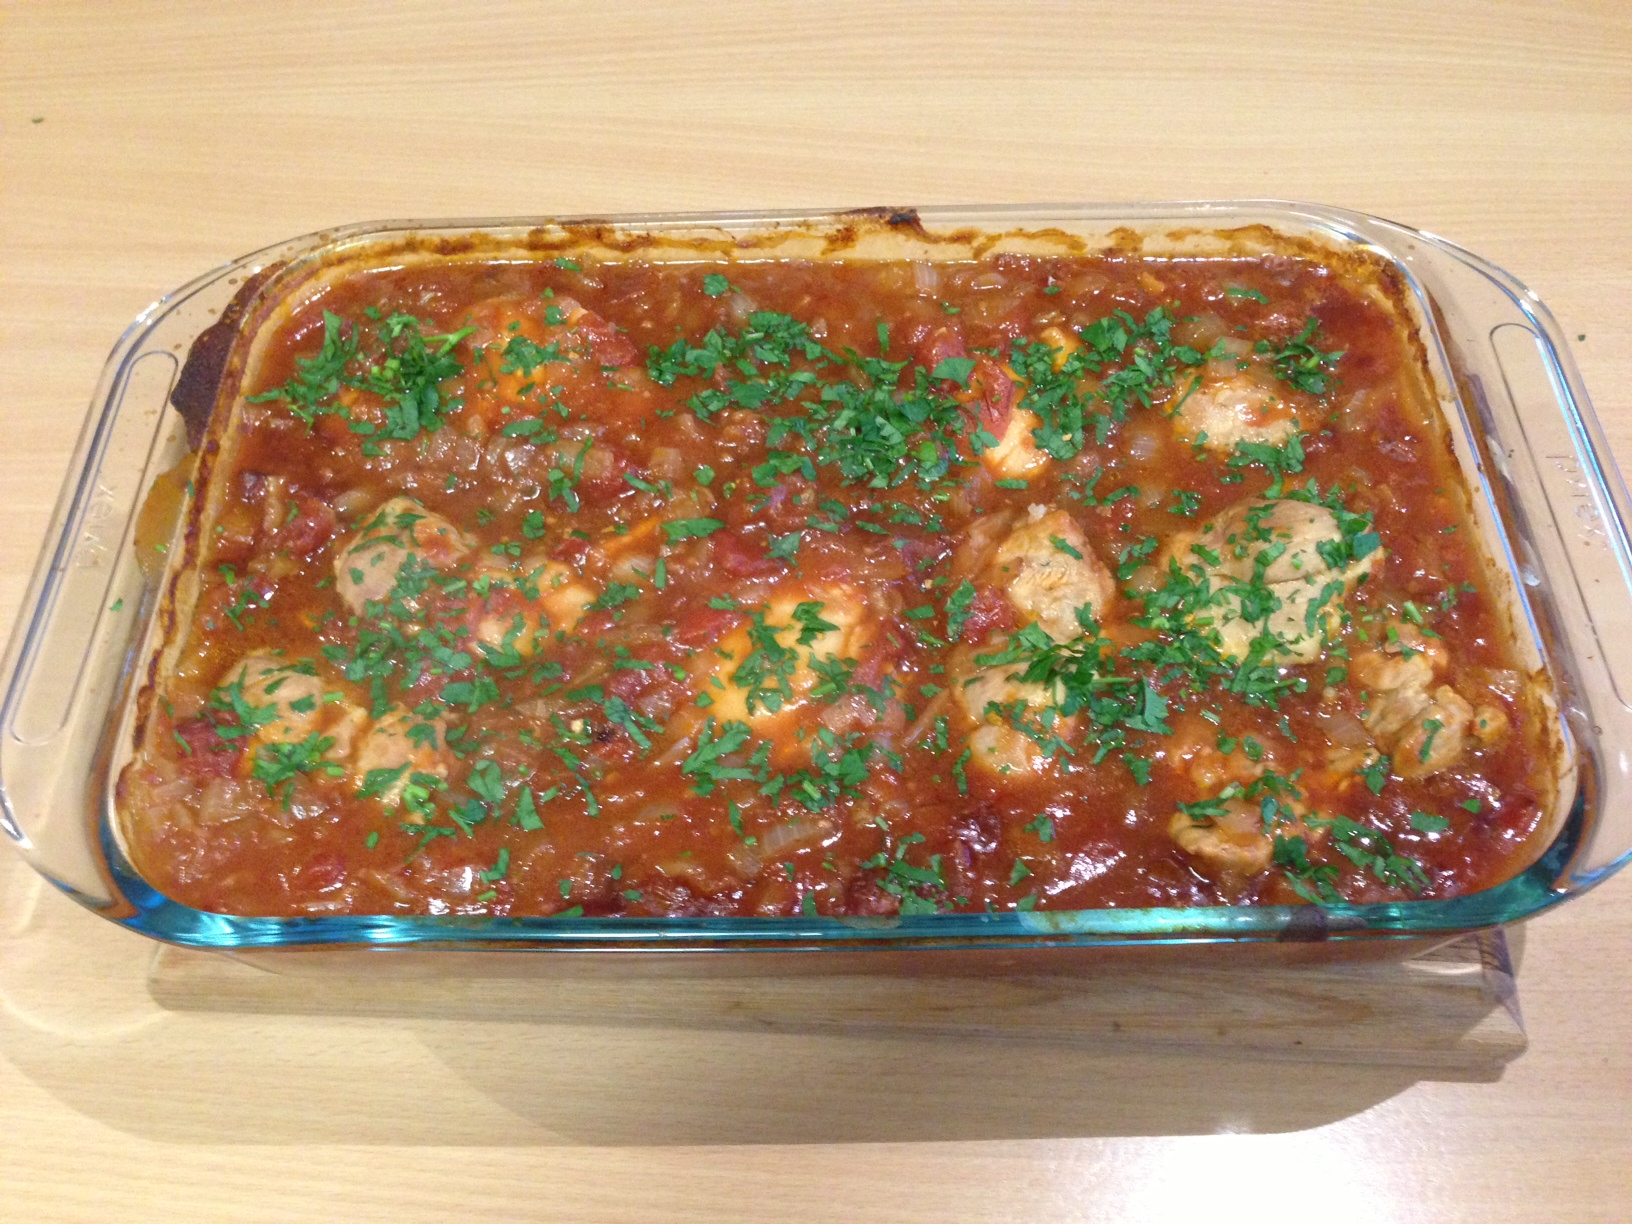
  3. Distribute this mixture evenly over the chicken and bake in a moderate oven for 40 minutes. When cooked, top the whole dish with parsley and serve with rice and greens if desired.

Gingerbread Slice

Standard

Image

Image

I love gingerbread – actually, I love anything with ginger in it. And years ago, my friend Cynthia put me onto this amazing recipe called Grandpa Pencil’s Gingerbread Men. Since then, it’s been my go-to for great tasting gingerbread that turns out just how I like it: sweet, gingery, a bit of crunch but mostly chewy in texture. And of course, the kids always love decorating them. The only down-side has been the time it often takes to make and decorate a batch of these lovely things – definitely more a holiday or a weekend thing, than something achievable when life is busy. But I’ve come by two solutions to this problem. The first is these square cookie cutters I recently stumbled upon for $9.95 in a kitchen shop. No more re-rolling excess dough multiple times because the cookie shapes are so awkward. With these square cutters, there’s no need for edges at all, which maximises time by just cutting once. I should say too, as my friend Jane suggested to me: you really don’t need square cookie cutters to treat rolled out dough like this – just use a butter knife and cut the dough into squares in whatever size you prefer. And here’s a tip: the best way I’ve found to lift the uncooked shapes off a floured bench is to use a thin, metal egg lifter. The second gingerbread solution is to cook Grandpa Pencil’s dough as a slice instead of as cookies and decorate with freckles before they go in the oven, which is my adaptation below. Either way, this recipe will cost no more than $3 to make. Thanks Cynthia, for sharing this one all those years ago.

  • 125g butter, softened to room temperature
  • 125g sugar (I use brown)
  • 280g plain flour
  • 1/2 teaspoon bi-carb soda
  • 1 1/2 teaspoons ground ginger
  • 1/2 teaspoon cinnamon
  • 1/2 teaspoon nutmeg
  • 1 cup golden syrup, warmed in microwave
  • 24 freckles
  1. Cream butter and sugar. Add the rest of the dry ingredients and mix to combine.
  2. With beaters mixing slowly, gently add warmed golden syrup until mixture turns to a ball of dough, not too wet and not too dry.
  3. If making into biscuits roll mixture onto a floured bench, otherwise, using wet hands, press mixture into a 30 x 20 cm lined lamington tin.
  4. Press 24 freckles into the wet mixture in a 4×5 configuration and bake at 180 degrees (170 if fan-forced) for 45 minutes. If it goes brown on top but still hasn’t cooked through, cover with foil and return to the oven. The end result should be a fudgy/brownie consistency, not so much a crumbly or dry slice.  Allow to cool completely in tin before cutting between freckles into 24 squares.

Strawberry Oatmeal Bars

Standard

Image

strawberry Oatmeal Bars Plated


When it’s school holiday time, we seem to eat so much more as a family than we usually do. It’s taken me by surprise how frequently my kids want to eat and with the extra time to spend with them at home, it’s been nice to do a little baking. But I’m no super spontaneous, indie, ‘let’s get creative’ type mum so adventures in this area still need to be simple enough to keep the fun levels high for all of us. This recipe sent in by Emily Yap totally fits the bill, who recommends it for lots of reasons: they’re tasty, cheap, easy to make and all the ingredients are standard pantry items – cause who likes having to make an extra trip to the shops just to do some baking? This recipe, adapted from a blog called The Pioneer Woman Cooks makes 15 squares of yummy-ness and will cost around $4 to bake.

  • 200g cold butter, cut into pieces
  • 1 1/2 cup all-purpose flour
  • 1 1/2 cup oats (quick or regular)
  • 1 cup brown sugar, packed firm
  • 1 teaspoon baking powder
  • 1/4 teaspoon salt
  • 1 x 370g jar of jam of your preference, I used IXL Strawberry Conserve
  1. Preheat oven to 180 degrees, then grease and line a 20 x 30 cm lamington tin.
  2. Put all the dry ingredients in the bowl of a food processor, blitz for just a moment until everything is just combined.
  3. Add chopped butter to the mix and process until mixture resembles crumbs with large/obvious chunks, roughly the size of rice grains. Be careful not to over-process.
  4. Divide mixture in half and press one half of the mixture firmly and evenly into the bottom of the lamington tin.
  5. Heat the jam in the microwave at 50% for 40 seconds and give it a good stir. Pour gently over the crumb base and use a spoon to spread evenly.
  6. Gently tip the rest of the crumb mixture on the top of the jam and spread evenly. Using clean fingers press down as firmly as possible without destabilising the jam.
  7. Bake for 20-30 mins until brown on top. Cool in the tin and use a sharp knife to cut into squares.

Dill and Smoked Salmon Frittatas

Standard

Image

Image

The warmer weather has well and truly arrived and as usually happens, I find myself craving lighter meals such as these delightful Dill and Smoked Salmon Frittatas. The basic recipe for these was given to me by my friend Kara who makes them as finger food, baked in mini muffin tins and topped with a small piece of salmon and dot of sour cream. And if you’re looking for a yummy and easy finger food option, I heartily recommend making them that way. But seeing as this blog is all about easy hospitality, I tried making these a little less labour intensive and with a view to serving as a main. The recipe that follows is Kara’s basic frittata recipe, but with a slightly different methodology. Make these ahead of time and freeze for quick lunches at home or for 6 people coming over for lunch – simply thaw gently and warm a little in a low set oven. Serve with a side salad and some crusty bread. The good thing about these little babies is they are the perfect thing to serve those on a sugar free and carb free diet (minus the side of bread) and they’re also gluten free. Making 12 regular muffin sized frittatas or 48 mini muffin sized hors d oeuvres, this easy, do-the-whole-thing-in-the-food-processor recipe will cost around $13, though less if you purchase the herbs at a green-grocer rather than the supermarket, and the ricotta from the deli rather than the fridge section.

  • 8 eggs
  • 3 tablespoons dill
  • 3 tablespoons chives
  • 1/3 cup cream
  • 1 cup ricotta cheese
  • 1 1/2 cup parmesan cheese, grated
  • salt and pepper
  • 1 x 415g can smoked salmon, drained with the majority of skin and bone removed.
  1. In a food processor, put in dill and chives and process until finely chopped.
  2. Add ricotta, eggs and cream and process again.
  3. Exchange the chopping for the grating blade and grate half a cups worth of parmesan onto the top of the mixture. Season the mixture with salt and pepper.
  4. Grease muffin trays well with spray oil and pour mixture in until 2/3 filled.
  5. Distribute salmon in chunks over the portions and top each with the remaining parmesan cheese.
  6. Bake at 160 degrees for 20 mins if using mini muffin tins. If using regular sized muffin tins, bake at same temperature for 20 mins, plus a further 5 with the oven cranked up as far as it can go. This cooks the frittatas further and allows them the brown on top.

Jamie Oliver’s Chicken Korma

Standard

Image

Image

I’m not exactly sure why, but until a few days ago, I have struggled in recent months to want to cook anything new. With no headspace for it, I’ve been in a season of sticking to: old faithful recipes, porridge and weetbix and making one thing last a few nights. But my drought seems to have broken. Perhaps it’s because the weather has turned warmer, or because the kids are on school holidays, but today I tried this blog-worthy recipe, adapted from Jamie Oliver’s Ministry of Food via my friend Kara. It’s all the things this blog is about: not foody-ness – but taste, ease and affordability so that having people over isn’t too stressful. And what a terrific recipe this turned out to be! It can be made ahead of time, or in that last hour between getting home from work and people turning up – because once everything’s in the pot, it’s a simple case of simmering this gluten free meal while doing other things. Depending on the type and price of the chicken you use, this dish will cost between $10-$13 to make and serves 6-8 with rice. Add to this dollops of greek style yoghurt and fresh coriander leaves. I’m loving eating it, even as I type! Thanks for pointing me towards this bonza recipe, Kara.

  • 800g chicken thighs or breasts, cut into 2-3cm pieces
  • 2 medium onions, halved and sliced thinly
  • 1 fresh green chilli, optional (only if you like spicy curries. I left it out)
  • A 3cm piece of fresh ginger, peeled and chopped finely
  • 1 small bunch of fresh coriander, washed, leaves removed and stalks chopped finely
  • 1 x 400g tin of chickpeas, drained
  •  rice bran or vegetable oil
  • Knob of butter
  • 1/2 x 290g jar of Patak’s korma curry paste
  • 1 x 400ml tin of coconut milk
  • A small handful of flaked almonds, plus extra for serving
  • 2 heaped tablesoons desiccated coconut
  • salt and pepper
  • Greek style yoghurt, for dolloping

1. Put the oil in the pan to heat and add onions, ginger and coriander stalks. Stir constantly for ten minutes to ensure it’s become fragrant and hasn’t burnt on the bottom. If using chicken thighs, throw them in for browning now, otherwise if using breasts, hold off til end of step 2.

2. Add the korma paste, coconut milk, half the flaked almonds, chickpeas, desiccated coconut and sliced chicken breasts. Half fill the empty coconut milk tin with water, pour it into the pan, and stir. Let the whole thing simmer away for about half an hour. This is so easy – now just walk away and do other things, like putting the rice on in the rice cooker.

3. Season carefully once the chicken is cooked and become tender. Serve with boiled rice, adding a few spoonfuls of Greek yoghurt dolloped on top. Sprinkle over the rest of the flaked almonds and coriander leaves.

Gluten Free Chocolate Brownie

Standard

Image

A while back the girls in the weekly Bible study group I’m part of were asked to help cater for desserts for an evangelistic event. We needed to provide a variety of easy desserts that involved little serving hassle, tasted great and cared for the needs of those with allergies. When my friend Jacinta said, “I’ve got a gluten free chocolate brownie recipe that works every time and tastes great”, we all praised God! And she was right. The group got together for a big baking session the night before and everything came together, in part due to this terrific recipe. Unlike many brownie recipes, there’s no expensive ingredients here and the whole thing cooked evenly without drying out the edges. I’m going to be using this one for many years to come! You’ll find gluten free flour in the health food section of most supermarkets and the whole recipe will cost around $5 to make.

  • 240g butter or margarine
  • 2 cups raw sugar (can substitute with caster or white)
  • 1/2 cup cocoa
  • 4 eggs
  • 2 cups gluten free plain flour
  • 1 teaspoon bi-carb soda
  • 1 teaspoon vanilla essence
  • pinch of salt
  1. Mix in 1/2-3/4 cup of any of the following, if desired: berries, jersey caramels, chocolate chips, walnuts or peanuts.
  2. Preheat oven to 180 degrees celcius, 160 degrees if fan-forced
  3. line a large baking dish or two 25×25 square pans with baking paper
  4. Melt margarine in glass jug or saucepan
  5. In a large bowl, combine sugar and cocoa, mix in melted butter, eggs, vanilla and salt.
  6. Sift bicarb soda and flour together and fold into the mix. Beat the mixture well by hand or with an electric mixer.
  7. Pour into tin/s and bake for 25-30 minutes, though start checking earlier. It should fee; ‘just set’ on top. Remember: it will continue to cook as it cools, so don’t overcook.
  8. Cool in the tin and serve by itself or with cream, icecream or raspberry sauce.

Gluten Free Raspberry Slice

Standard

Image

Image

You’ve got to love a gluten and egg free recipe that works just as well as if it weren’t, tastes just as good as its gluten-full counterparts and doesn’t cost the earth to make. That’s exactly my review of my friend Mim’s Gluten Free Raspberry Slice. This very simple recipe looks far more impressive than the minimal effort it actually requires – so don’t be put off by the creaming of the butter and sugar – everything else is so jolly simple, it’s really not a deal-breaker. Serve this up to all your guests as a dessert with cream or icecream or simply as a an eye-pleasing morning or afternoon tea. Finally, this yummy number can be done with berries of your choice (mine pictured above is mixed berry) and regular flour should you not require freedom from gluten. Either way, will only set you back around $4. Thankyou Mim, I can tell I’m going to be making this again and again.

  • 200 g butter
  • 1 teaspoon vanilla
  • 1 cup caster sugar
  • 1 cup almond meal
  • 1 1/2 cups of gluten free flour
  • 2 cups frozen raspberries
  • 1/3 cup flaked almonds
  1. Line lamington pan with baking paper.
  2. Beat butter, vanilla and sugar until light and fluffy. Stir in almond meal and sifted flour.
  3. Press 2/3 pastry into base – reserve rest for crumbling on top.
  4. Bake uncovered in moderately hot oven (200) for 10 minutes until lightly browned.
  5. Sprinkle raspberries over the top.
  6. Sprinkle remaining pastry (crumbled) and flaked almonds.
  7. Bake 35 minutes, or until brown.
  8. Cool in pan. Lift whole slice out using baking paper. Cut into squares, dusting pieces with icing sugar.

2 Ingredients Banana Pikelets (with no added sugar or carbohydrate)

Standard

Image

Image

Image

My friend Victoria posted a link to this delightful recipe during the week and I was genuinely intrigued by it – pikelets made using only eggs and bananas? I had to try them. This morning provided the perfect opportunity: waking up to an overcast, sleep in, pyjama type Saturday. The kids devoured these healthy, protein rich, gluten free and diary free pikelets that contain no added sugar or carbohydrate – definitely my kind of breakfast or snack. The consistency of these on eating is a little more spongy than a standard pikelet, but it certainly isn’t a deal-breaker. If you prefer something a little sweeter, simply add some icing sugar to serve. These little babies would also make an excellent dessert for sugar-phobes, simply drizzle with cream – though I must confess to eating mine like this for breakfast. Makes 24+ and costs no more than $2.

  • 2 bananas, mashed a little with a fork
  • 4 eggs

1. Put slightly mashed banana and eggs in a mixing jug. Using a stick blender, puree the mixture until completely smooth.

2. Pour small amounts (about the size of the lid of a jam jar) into a frypan set to medium/low. Use a small amount of canola spray before pouring. Cook each for a couple of minutes each side (though I do find the first side takes around 3 minutes and second takes less than one). Eat by themselves, with a dusting of icing sugar or with some runny cream.

Raspberry and Coconut Loaf

Standard

Image

Image

My dear friend Kim contributed this terrific little recipe from taste.com AGES ago – but I only recently noticed it in the foodthatserves@gmail.com inbox. This is a bonza recipe: the ingredients are ones you’re likely to find in your pantry and freezer and there’s no butter in it at all. If you’re avoiding sugar this recipe works well by simply exchanging sugar for dextrose exactly. If you don’t have raspberries in your freezer but do have tinned ones or berries of another kind, do feel free to exchange as needed. I made this using blueberries (see second photo) and it tasted lovely. This gorgeous little loaf will cost you no more than $4 to make. Enjoy!

  • 1 3/4 cups desiccated coconut
  • 1 1/2 cups coconut milk
  • 1 cup caster sugar
  • 1 egg, lightly beaten
  • 1 teaspoon vanilla essence
  • 1 2/3 cups self-raising flour
  • 2 tablespoons flour extra
  • 1 cup frozen raspberries
  • icing sugar, to serve
  1. Combine coconut and coconut milk in a large bowl. Cover and stand for 30 minutes (or not – I have little patience for steps like these!).
  2.  Preheat oven to 170°C. Line base and sides of a 7cm-deep, 10.5cm x 20.5cm (base) loaf pan with baking paper, allowing a 2cm overhang at both long ends.
  3. Toss frozen berries in extra flour (this will prevent them from sinking to the bottom of the loaf as it cooks). Using a metal spoon, stir sugar, egg and vanilla into coconut mixture. Sift flour over coconut mixture. Gently stir until combined. Fold in raspberries.
  4. Spoon mixture into prepared pan. Bake for 1 hour 10 minutes to 1 hour 15 minutes or until a skewer inserted into the centre comes out clean. Cool loaf in pan for 10 minutes. Lift onto a wire rack to cool completely. Dust with icing sugar and slice. Serve toasted, if desired.

Roasted Pumpkin Soup

Standard

Image

My super cool aunt, Jacqueline, gave me this pumpkin soup recipe years ago and since then it’s the only one I’ve used. I’m not a fan of lumpy pumpkin soup and I like mine to taste rich and pumpkiny. The roasting of the pumpkin produces this result with beautiful smoothness. Chop and roast the pumpkin days in advance and simply refrigerate until you want to blend the ingredients together. You can peel the skin off before hand or remove it after roasting – whichever you find easiest, though I think there’s a little more wastage of the pumpkin when you roast with skin on. I purchase my pumpkin from my local cheap-as-chips grocer and can usually pick up a 3kg for around $5. The other ingredients are incidental, especially if you, like me, use powdered stock. Serves 6-8.

  • 3kg pumpkin, chopped into smallish pieces and roasted for around 1 hour.
  • minimum of 7 cups chicken or vegetable stock (I used powdered. Increase until you have desired consistency)
  • 2 tablespoons dijon mustard
  • 2 tablespoons honey
  • salt and pepper to taste
  1. Combine roasted pumpkin, stock, mustard and honey in a large stock pot.
  2. Process using a stick blender until ingredients are combined.
  3. Heat through, stirring regularly and season with salt and pepper to taste.
  4. Serve with drizzled cream and fresh bread. Enjoy!