TRAY BAKE CHICKEN WITH FETA AND OLIVES
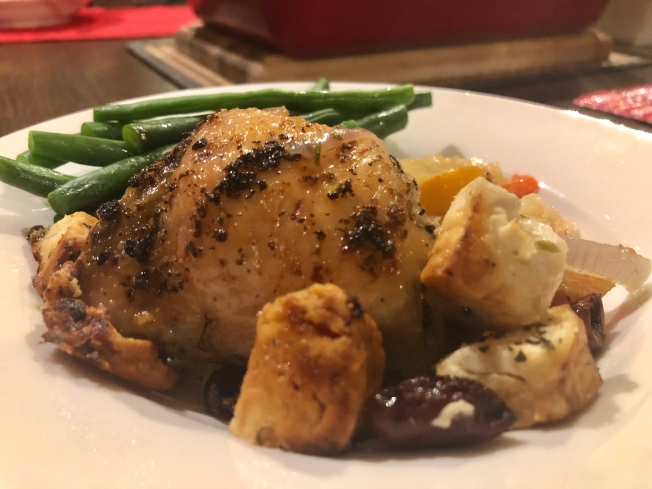
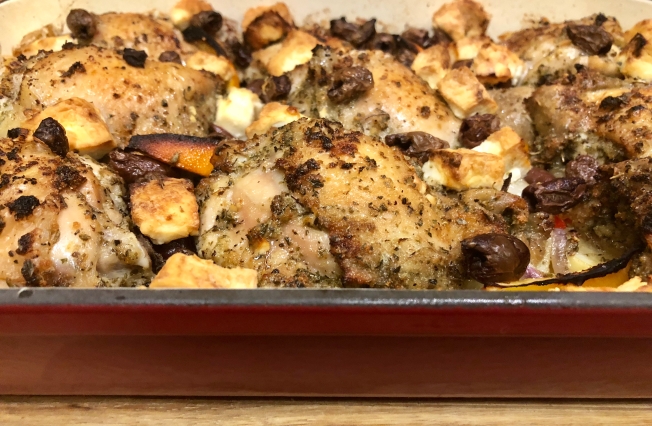
In recent years, tray bake dinners have been the solution to many a mid-week meal problem at my place. And my friend Amy keeps me in great supply of new tray bake recipes to try. Or try for me – by which I mean, she makes enough for her family and mine and then sends me home from Small Group with the next night’s dinner, plus the recipe. Yep, she’s a keeper. And so is this recipe. Everything in it is inexpensive, easily sourced and fast to make. And with my lemon tree once again going bananas, this dish is the very definition of doable. If you need a low-carb option, just ditch the wedges of potato, like the original recipe suggests here. Apart from the ease and affordability of this gluten-free dish, it must be said that it just tastes so good – the chicken skin goes nice and crispy in the hot oven, the cubes of feta don’t melt but they brown up nicely and the flavour made by the lemon and oregano is homely, satisfying and not too out there for the kids. This dish serves 6-8 people easily and costs less than $20 to make. And if your need is for a smaller group, the quantities halve nicely. Thanks, Amy, for this recipe and much more.
- 8 chicken thigh cutlets, bone in, skin on
- 200g Greek or Australian feta
- 1/2 cup Kalamata olives, pitted
- 4 tablespoons olive oil
- 1 red capsicum
- 4 medium sized potatoes, cut into wedges (not too thickly)
- 1 red onion
- 2 lemons
- 2 tablespoons dried oregano
- 4 tablespoons garlic powder (not garlic salt)
- 2 teaspoons salt
- cracked black pepper
1. Pre-heat oven to 200 degrees Celsius/ 390 degrees Fahrenheit
2. Cut the capsicums and onion into thick wedges.
3. Cut the feta cheese into large cubes.
4. Cut the potatoes into wedges, not too thickly or they won’t cook in time with the rest of the dish.
5. Place the chicken thighs and the cut vegetables into a large bowl.
6. In a small bowl, combine the oregano, garlic, salt, pepper and olive oil and stir until combined.
7. Pour the olive oil mixture into the large bowl with the chicken thighs and vegetables. Toss to make sure all the chicken and vegetables are coated in the olive oil mixture.
8. Place the chicken mixture into a large baking dish or a rimmed baking tray. Make sure the chicken is skin side up on the tray. You will also want the vegetables to be at the bottom of the tray. Some juices may collect in the cooking process so it is better if there is a small rim on the tray or dish. Add the olives, feta and lemon wedges around the chicken pieces. Try not to place them on top of the chicken skin.
9. Place the baking tray into the oven and cook for 30 minutes, then increase the temperature to 220 degrees Celsius/430 degrees Fahrenheit for a further 10-15 minutes or until the skin is golden brown.
OVEN-BAKED BOLOGNESE

This bolognese sauce is my new addiction. My friend Corinne made dinner for the kids and I last week saying “We’re just having bolognese, I’ll bring some over.” But there’s nothing “just” or ho-hum about this bolognese, which is hinted at by its somewhat random ingredients list, and twice cooked methodology. But man, is it worth it. Corinne’s bolognese is hands down the best I’ve ever tasted. I think perhaps she was well aware of our family’s penchant for Weetbix and porridge dinners, especially when dad’s away. But we so appreciated her kindness in sharing with us some of what she and her family were having for dinner that night, which just so happened to be amazingness masquerading as ordinary. To me, this best ever bolognese is called Bacony Kindness Bolognese, and I thank God for my friend and for hers. First published by Delicious Magazine, (photo credit too) this lovely gluten free and freezer friendly recipe costs under $20 to make and easily serves 10.
- 30g unsalted butter
- 2 tablespoons olive oil
- 200g bacon, any kind, finely chopped
- 1 large onion, finely chopped
- 2 celery stalks, finely chopped
- 1 small carrot, finely chopped
- 2 garlic cloves, finely chopped
- 500g each beef and pork mince
- 2 cups (500ml) milk
- 1/4 teaspoon freshly grated nutmeg
- 2 tablespoons tomato paste
- 1 1/2 cups (375ml) dry red wine (I just use a cheap clean skin)
- 800g canned chopped tomatoes
- 2 cups (500ml) beef stock (I use powdered, but use a gluten free variety if needed)
- 2 bay leaves
- 2 tablespoons chopped basil leaves
- Preheat the oven to 160 degrees celcius.
- Melt the butter and olive oil in a large flameproof casserole over medium heat. Add the chopped bacon and cook, stirring, for 3-4 minutes until it starts to crisp. Add the onion, celery, carrot and garlic and cook, stirring, for 5 minutes or until softened. Add the beef and pork mince and cook for 8-10 minutes, breaking the meat up with a wooden spoon, until browned.
- Add the milk and nutmeg and simmer over medium heat for 4-5 minutes until the milk evaporates. Add the tomato paste and stir for 2-3 minutes until combined, then add the wine and allow to simmer for 10 minutes. Add canned tomatoes, stock and herbs. Season with salt and pepper. Cover, then cook in the oven for 2 hours or until thickened and reduced. Skim any fat from the surface, then serve with pasta.
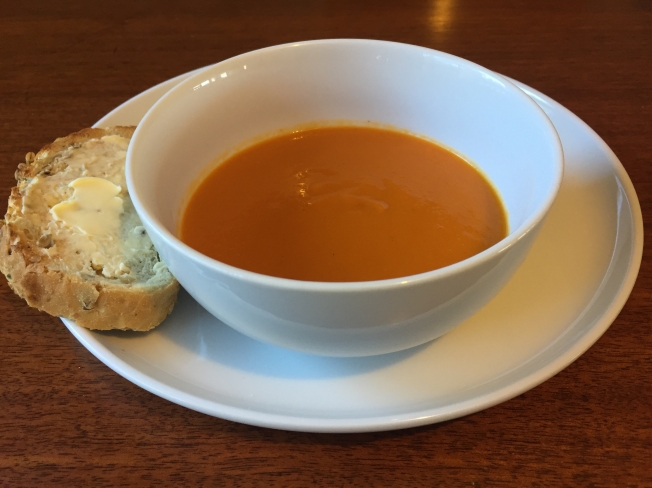
CARROT & TOMATO SOUP

Last week our family came home from holidays with a gastro bug, my dear husband suffering the worst of it. Overwhelmed and tired after a terrific break, but a long return journey, we were feeling rather ordinary and just so thankful to be home. Our weary hearts were made even more thankful by the countless expressions of care we received – more than one friend brought meals around for the days ahead in Vomit Land and we had countless offers to pick up milk and food for us, as well as prayers offered to our Heavenly Father on our behalf. On one hand, things like this happen pretty frequently among all sorts of people, but I’m still just struck by the fact that these kinds of everyday miracles are just how God rolls. Whether or not we realise it, he cares for us and provides what we need through the people he’s made us to be. In his letter to the scattered early church, James writes:
“Every good and perfect gift is from above, coming down from the Father of the heavenly lights, who does not change like shifting shadows.” – James 1:7
God is good, though it’s sometimes hard for me to see. He doesn’t change, he isn’t moody and I don’t need to catch him at a good time. He gives good and perfect gifts. One of them was this flavoursome and refreshing soup provided that night by our friends Ben & Renee for my green-feeling husband. It hit the spot. Renee shared the recipe with me which has come in handy this week, cause some of us are sick again, this time with colds and flus. Oh well, that’s life. But this yummy comfort food is also just what we feel like at the moment: It’s autumn, the weather has turned crisp and the kids and I are using up some school holidays visiting family in the Snowy Mountains (check out the view!). Not a bad time and place to be sick and snuggly with soup. This recipe is freezer friendly and a great option for those with special dietary needs (just use gluten free stock and leave out the cream if need be), and cheap to cook costing less than $5 to make more than 2L. We’re having it tonight with oven-ready bread and real butter. Thanks, Ben & Renee for the soup, and much more.
- 125g butter (half a block)
- 2 large onions, finely chopped
- 2 x 400g tins crushed tomatoes
- 1 x 500g bag carrots, peeled and roughly chopped
- 8 cups chicken stock (I use powdered, reconstituted with water)
- salt, pepper and pinch of sugar
- cream for drizzling, if desired
- In a large soup pot melt butter and saute onion until golden. Add carrots and cook until soft and golden (this preliminary cooking step add lots of extra flavour to the end result).
- Add the remaining ingredients (except the cream) to the carrot, butter and onion mixture, and simmer for 45 mins.
- Blend with a stick blender in the cooking pot and serve with or without drizzled cream and crusty, buttery bread. Serves 8.
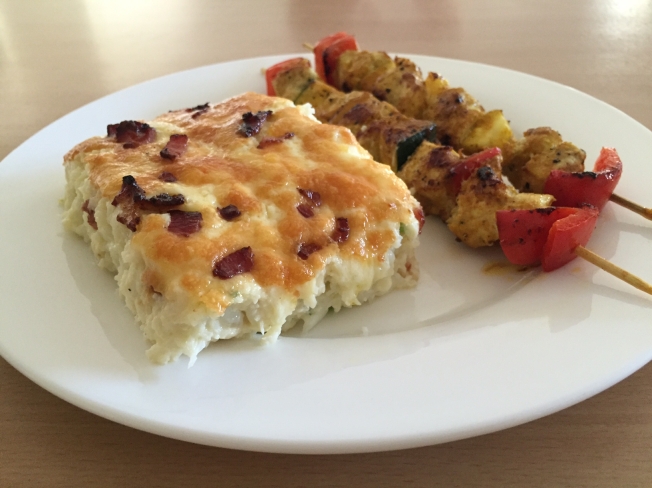
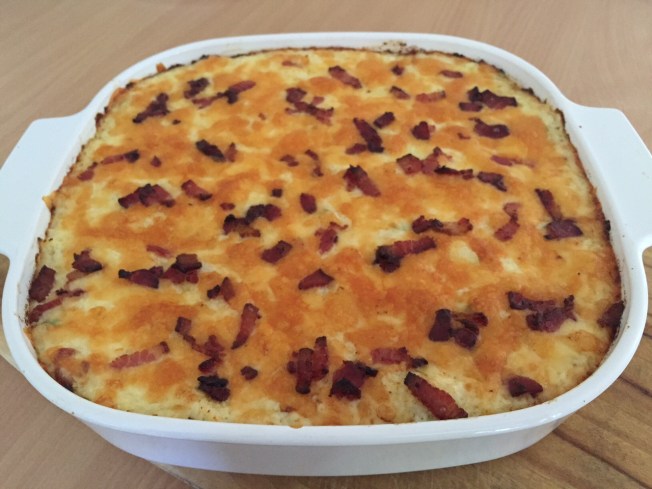
CHEESY CHORIZO AND POTATO BAKE
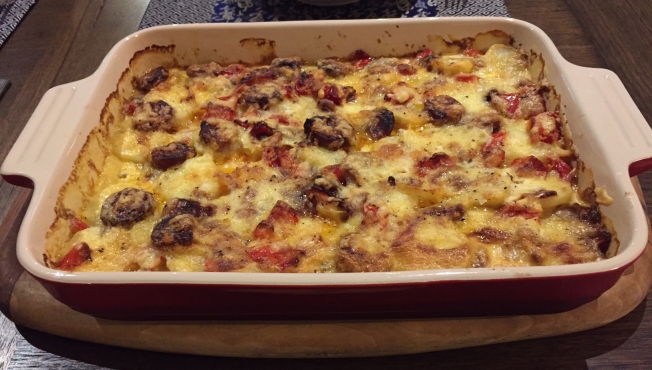
Recently my friend Ruth and I have found ourselves sitting together in the stands at basketball a couple of afternoons a week, watching our boys play and getting to know each other while talking food, kids, faith and life in general. She recently shared a couple of recipes with me, the first of which was this lovely Spanish take on the old Potato Bake. Our whole family really liked it as a main meal, though my husband enjoyed pairing it with leftover pulled pork for lunch for a number of days afterward as well. Chorizos are frequently on half-priced special at the Woolworth’s deli, and when they are I tend to buy lots at once and freeze them in pairs, which makes each bundle about 200g, just the amount needed for this recipe. Even when using full-priced Chorizo this yummy dinner costs less than $10 to make and serves 6, even more when serving as a side dish. Thanks for sharing this lovely wintery recipe, Ruth.
• 1 tablespoon olive oil
• 200g chorizo sausage, sliced
• 1 red onion, sliced
• 1 red capsicum
• 1 kg potatoes, unpeeled, thinly sliced
• 1 cup cream
• 200g grated cheese – any is fine, but Gouda, Edam or Cheddar work well
• salt and pepper to taste
• Paprika, for sprinkling
1. Heat oil in a fry pan and fry chorizo, onion and capsicum together until golden and soft.
2. Overlap half the potato slices in the base of a large quiche or lasagna dish.
3. Layer with half the chorizo mixture, half the cream and half the cheese. Season with salt and pepper.
4. Repeat layers with all ingredients except other half of the cheese.
5. Cover with foil and bake at 200°C for 45 minutes, until potatoes are tender.
6. Remove foil, sprinkle with remaining cheese and bake a further 30 minutes until golden brown.
7. Serve sprinkled with paprika if desired.
CAULIFLOWER BAKE
Well here in Australia, my favourite season – winter – has arrived. For me, winter is all about boots and soft socks, jackets, warm jumpers, snuggly evenings on the couch and having people over to enjoy comfort food. The downside is only that these yummy dishes are often carb-heavy and and high in fat, and well, over the course of winter, the old jeans can get a bit tight. So I thought I’d share this recipe with you cause it’s been getting a bit of a workout at our place lately and while it’s definitely a treat-like comfort food (it’s no low-calorie salad!), it is very low carb. And it’s so versatile – we use it as a side as well as a main and the whole family devours it. It’s also great for lunches made on Sunday afternoons for the working week ahead or as an easy meal to give away. This yummy, wintery dish that serves 15 people as a side, 8+ as a main, costs $28 to make if you buy your cauliflower and all the other ingredients from a supermarket (I’ve calculated this based on current Woolworth’s pricing), but almost half that if you’ve got time to swing past a fruit and veg shop. Similarly, Coles has recently released an excellently priced and packaged You’ll Love Coles cream cheese product, and streaky bacon from Aldi is always a good price. A little shopping around makes the whole meal quite affordable. Happy winter, everyone!
- 2 heads fresh cauliflower
- 250g cream cheese
- 1 cup sour cream
- 1 bunch spring onions sliced finely, white stalk to mid-green length (chuck away dark green part)
- ½ cup parmesan cheese, grated finely
- 10 slices of streaky bacon (though any kind is fine), fried off and crumbled
- 2 cups grated cheddar cheese
- Preheat oven to 180 degrees. Boil the cauliflower in a large pot, drain the water completely and mash to a pulp in the pot you cooked it in.
- Mix in cream cheese, sour cream, spring onions, parmesan and ¾ of the bacon.
- Spread the mixture evenly into a large lasagne dish. Sprinkle with cheddar cheese and reserved bacon. Bake for 30-35 mins until hot and bubbly. Enjoy!
HUGH FEARNLEY-WHITTINGSTALL’S RED ONION, BACON, AND CHEDDAR MUFFINS

Although I hear that some people don’t like bacon, to me, it’s a food group all of its own, along with Diet Coke and good coffee. What follows is another delightful recipe from Hugh Fearnley-Whittingstall, the third and final in this series for summer hospitality and easy back to school non-sandwich lunches. These cheesy, bacony, and very pretty muffins are fluffy and so eatable. The recipe below produces 12 and costs less than $6 to make.
- 1 tsp oil
- 100g streaky bacon, cut into 1cm pieces
- 1 red onion, finely diced (I used a regular brown one)
- 250g wholemeal self-raising flour (I used plain white flour)
- 2 tsp baking powder
- ½ tsp bicarbonate of soda
- ¼ tsp salt
- 2 eggs
- 80g unsalted butter, melted and cooled
- 200ml buttermilk (replace with yoghurt, sour cream or ordinary milk if need be)
- 1 tbsp finely chopped chives (optional, I like chives so put in 3 tablespoons)
- 150g strong cheddar, grated
- Heat the oven to 200C/400F/gas mark 6 and line a muffin tin with 12 paper cases.
- Warm the oil over a medium heat and fry the bacon in it until just crisp. Lift the bacon from the pan with a slotted spoon and drain on kitchen paper. In the same fat, sauté the onion until just softened, about five minutes, then set aside to cool.
- In a large bowl, whisk together the flour, baking powder, bicarbonate of soda and salt.
- In a jug, whisk the eggs, butter and buttermilk, stir them into the flour mixture with a spatula until just combined, then fold in the cooled bacon, onion, chives, if using, and two-thirds of the cheese until just evenly distributed.
- Spoon or scoop the mixture into the muffin tins, sprinkle on the rest of the cheese, and bake for about 18 minutes, until the tops are golden and a toothpick inserted into the centre of a muffin comes out clean.
BOLOGNESE PASTA LUNCH MUFFINS
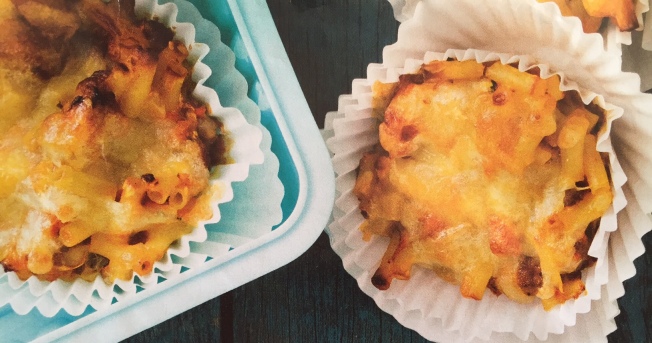
Unless you’ve been living under rock, you’d know that the last week (at least in Australia) has been all about back to school. And for some precious little ones its meant heading to school for the first time. I’m not generally a sentimental kind of person but there’s something about it all that makes my heart stop and pause as the page of life turns. All this, as well as the good holiday break, somehow gives me at least a small spurt of energy for school lunches at the beginning of the year. Now generally, all those posts in the blogosphere about how to make school lunches organic, healthy, fun, dinosaur shaped and immaculately presented for our little idols, I mean, children – send me into a tailspin. And I’m glad to have mostly avoided them this back to school season. But level-headed suggestions from level-headed friends are always welcome and this recipe brings together two that recently came my way: one friend mentioned she feeds her kids pasta for lunch because it’s more filling than sandwiches and much easier to prepare in batches. Another suggested this recipe she found in Fresh Magazine at Woolworth’s. These pasta ‘muffins’ were painless to make, froze and thawed out well (so you can get a good fortnights worth done at once) and around the same price to make than the same number needed of ham and cheese sangas, approximately $5 for 24. I’m sure when the kids are a tired of these we’ll head back to sandwich land, but these yummy numbers (adapted a little – I left out all the veggies) are welcome option around here.
- 500g macaroni, cooked al dente and drained
- 1 large 700g jar home brand passata
- 1 cup grated carrot (optional)
- 1 cup grated zucchini (optional)
- 2 eggs lightly whisked
- Salt to taste
- 2 cups grated cheese
- Preheat oven to 180 degrees celcius. Line 2 x 12 hole muffin tins with paper cases.
- Combine all the ingredients except the cheese in a bowl, and divide mixture evenly among muffin holes. Season to taste with salt.
- Top each muffin of pasta with grated cheese, using it all up.
- Bake in oven for 15 mins or until cheese has melted. Allow to cool before freezing them ready for school each day.
NIGELLA LAWSON’S AMERICAN BREAKFAST PANCAKES
 How To Be A Domestic Goddess by Nigella Lawson is my second favourite cook book for baking (the first being Belinda Jeffrey’s Mix and Bake), and it’s where I came across this lovely pancake recipe. I’ve been using it for more than ten years because the resulting pancakes are wonderful: light and fluffy, and thick, without being dense or rubbery. The mixture can be used immediately, though it can also be made ahead of time and allowed to stand in the fridge for whenever you need to use it. The batter I made for those in the picture here was left on the bench for only 10 minutes before cooking. The quantities below make 30 medium sized pancakes (just halve the quantities for a smaller crowd) and costs no more than $1.50 to make.
- 2 tablespoons baking powder or 1 teaspoon bi-carb soda
- 2 pinches of salt
- 2 teaspoons icing sugar
- 60 grams butter, melted
- 600ml milk
- 4 eggs
- 500g plain flour
- Butter for frying
- Place all the ingredients in either a food processor or stand mixer and mix together until all the lumps are gone.
- Transfer mixture to a 2L jug, or smaller if halving the recipe.
- Cook pancakes one at a time in a decent non-stick pan on medium heat. When you start to see bubbles blistering on the pancake it’s time to flip to the other side for no more than a minute.
- Enjoy topped with whatever you like: lemon and sugar, maple syrup and butter, bacon or berries or ice-cream.
ONE POT CHICKEN AND BASIL PASTA
This recipe comes directly from the kitchen of my dear friend Lisa, who found it in One Handed Cooks magazine. Lisa is such a wonderful old soul – she carefully loves the people around her, thinks hard about everything that’s important in life and wastes no time on what isn’t. She looks after her family simply but diligently, with a heart full of wonder at all God’s given her. She put me onto this tasty, simple, and affordable meal and in addition to all these things, it’s so very her: warm, generous, and hearty. Once cooked, this crowd-pleasing one pot dish can be pureed with a stick blender for babies and frozen for future baby meals – no need to make the little ones a separate meal. And if you need a gluten free meal, simply exchange pasta for the gluten free variety. This dairy free recipe costs around $7 to make and serves 6. Thanks Lis, when I grow up I wanna be just like you.
- 2 tablespoons olive oil
- 1 red onion thinly sliced
- 1 clove garlic crushed
- 340g dried linguini (any pasta is fine though)
- 1 x 400g can diced tomatoes
- 1 large chicken breast, diced very small
- 4.5 cups chicken stock (powdered is fine, but check for gluten if need be)
- ½ cup basil leaves (but dried is totally fine too)
- Heat oil in a large pot/frypan. Sauté onion and garlic together over low heat. Gently fry chicken pieces in this mixture.
- Add all the other ingredients and simmer for 20 minutes, or until pasta is cooked through and liquids have reduced to a risotto-like consistency. Enjoy with crusty bread and/or salad.
CHICKEN TERIYAKI DRUMSTICKS WITH STICKY SAUCE
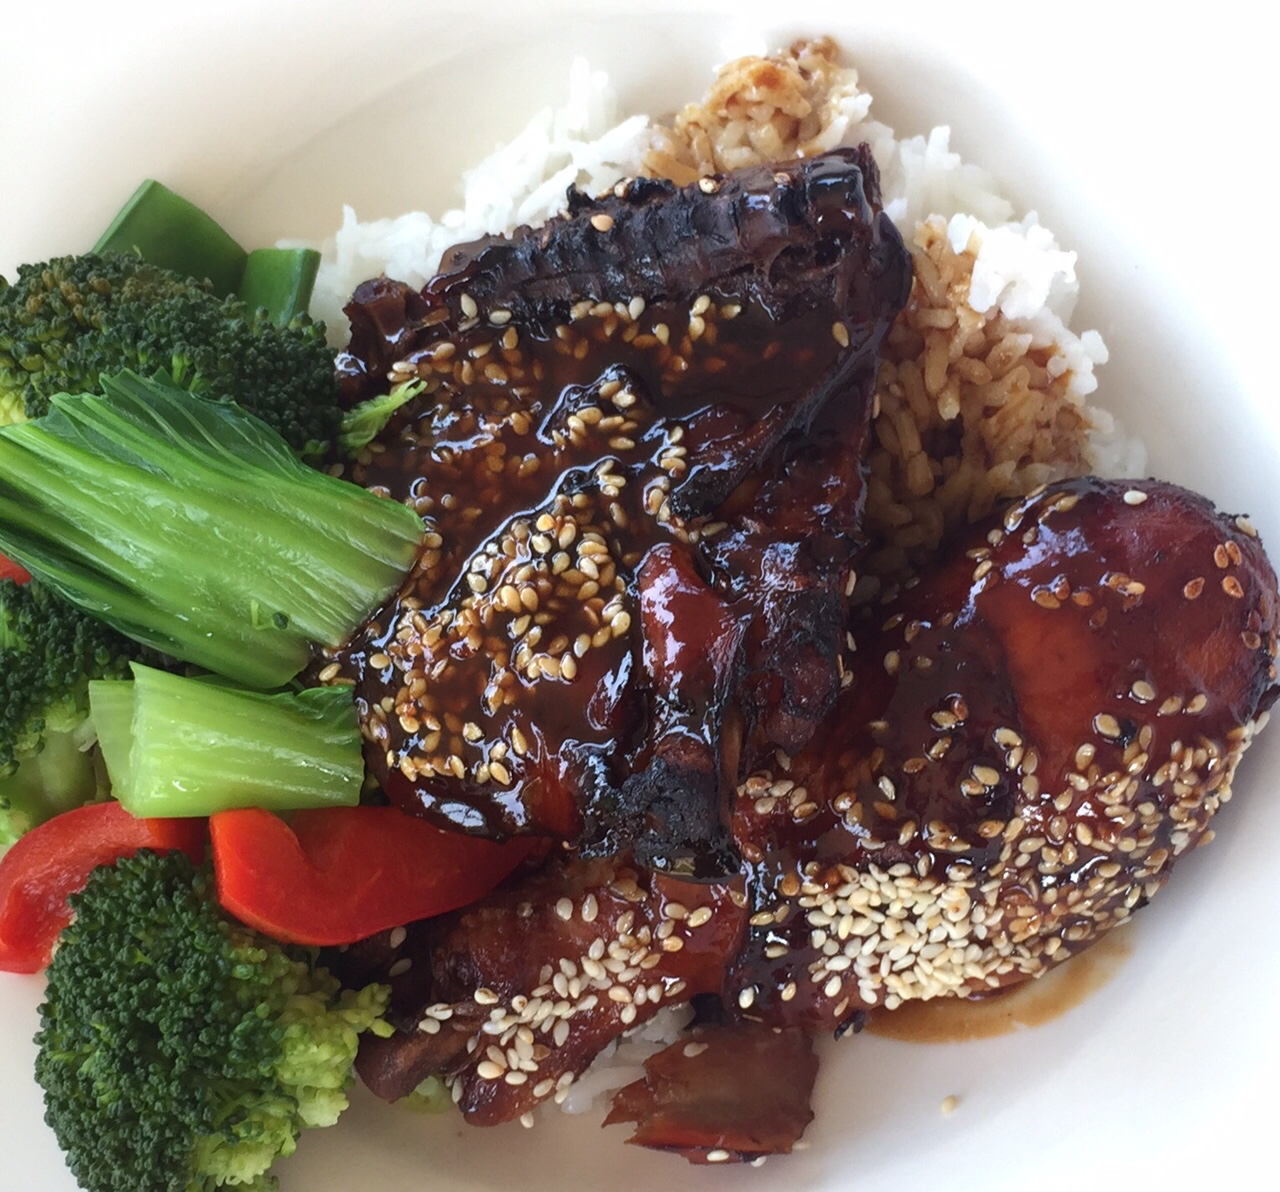

I’m not quite sure how I came across this easy, slow-cooked winning dinner. It’s been getting a bit of a workout at our place lately, mainly for two reasons: simplicity and affordability. Aside from a couple of steps at the end, to make this dinner, all you really need to do is stick 2kg of chicken drumsticks in the slow cooker turned onto ‘low’, covered with a full bottle of teriyaki marinade, and walk away. And in terms of price, even with steamed Asian veggies and rice, this tasty meal costs only $10 to make for 6 people. A great one for this time of year as life gets busy!
- 2 kg chicken drumsticks
- 1 x bottle Masterfoods chicken teriyaki marinade
- A couple of handfuls of sesame seeds
- Mixed Asian veggies to serve (I use pak choy, capsicum and broccoli)
- 2.5 cups jasmine rice
- Place chicken in the slow cooker, cover with teriyaki sauce and cook on low for 6-8 hours.
- Half and hour before serving, prepare vegetables for steaming and cook rice according to instructions on the packet. Heat oven to 200 degrees.
- Carefully remove drumsticks from the slow cooker and place on a baking tray lined with baking paper. Sprinkle each drumstick with sesame seeds and place tray in oven, turning chicken, and sprinkling more seeds after 5 minutes on each side.
- Strain the teriyaki liquid from the slow-cooker into a small saucepan and simmer on stove to reduce to a thick sauce. This takes about 20 minutes.
- Remove chicken from the oven, which should now have a shiny and sticky coating. Serve on rice with asian veggies and cover each portion with reduced sticky teriyaki sauce. Enjoy!
DIANE SEED’S PENNE ALLA MATRICIANA

Friendship has got to be one of the most precious things in life – just one of God’s many graces, but one of his best. A writer I recently stumbled upon, Katherine Sonderegger, says that for her “…friends have turned each day and season into golden joy.” I can’t help but agree. Years ago, a friend texted to ask when we’d be home from our summer holiday. When we arrived home this Penne alla Matriciana was waiting in our fridge, along with a bottle of milk, and the air-con had been switched on for us so we would arrive home to a cool house. A month ago she did much the same thing for us (and countless times in-between), and tonight when I finally tried this recipe for myself, as they always do when my pantry lacks an ingredient, our champion neighbours provided me with what I needed – this time, a tin of tomatoes. So for me, this authentic Italian recipe from Diane Seeds The Top One Hundred Pasta Sauces, is all about friendship. And it tastes simply out of this world – so much better than any store bought pasta sauce in a jar, because the high cook temperature produces lovely bit of caramelised tomato that end up running throughout the sauce, giving the whole thing a rich and rustic flavour. And this kid-pleasing dish is so cheap and simple to prepare. Make it for friends new or old, using the quantities below and this classic recipe will feed 6 and cost around $6 to make.
- 500g penne pasta (or whatever you prefer)
- 30ml olive oil
- 1 medium onion, diced finely
- 2 cloves of garlic, crushed
- 2 x 400g cans crushed tomatoes
- 1 teaspoon sugar
- Salt and pepper to taste
- 250g middle bacon, thinly sliced
- 60g parmesan cheese, grated
- Heat the oil and gently fry the chopped onion and garlic until softened, cover the frypan to avoid browning. Add the tomatoes with their juice, sugar, salt and pepper to taste and cook on a high flame, uncovered for about 20 minutes, stirring occasionally.
- When the sauce is reduced and thick, check the seasoning and puree roughly with a stick blender. In the same frypan, fry off the bacon and set aside.
- Cook the pasta following the directions on the packet. Drain the pasta and stir the sauce and bacon through with the pasta in its cooking pot. Serve with toppings of grated parmesan and with a salad or garlic bread as desired.
SMASHED & ROASTED JACKET POTATOES

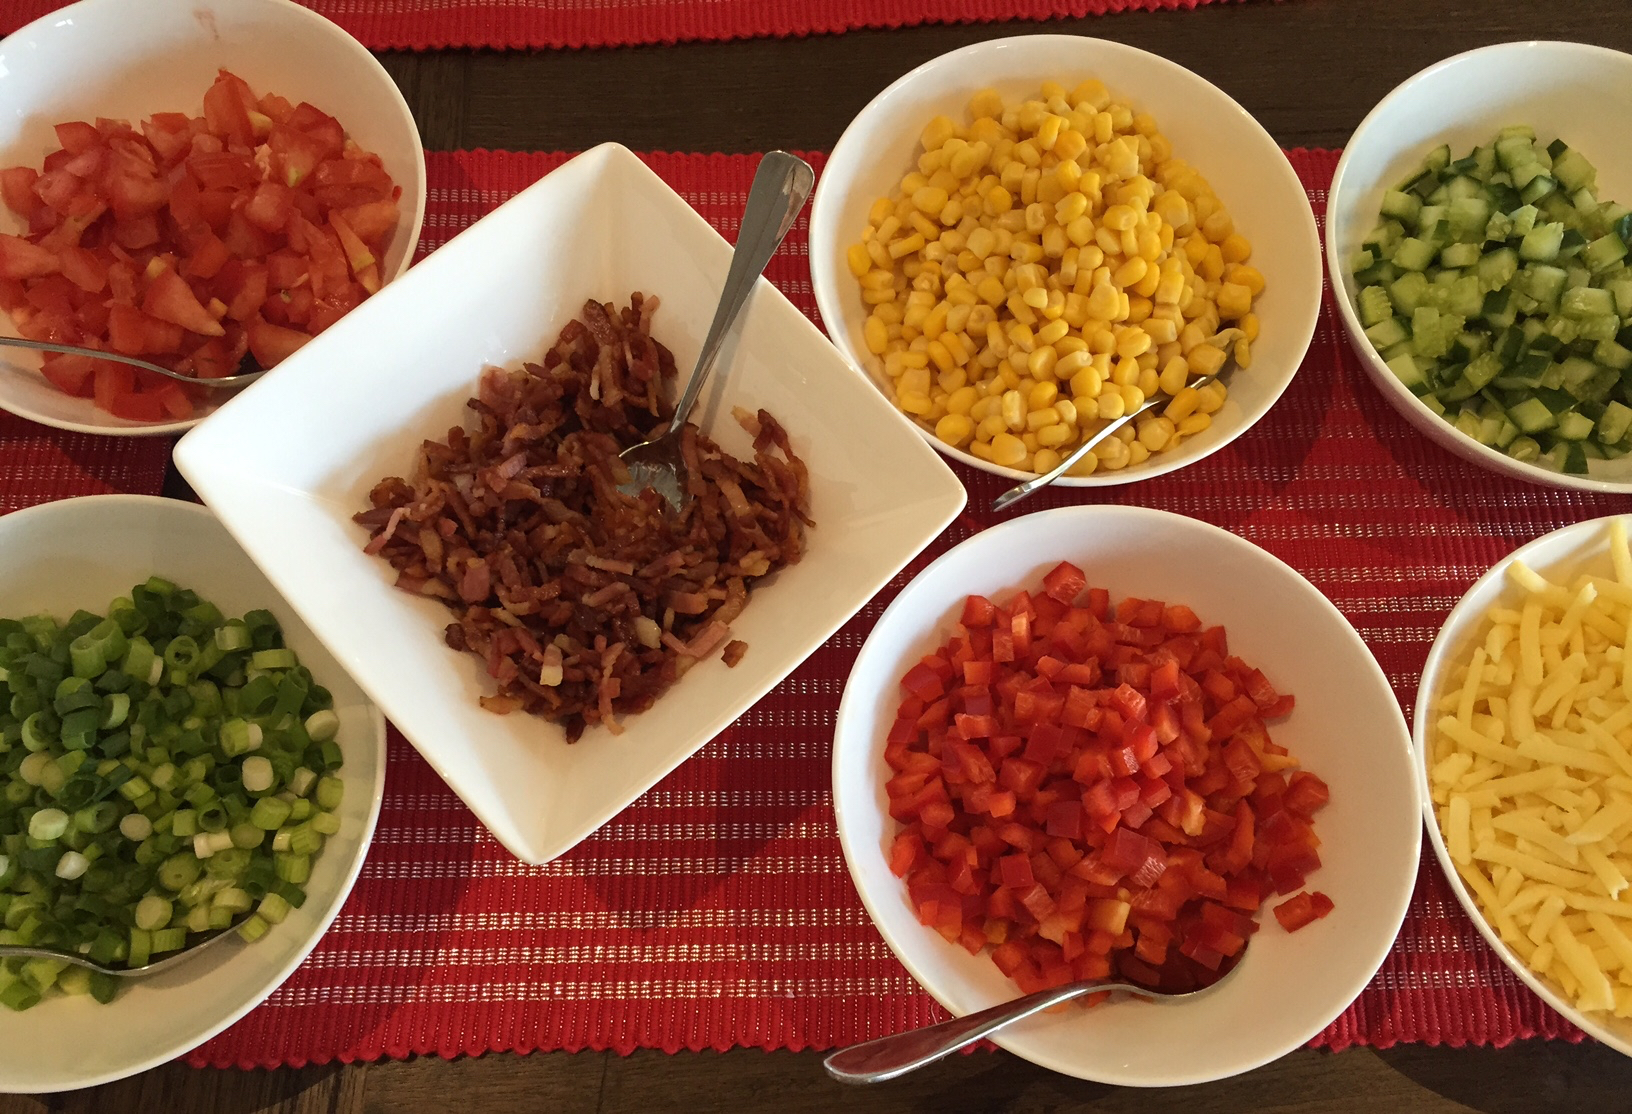
Whether you need a cheap meal for a crowd, or a slack dinner at home or an easy way to satisfy a Zambrero’s-type craving, these yummy Mexican style jacket potatoes are a great choice. They’re wonderful for satisfying other catering needs too: they can easily be served as vegetarian and are wonderfully gluten free too. Cheap to make, easy to whack together and super yummy, 8 of these fat babies with the ingredients pictured cost less than $10 to make and serves 6 people.
- 8 large and clean roasting potatoes
- 300g streaky bacon, chopped finely
- 4 shallots, chopped finely
- 1 lebanese cucumber chopped finely
- 2 roma tomatoes, chopped finely
- 1 can corn kernels, drained
- small tub sour cream
- 200g grated cheese
- 1 red or green capsicum, chopped finely
- Preheat oven to 200 degrees. Prick potatoes all over and par-boil in a large pot of water until soft, about (the time this takes depends on the size of potatoes), drain water.
- Place each potato inside a large roasting dish, and using a potato masher, press down gently but firmly on each one until it squashes/smashes nicely. Cover in spray oil and what in the oven until golden, about 20 minutes.
- Organise whatever toppings you’ve decided on – chop and fry bacon and quickly chop up vegetables of choice.
- Take all ingredients to the table and allow friends and family to assemble their potatoes as desired.
CHORIZO PASTA WITH TOMATOES & VEG
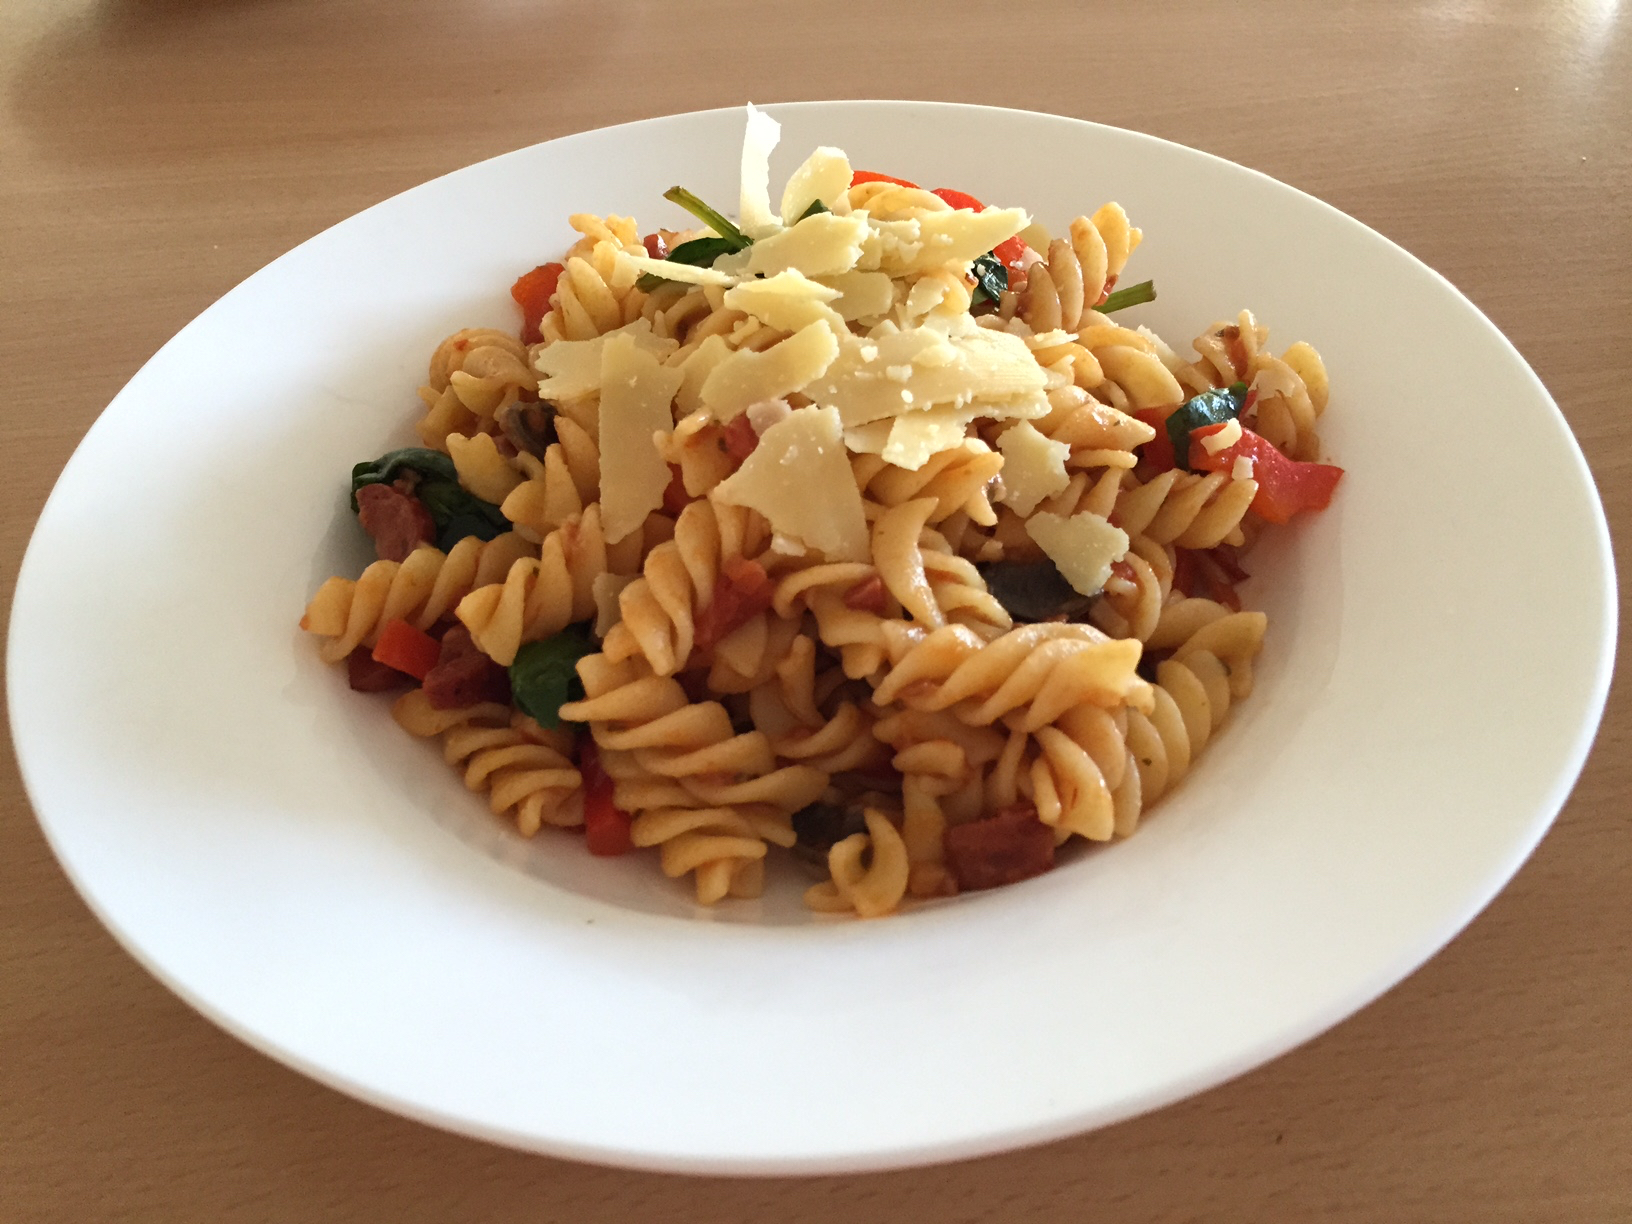

Pasta has to be one of the easiest and cheapest things in the world to make. As is the case for many of us I’m sure, pasta dishes in my kitchen are rarely based on a recipe but on whatever happens to be in my cupboard and rapidly going off in the bottom of my fridge. This was the case one weekday a few months ago, coming home from a long afternoon of after school sport. The freezer yielded a chorizo or two and everything was tossed in to make this simple dinner that the whole family enjoyed. If you decided to make this, do make any exchanges that take your fancy: passata can be replaced with any variety pesto and chorizo with bacon or chicken – use whatever floats your boat. I’ve costed this recipe at $13 using Woolworth’s prices, but I do find it much cheaper when I shop at my local grocer instead. Serves 6.
- 130g chorizo, diced finely (approximately 2 sausages)
- 1 teaspoon minced garlic or 2 cloves, freshly crushed
- a drizzle of olive oil
- half a bag of mushrooms, peeled and sliced, stems and all
- 1 medium capsicum
- 60 gram bag baby spinach
- 500g pasta (whatever you prefer)
- 1/2 700g jar of passata (I use homebrand)
- shavings of fresh parmesan
- Get a large pot of water boiling for the pasta and add the uncooked pasta as soon as water is rapidly boiling. Keep checking and stirring so pasta doesn’t stick to the bottom of the pot.
- In a large frypan gently fry up the diced chorizo and garlic with the olive oil
- When pasta is close to al dente, add mushrooms and capsicum to the frypan with the chorizo. Continue frying until just soft.
- Drain pasta, turn back into the pot, add the chorizo and vegetable mix, the bag of baby spinach and the passata. Toss until combined well and spinach has wilted.
- Serve immediately and top each offering with shavings of parmesan cheese. Enjoy!
WINTER PEA SOUP

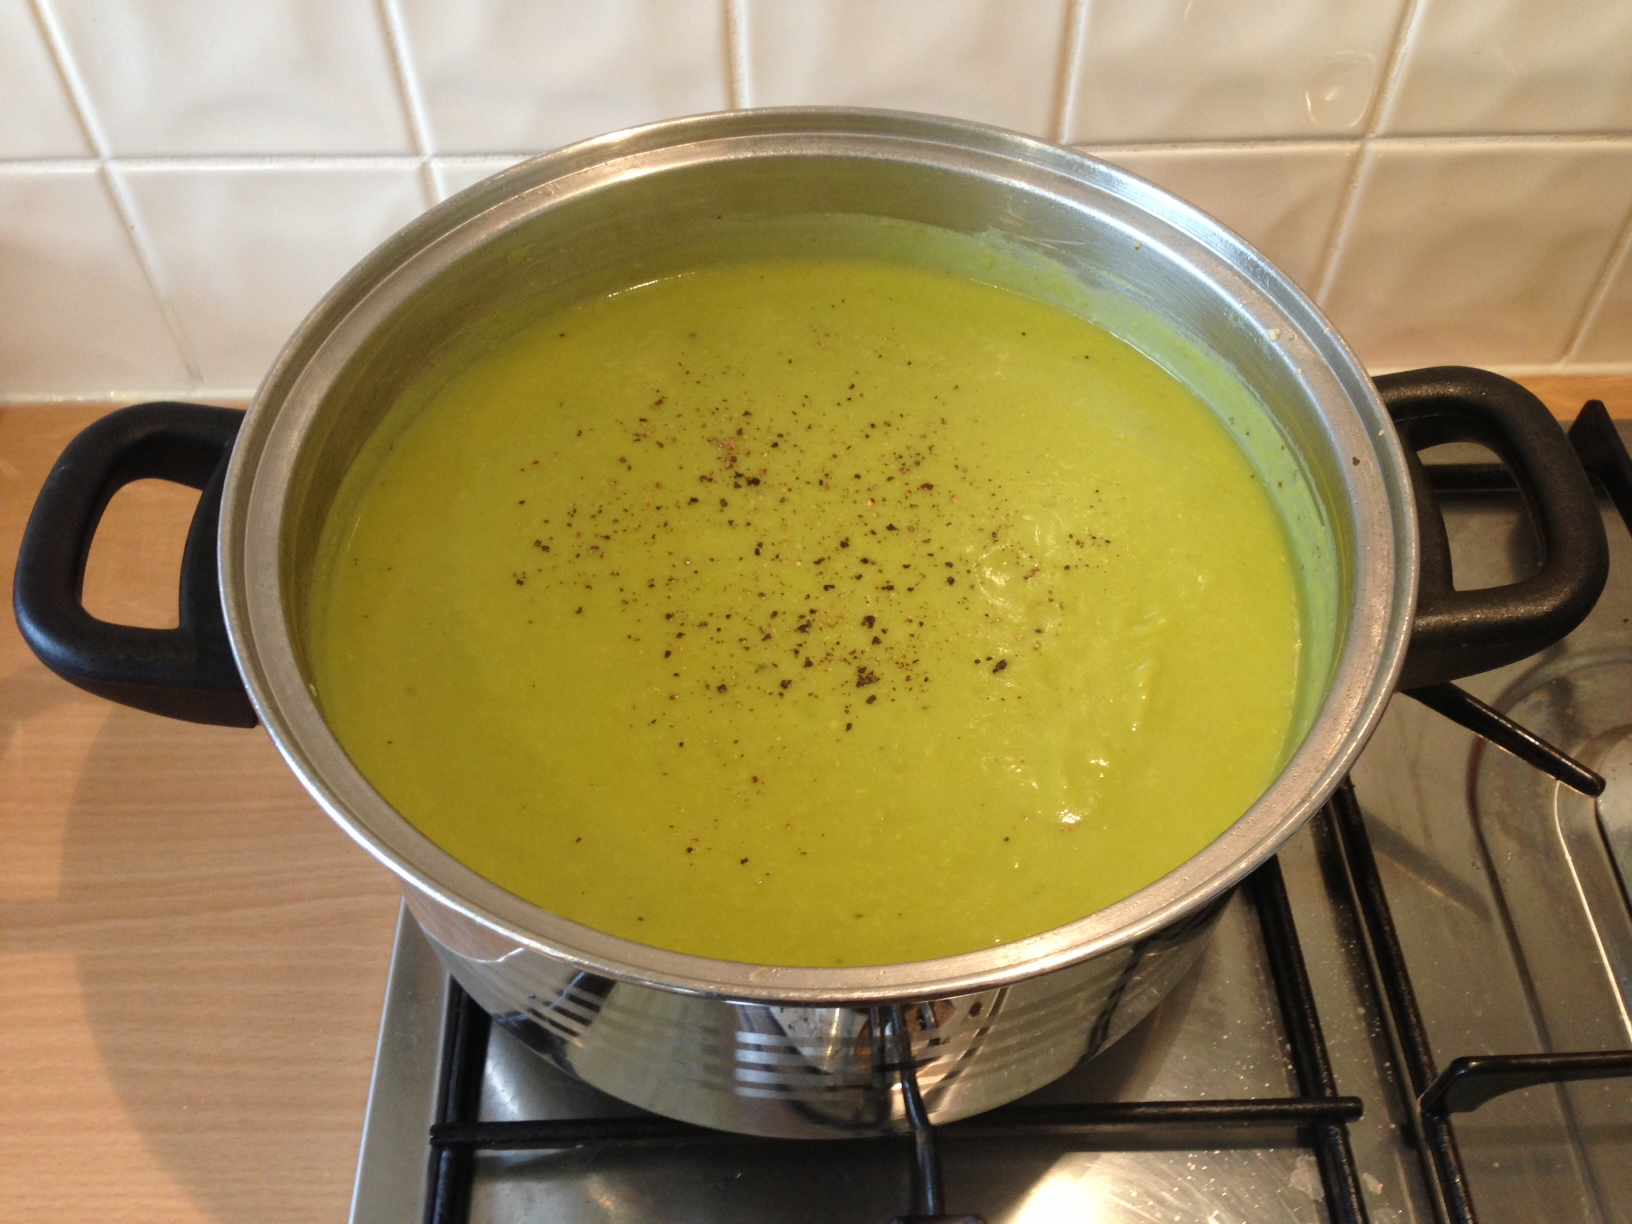
My friend Julie sent in this tasty soup recipe and having tried it out last weekend, I’m super keen to share it with you. Here are four reasons to love this bright green broth: there’s very little preparation at all – just a few quick steps with readily kept ingredients thrown in, followed by simmering; the recipe requires only one pot, which means very little washing up; it’s cheap, cheap, cheap to make (only approximately $3); and perfect for warming comfort during these lovely cooler months. Thanks for sharing this, Julie.
- 2 large onions
- 2 cloves garlic
- 3 large potatoes
- 1 kg frozen peas
- 1.5 litres vegetable stock (I used powdered and chicken stock as substitute)
- 150ml cream
- In a large, 3L+ pot, gently fry onion and garlic in a little oil.
- Add peeled potatoes, chopped into chunks, peas and stock. Bring to boil and cook until potatoes are soft.
- Blitz with hand blender until smooth then add cream. Season well with salt and pepper and serve with bread.
DONNA HAY’S CHICKEN ENCHILADAS
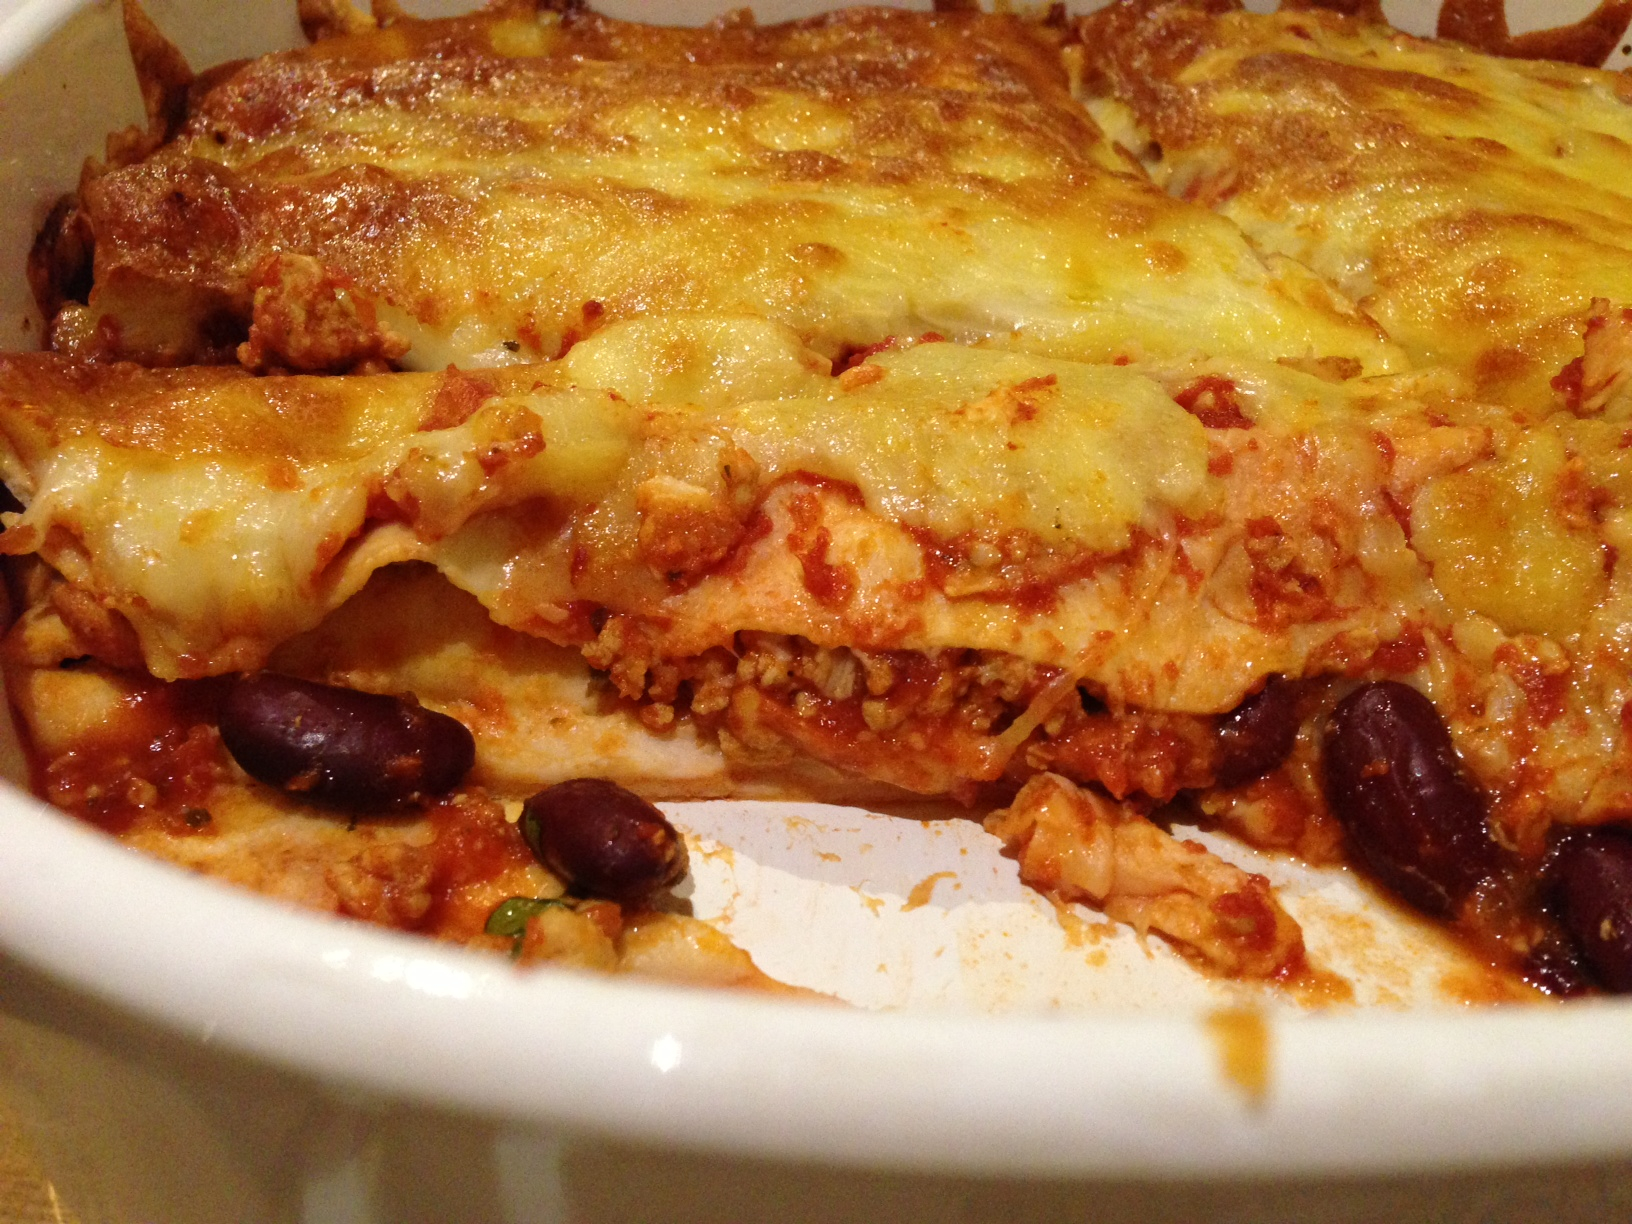

Chicken mince is one of my favourite cooking ingredients. It’s tasty, it’s cheap, it’s lean and so versatile. And Mexican food, how I love Mexican food! Looking down the list of ingredients from my friend Anna’s Enchilada recipe makes me want to party: tomatoes, chicken stock, coriander, beans, tortillas and cheese – but even more so the ease of making them. Originally from Donna Hay Magazine, these crowd-pleasing enchiladas feed lots of people in one hit and are fast to make, especially as the chicken filling can be made and frozen ahead of time. And I especially like the way the tortillas soften into something more like lasagne than a wrap when baked in the oven. The quantities below serve 10 people and cost around $23 to make. Thanks for sending in this recipe, Anna.
- 1 tablespoon olive oil
- 1 brown onion, chopped
- 1kg chicken mince
- 4 cloves garlic, crushed
- 1/4 cup oregano leaves (I use dried)
- 3 cups (750ml) chicken stock (I use powdered)
- 2 x 400g can chopped tomatoes
- 2 tablespoons tomato paste
- 1 x 400g tin of red kidney beans, drained and rinsed
- 1/4 cup fresh coriander, chopped
- 2 x packets of mini tortillas (total 20)
- 120ml tomato puree
- 200g grated mozzarella or pizza cheese
- Heat the oil in a large deep sided frying pan, such as an electric one. Add the onion and cook for a few minutes until softened. Add the mince, garlic and oregano and cook for 10 minutes, breaking up any lumps with a wooden spoon.
- Add stock, tomatoes and tomato paste and bring to the boil. Reduce the heat to medium and cook, stirring occasionally for 30-40 minutes or until thickened. Set aside and allow to cool. Stir in beans and coriander.
- Place a couple of tablespoons of chicken mixture in the middle of each tortilla and roll up, placing each one side by side in a large baking dish.
- Top with tomato puree and grated cheese. Bake at 200 degrees for 15-20 minutes.
DONNA HAY’S INSTANT CHICKEN SATAY
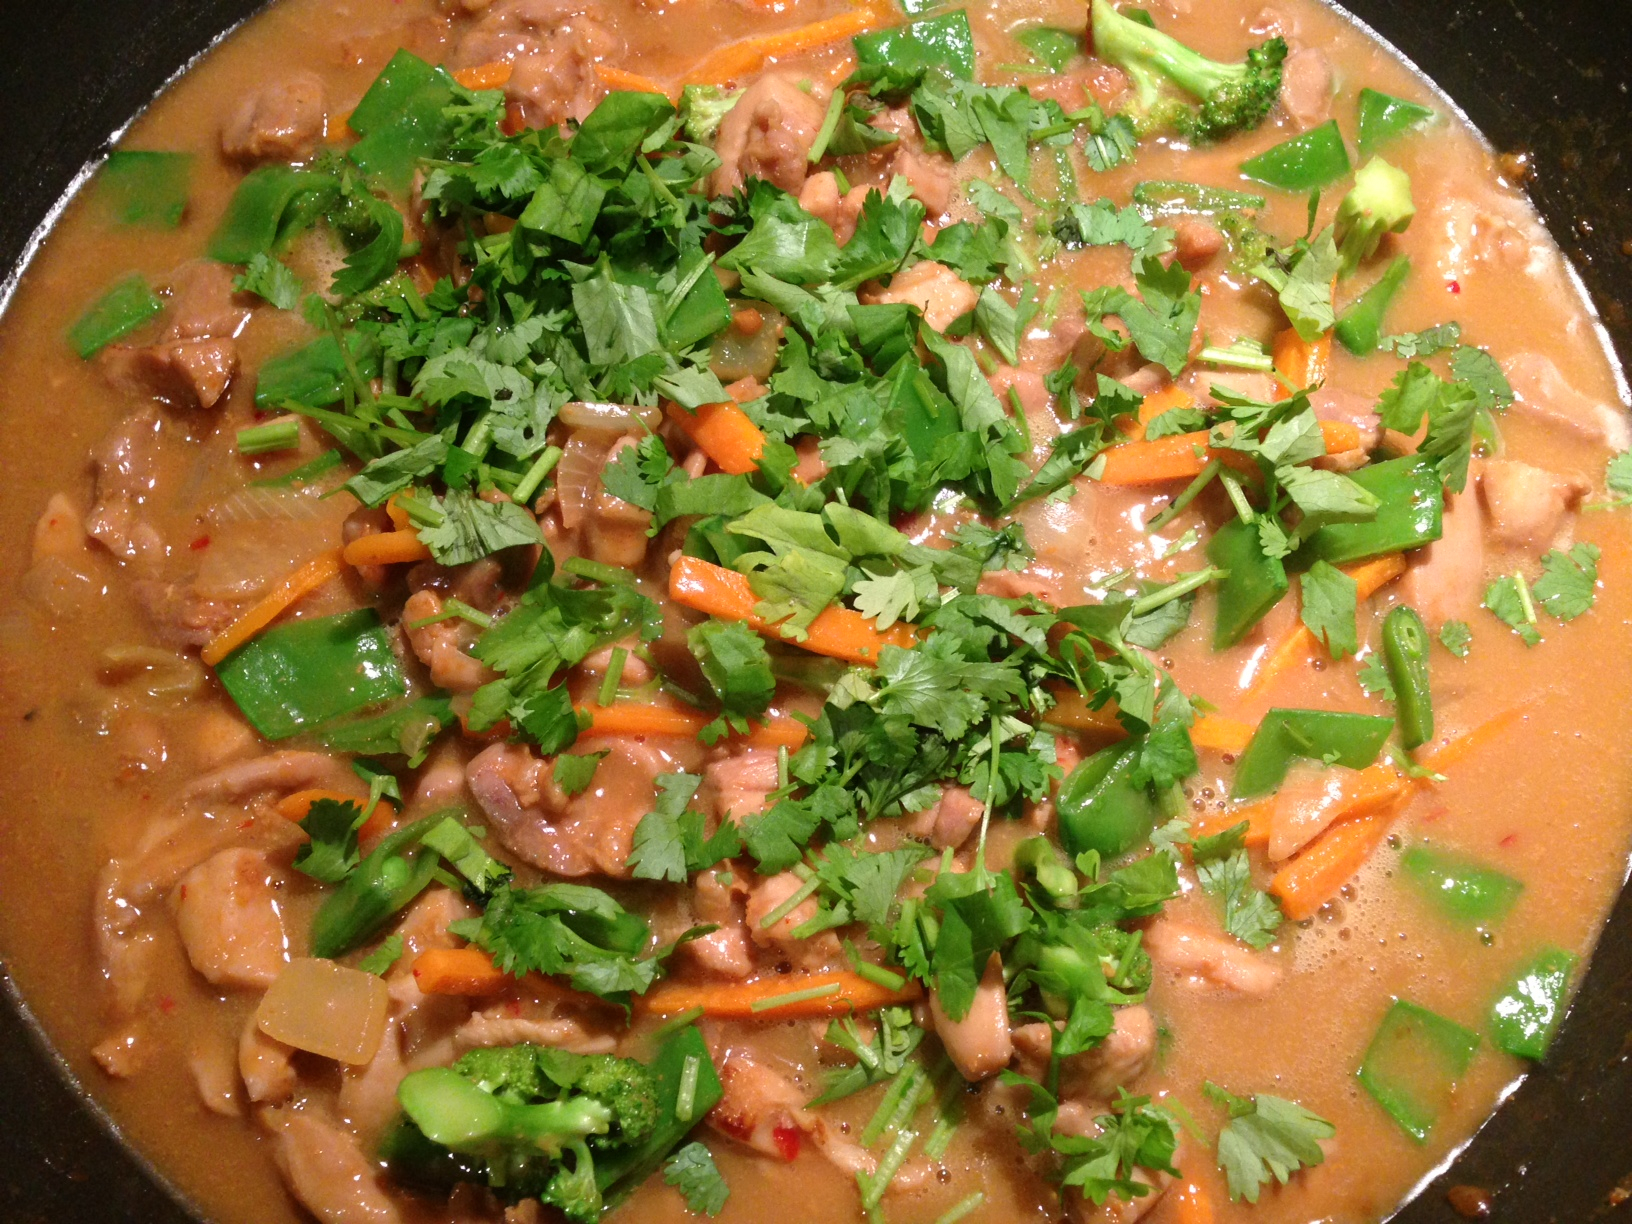
As I was thinking about what to write about this wonderfully fast and tasty dish, I realised again just how many times I’ve sat at the bench in my friend Amy’s kitchen as she’s recommended recipes to me. Though she’s moved houses since we first met, the scenario hasn’t changed much over the ten years we’ve known each other: Amy makes cups of tea for us both, she cooks whatever she needs to cook (and she’s a good deal better at it than me), we chat, sip tea, and she tells me about all the great recipes she’s tried out lately. Probably a good number of the recipes on this blog have come from her and over the years I’ve learnt a good deal about simple, yummy eating from Amy. In the beginning, I’d write her recommendations down on scrap paper (many of which I’ve still got) but these days I just take a photo of her recipes on my phone and then come home and try them out. Now that my son is learning piano from Amy’s wonderful husband, once a week while he’s having his lesson, I get to once again sit at her bench and learn new things, which is exactly what happened a fortnight ago when she suggested this truly yummy, simple and affordable Donna Hay number. And although I’ve already added a slow-cooker satay recipe here, sometimes you just need a tasty stir-fry recipe of the instant variety. This one is freezer friendly and good to give away, though of course, check for peanut allergies before doing so or inviting folk over. A double portion of the recipe below fills a large wok almost to the brim, though following those listed below serves 8 with rice, and costs around $12.
- 2 tablespoon vegetable oil
- 1 large onion, thinly sliced (my addition, not Donna’s)
- 4 chicken breast fillets / 6 chicken thigh fillets
- 2 long red chillies, thinly sliced (I use the gourmet garden one in a tube)
- 1/2 cup coconut cream
- 2 tablespoons crunchy peanut butter
- 2 tablespoons of soy sauce
- 1/2 cup chicken stock (I use powdered, reconstituted in water)
- 2 teaspoons fish sauce
- 4 tablespoons brown sugar
- 200g fresh snow peas
- 2 carrots, peeled and julienned (my addition, not Donna’s)
- 1 1/2 cups fresh coriander leaves (optional, no big deal if you don’t have them)
- In a small bowl combine coconut cream, peanut butter, soy sauce, stock, fish sauce and sugar. Mix well and set aside.
- Heat a large wok or frying pan over high heat. Add the oil, onion, chicken and chilli and cook for 2-3 minutes until golden.
- Add the snow peas and carrots and cook for 1 minute. Add the combined peanut butter and liquids and cook for a further minute or until slightly thickened. Stir through the coriander and serve on steamed rice.
STICKY ASIAN LAMB WITH RICE NOODLES

This simple and tasty recipe was floating around of facebook a couple of weeks ago and my lamb loving husband emailed me the link saying “Idea?” which is his understated and unpressuring way of saying “We should totally make this very soon!”. The following Saturday proved the perfect occasion to give it a go as we were heading out to the river for a day of ‘day camping’ where we took the BBQ and some chairs and pretended we were there for days on end, chilling out and doing nothing but chatting, eating and throwing rocks in the water. By the time we got home, this yummy lamb which had been cooking all day was ready and from slow cooker to plate, it took very little time and energy to serve. The quantities below serves at least 15 people for around $36 ($2.40 per person), so if you only need dinner for 6-8, just halve everything, which also halves the cost. But if you need to cook for a crowd after being at work or tied up with other things all day, this is a great option.
- 2kg leg of lamb or hoggett, either on the bone or deboned and rolled
- 1tbs of peanut oil
- 1/2 a cup of kecap manis (indonesian sweet soy)
- 1 tsp sesame oil
- 1/4 cup of rice wine vinegar
- 1/4 cup of brown sugar
- 3 star anise
- 2 stalks fresh lemon grass, beaten and bruised (I use the one in the tube)
- 8 cm piece of ginger, roughly chopped
- 4 cloves of garlic, roughly chopped
- 1 large red chilli, roughly chopped
- 6 green onions, sliced diagonally and/or bunch of fresh coriander leaves
- 1 tbs of toasted sesame seeds (optional)
- 5x 200g packets rice stick noodles (each 200g packet serves three adults)
- Brown the lamb all over in a rather hot frypan using the peanut oil (or not – seriously, it’s not essential you do this), and stick it in the bowl of a slow cooker.
- In a bowl combine all the other ingredients except sesame seeds, green onions/coriander and noodles. Pour over lamb and switch to low for the whole day or high for half a day of cooking.
- When cooked through, just before serving, remove lamb from the slow cooker and sieve the juices into a small saucepan. Simmer these juices on a low heat until reduced into a sticky sauce. If it thickens too much, whisk in some water to bring back to a sauce consistency.
- Shred lamb with two forks on a chopping board and serve on top of rice noodles cooked quickly in boiling water according to packet instructions. Drizzle sauce all over, distributing it generously and evenly among the plates. Be heavy handed as it’s the sauce that makes this so good. Top with sesame seeds, shredded spring onions and/or coriander leaves. Enjoy!
INDIAN STYLE RISONI

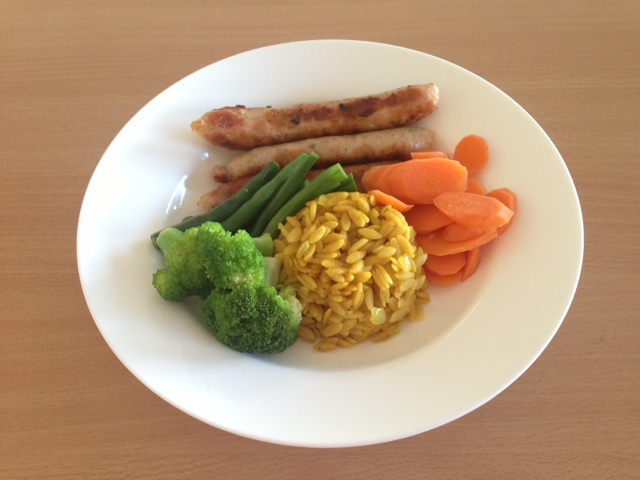
Sometimes you just need a little side dish that makes a standard meat and three veg meal a tad more special. Years ago a friend gave me a packet of Israeli cous-cous and it was the recipe on the back of the packet that inspired this risoni (or orzo) dish. If you’re unfamiliar with risoni, the (Australian) way to understand this carbohydrate is ‘pasta in the shape of rice’ and it can be found in the pasta section of most supermarkets. This not-at-all-spicy dish is really quite fast to make: you can get it going quickly and then reduce it to the absorption stage, which provides all the time you need to whack on whatever meat and vegetables you might be having, in this case, chicken sausages and steamed vegetables. And there’s no reason why this must be a side dish and not the main dish – just add some panfried pieces of chicken breast, a handful of freshly chopped parsley and some vegetables of your choice and you’ve got a dead-easy, one frypan main course – done. Using the ingredients and quantities below, this dish costs about $1.50 and serves 4 adult x 1 cup portions of risoni.
- blob of butter
- 1 small onion, finely chopped
- 1 cup risoni
- 1 cup chicken stock (I use powdered stock and water)
- 2 teaspoons tumeric
- 2 teaspoons cumin powder
- salt and pepper to taste
- handful of fresh parsley, chopped (though you can see from my picture I omitted it for the sake of my kids who aren’t so keen).
- Melt butter in a small frypan with a lid and add onion. Cook at a low temperature until onion is clear and soft. Add risoni and stir thoroughly to coat in the butter and onion mixture.
- Add chicken stock and stir carefully, adding in tumeric and cumin powder. Reduce the heat to the lowest possible setting, place lid on the pan, and allow everything to cook and absorb for at least 20 minutes.
- Just before serving, season with salt and pepper and toss parsley in too. Enjoy!
DONNA HAY’S THAI LIME LEMONGRASS CHICKEN WITH NOODLES

“Do you have plans tonight? Wanna come over, make me dinner, and watch a movie?”. That was my text to my old friend Sheridan one Sunday night at the end of last year. My husband was away and all the end of year ‘lasts’ – functions/events/things, had left me exhausted. And although normally under such circumstances, breakfast cereal is the dinner time option of choice around here, I couldn’t face another such dinner for the 5th time that week. Generous and hospitable as she is, even at my place rather than hers, Sheri came over and made this delightfully easy and tasty Donna Hay dish, which just happens to be gluten, egg, wheat and dairy free. Her food, good company and contentment with not much chit-chat that night were real blessings to me. And we’re still laughing about how from now on she’s going to have to read my sms invitations carefully to check who’s doing the cooking! Super simple to make, fresh and healthy too, this noodle dish is perfect for cooking for yourself or friends straight after work and can easily be multiplied for a larger group. And all of the preparation can be done quickly and hours ahead of people coming over – once they’ve turned up and have a cold drink in their hand, just stir fry everything from start to finish in 10 minutes. If you purchase your herbs from a grocer rather than a supermarket, this dish costs no more than $10 to make and serves 4. Thanks for this terrific recipe, Sheri.
- 2 teaspoons vegetable or sesame oil
- 1 tablespoon grated ginger
- 1 stalk lemongrass, finely chopped (or, as I do, a good squeeze of Gourmet Garden lemongrass in a tube)
- 1 teaspoon chilli flakes
- 500g chicken mince
- 1/4 cup lime juice (I use lime squeeze from the fridge)
- 1/4 cup fish sauce
- 1 tablespoon sugar
- 3/4 cup coriander (cilantro) leaves
- the stalks of the coriander leaves, washed and chopped finely
- 3/4 cup basil leaves
- 4 green onions, shredded
- Put a large pot of water on the stove and bring the boil for cooking egg noodles.
- Heat a frying pan or wok at high heat. Add the oil, ginger, coriander stalks, lemongrass and chilli and cook for 1 minutes. Add the chicken mince and cook, stirring for 6-7 minutes or until cooked through, breaking up any large lumps of chicken as you go.
- Add rice noodles to the boiling water and cook according to instructions on the packet and when soft, drain in a colander.
- Stir through the lime juice, fish sauce, sugar, coriander, basil and green onions. Serve stir-fry in bowls on top of freshly cooked rice noodles.
NIGELLA LAWSON’S GREEK LAMB CHOPS WITH LEMON AND POTATOES
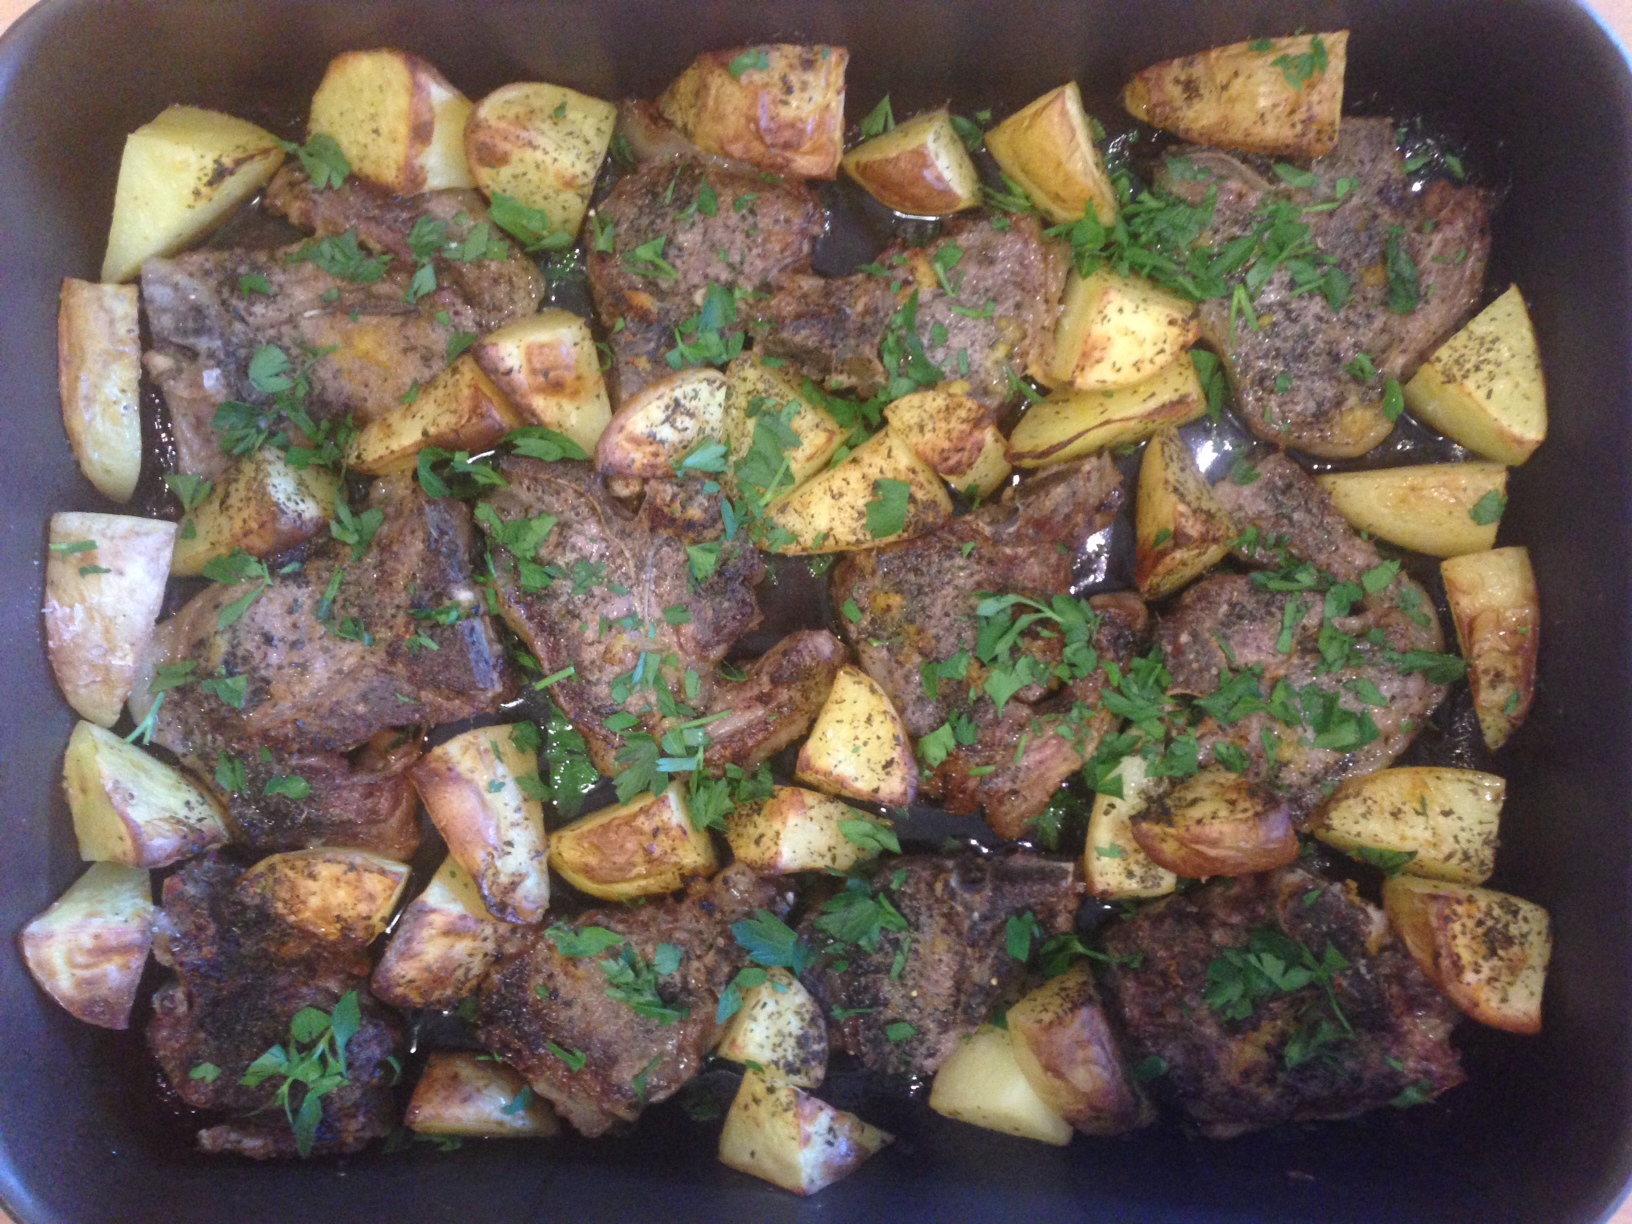

Today is Australia Day so I’m pretty excited to be sharing this lovely lamb recipe with you, not only because in my family Australia day equals eating a good deal of lamb, but because this dish, adapted from a terrific one by Nigella Lawson, pointed in my direction by my friend Amy, is all the things this blog is about: easy, tasty, affordable and delightfully do-able when having people over. Using either lamb loin or chump chops, simply place all the ingredients in a roasting dish at the same time and stick it in the oven. You don’t even need to turn anything! Just add something green to eat it with, perhaps a salad or steamed green beans, and whack the lot, straight out of the oven, onto the middle of the table with a fresh loaf of bread for mopping up the yummy juices. The lamb turns out oh so tenderly and the chopped fresh parsley makes the flavours come alive. This recipe is easily doubled using two roasting dishes and which can both go in the oven together – no problem: that’s 12-16 people fed for the cost of one at a nice restaurant! Even better is the fact that this delicious one-pot feast is gluten, egg, wheat and diary free. Using the quantities below, this recipe serves 6-8 and costs no more than $15 to make. Thanks for this one, Amy.
- 12 lamb chops, either loin or chump
- 3 baking potatoes, adding up to approximately 650g
- 45ml olive oil (approximately three tablespoons)
- 2 teaspoons dried mint
- 1 teaspoon dried chilli flakes (a little less if substituting with chilli powder)
- salt and pepper
- 2 lemons
- small handful of roughly chopped parsley
- Preheat oven to 200 degrees celcius. Put the lamb into a roasting dish
- Cut clean potatoes into wedges (don’t bother peeling them) and place them in the gaps around the lamb.
- Drizzle the oil over the lamb and potatoes and sprinkle with the dried mint, chilli flakes and salt.
- Zest 1 lemon over the roasting tin and then juice both lemons and pour the juice over everything in the tray.
- Season well with salt and pepper and cook in the oven for 1 hour, not bothering to turn anything over. Pull the tray out of the oven when everything looks quite brown (don’t let anything burn), and if it looks like it’s very brown before the end of the cooking time, cover the tray in foil and return to the oven.
- Serve everything in the middle of the table for a yummy and casual feast.
SLOW COOKER CHICKEN WITH CASHEWS

This week where I live we’re having a heat wave, the temperature staying in the 40s for what feels like days on end, so I thought it worth sharing some more slow cooker recipes people have been kindly sending in. Huh? Slow cooker meals on ridiculously hot days? Have I gone mad? While it’s possibly true that I have, let me tell you why this makes sense: meals cooked in the slow cooker don’t heat up your kitchen on sweltering days, you can fill them up to make enough dinner for an extra night or two, and if you serve your slow cooked yumminess on rice, having cooked it in a rice cooker, with some greens quickly steamed in the microwave, you’ve managed to completely avoid adding to the heat in your house. Ages ago, my friend Sam sent me this very simple and tasty recipe which is perfect for hospitality: just put it on in the morning, when friends are coming over for dinner after work or church, or just divide into batches of family sized portions for freezing – for your own family or to grab at short notice when someone is in need (but do check that there are no cashew allergies among your recipients!). Doubling the recipe below two thirds fills a 5.5L slow cooker, and using the quantities below costs around $16 to make, even less when chicken breast are on special. Thanks Sam for a healthy, tasty, cheap and easy recipe. Serves 6-8.
- 3 boneless chicken breasts (approx. 750g), cut into thin strips
- 2 tbsp butter (optional, I don’t use it)
- 3 cloves of garlic, crushed
- 2 chopped green onions
- 200g sliced mushrooms (I prefer to cop my own, the thin sliced ones from the shop end up too small once cooked)
- 1 x can condensed cream of mushroom or cream of chicken soup (undiluted)
- 2 sticks celery, sliced
- 1 ½ tbsp. soy sauce
- ½ cup cashews, (approx. 100g, pre-roasted is a little nicer, but not necessary),
- 1/2 cup white wine (optional)
- salt and pepper
- handful of fresh parsley, roughly chopped
1. Combine chicken, butter, garlic, green onions, mushrooms, soup, celery, soy sauce, and wine (if using) in the slow cooker. Cover and cook on low 6 hours, or high for four hours. Alternatively, cook in a large heavy based casserole dish with lid on at 160 degrees for 2 hours.
2. Half an hour before the end of the cook time, add the cashews into the chicken. Season well with salt and pepper. If necessary, thicken with a little cornflour suspended in water, then add to chicken, stirring well. If desired, add chopped fresh parsley just before serving. Serve on steamed rice with a side of greens.
PANCAKE CUPS FOR A (CHRISTMAS) CROWD


Christmastime provides just the opportunity for lazy breakfasts and slow mornings with friends and family – how delightful it is to take things slowly and remember that God entered our world as a person to save people like us! And pancakes are an affordable option for making things a bit more special than usual – for treasuring Christmas and the people God brings into our lives. But pancakes can be tricky too – the first few are always duds as the person cooking gets the temperature of the pan and their technique just right, and for that poor person cooking, it can be a task that takes most of the morning if there are lots of keen pancake eaters in the house. The recipe that follows is my attempt to solve this problem whilst still making Christmas breakfast special. The batter can be made the day before and stored in the fridge so there’s almost no work in the morning. If you require more pancake cups, simply double the recipe. Doing so fits inside a 2L food processing bowl perfectly. This recipe makes 16 pancake cups and using berries, cream and maple syrup, costs around $7 to make.
For pancake cups:
- 225g plain flour
- 1 tablespoon baking powder
- pinch of salt
- 1 teaspoon sugar
- 2 eggs
- 30g butter, melted
- 300ml milk
Fill cups with your choice of:
- 300g frozen mixed berries
- icing sugar for dusting
- cream for dolloping or drizzling
- ice-cream
- maple syrup
- Remove berries from freezer and begin thawing in a bowl. Preheat oven to 200 degrees celcius (180 degrees if fan-forced).
- Grease muffin holes using a little extra melted butter or spray oil.
- Put all pancake cup ingredients in a food processor and blitz for 30 seconds until combined. Use immediately or store in fridge for when needed (If you do this, the batter will thicken slightly. If this happens, don’t stress – just thin it out with a whisk and a little extra milk just before using it).
- Fill 1/3 – half of each muffin hole (no more) and bake in oven for 8 minutes. After this time, the pancakes will be golden brown and flat. As soon you take them from the oven, use a soup spoon to push each one down in the middle, creating a crater/cup shape. Pop out of the tins onto a shared plate and top with berries and dusted icing sugar. Enjoy!
BACON & EGGS FOR A (CHRISTMAS) CROWD


Christmas is just around the corner, so I thought it timely to share some recipes you might find helpful for inspiring or planning your Christmas menu. Today’s recipes are designed to help you enjoy the large number of people you might have visiting, without extra kitchen and food stress. Cause what’s the point of all that effort if it ends up owning you?
Years ago, I watched my friend Bron make bacon and eggs much like the recipe below and since then my husband Steve has fiddled around with various ingredients when making them – he’s finally settled on this recipe, but also sometimes cut a disc of store-bought puff pastry and popped one in the bottom of each muffin hole – which ends up becoming something like a yummy little bacon and egg breakfast pie. Depending on your choice of eggs, this easy, portion-controlled breakfast for 12 will cost a little over $6 and take no more than 20 mins to make.
- 12 eggs
- 200g bacon
- spray oil or a little melted butter
- 1/3 jar of tomato chutney
- salt and pepper
- Preheat oven to 190 degrees, (180 if fan forced) and grease a 12 hole muffin tin very well using spray oil or melted butter.
- Cut bacon into thin strips or wedge shapes and distribute evenly across the bottom of the 12 muffin holes.
- Put half a teaspoon of tomato chutney on top of the bacon and crack and egg on top of the lot in each muffin hole.
- Bake for approximately 15 minutes (but start checking earlier) and once cooked, immediately use a sharp knife around the edges of each portion to dislodge from the pan. Season with salt and pepper and enjoy.
BALSAMIC CHICKEN BAKE


I’ve been meaning to blog about Miriam English’s Balsamic Chicken Bake for ages and I’m so pleased to have finally got around to it. Since I first tried this awesome recipe about six weeks ago we’ve eaten it many times because it’s so very easy and tasty: just put everything in the roasting dish at the same time, and then whack it in the oven. Then, just before serving, steam some greens to serve with this crowd-pleasing dinner, stick it all in the middle of the table, and that’s it – dinner is done. This versatile dinner, originally from Super Food Ideas, Issue 111, copes well with various cuts of chicken and the addition of extra roasting veggies such as carrot, pumpkin and sweet potato. Recipes like this one are so great to have in your back pocket, cause if you’re anything like me, all sorts of things need to happen while dinner is cooking: supervising the reading of school readers, quickly scrubbing the loo before guests arrive, wiping down most surfaces and putting washing away – this tasty and simple dinner enables much needed efficiency. Using the quantities below and chicken thigh cutlets, this problem- solving dish costs less than $15, serves 6-8 people, and is dairy, egg, wheat and gluten free. Pictures here are of half quantities.
- 12 (2kg chicken thigh cutlets, fillets, wings or drumsticks
- 600g potatoes, quartered
- 2 med red onions
- 6 garlic cloves, unpeeled
- 6 fresh thyme sprigs
- 1/4 cup balsamic vinegar
- 2 tablespoons olive oil
- 2 teaspoons brown sugar
- 250g cherry tomatoes
- Preheat oven to 220 degrees celcius. Arrange chicken, potato, onion, garlic and thyme in 2 large roasting dishes.
- Whisk vinegar, oil & sugar in a jug until sugar has dissolved. Drizzle over chicken mixture. Season with salt and pepper.
- Bake for 40 minutes. Add tomatoes. Bake for 10 minutes more, or until chicken is cooked through.
- Serve with a green salad or steamed greens.
BRAISED CHICKEN AND TOMATO WITH RICE
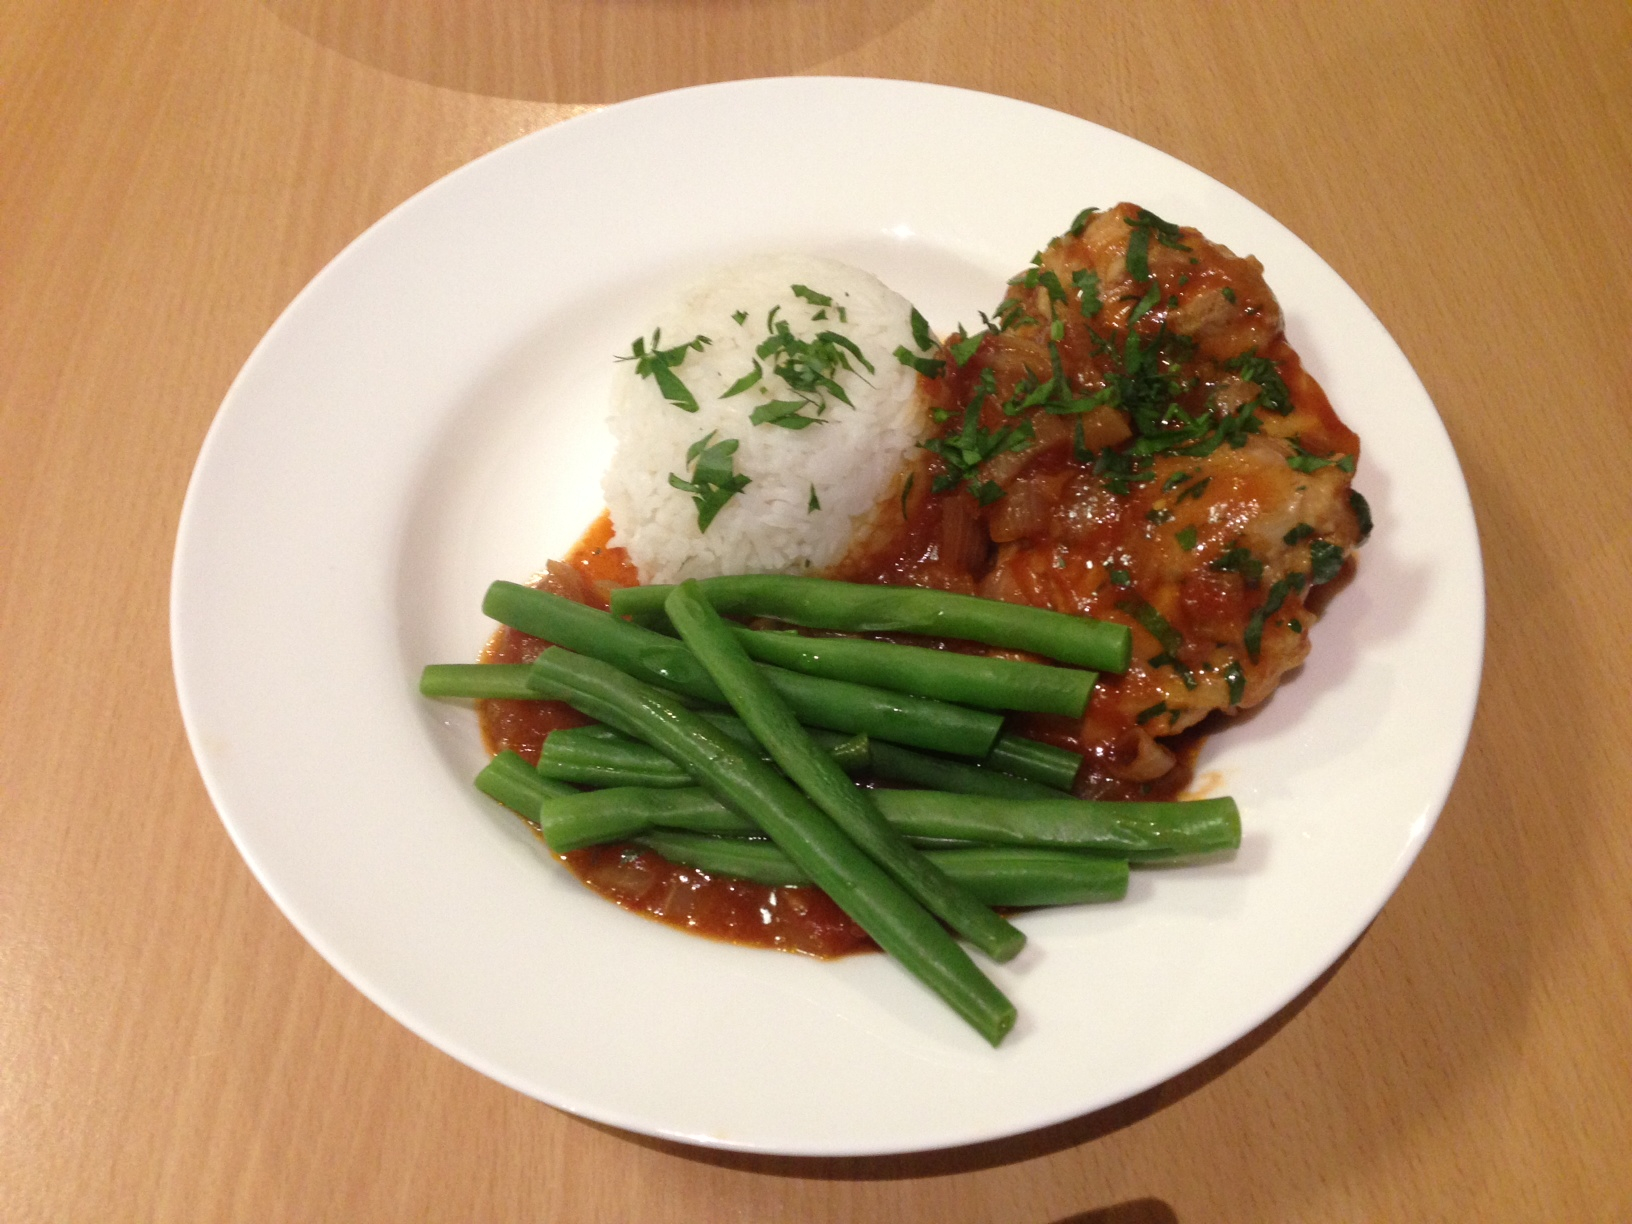
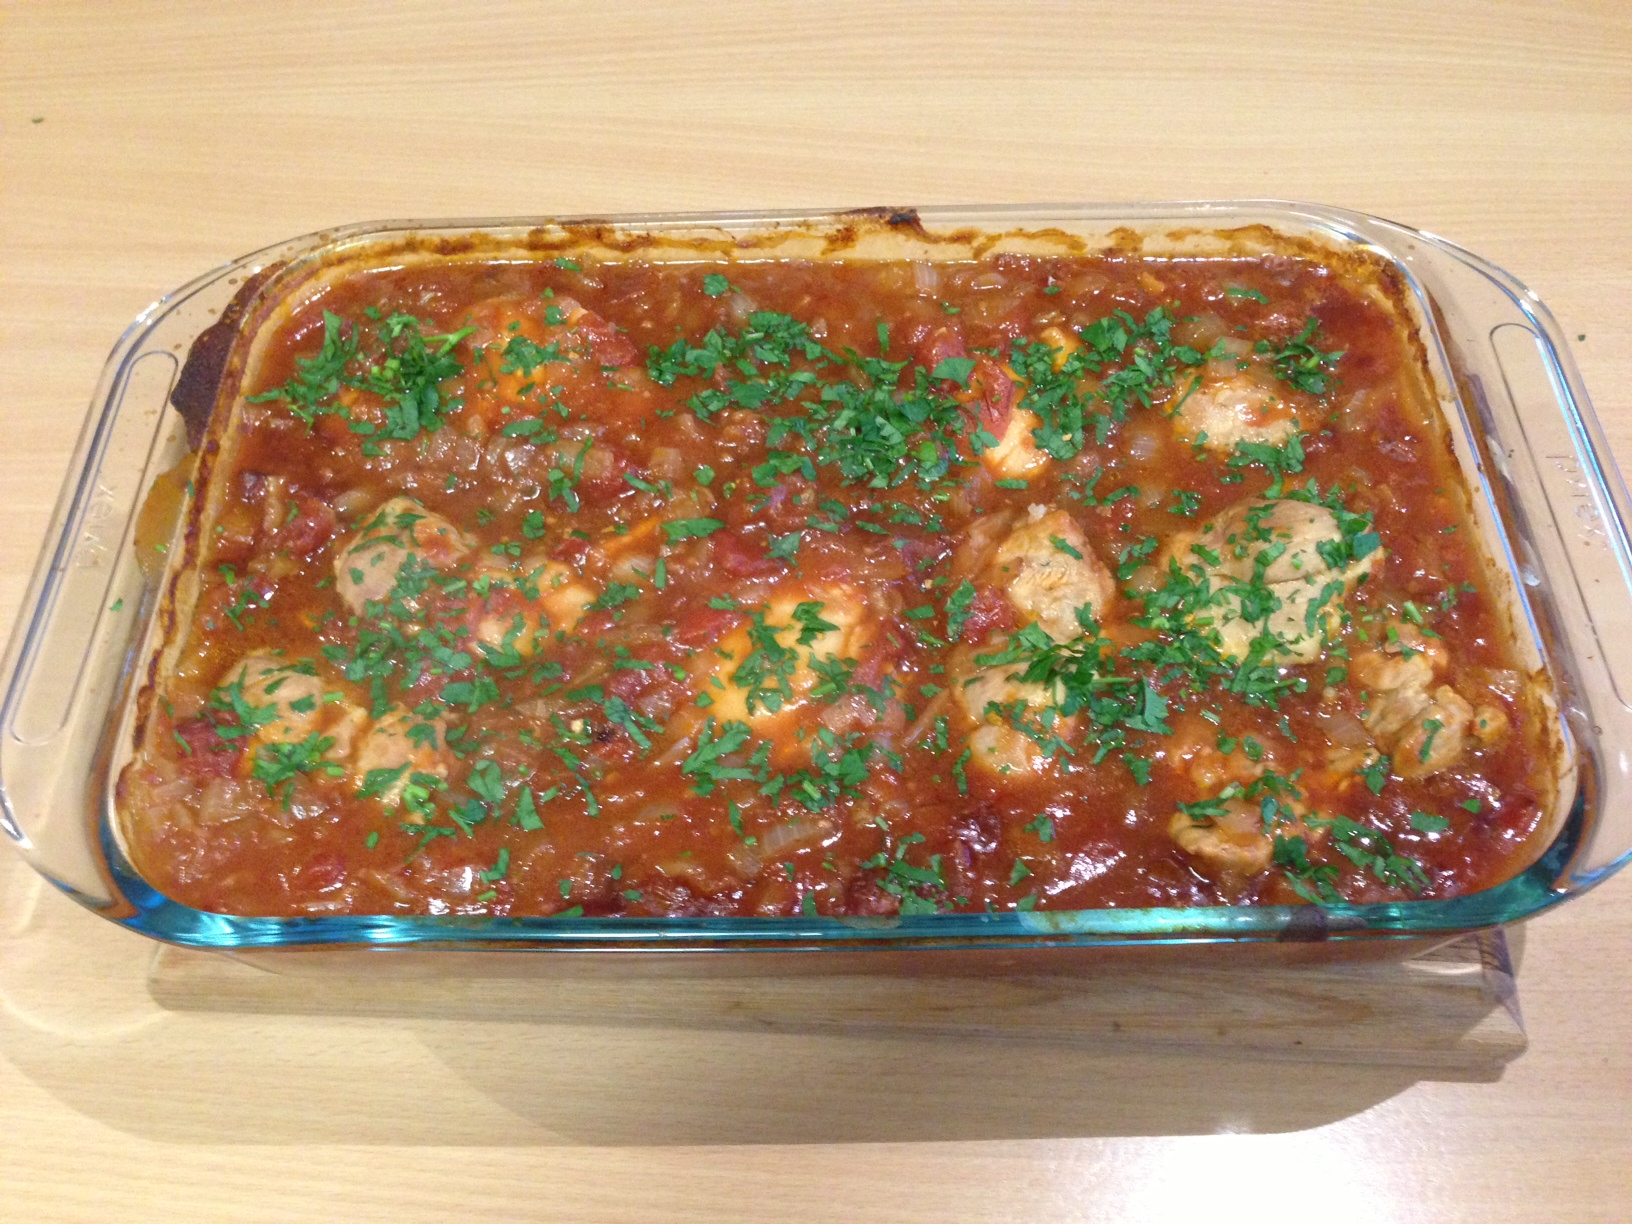
One lovely thing about writing a blog is hearing from other bloggers. One day I hope to meet Meredith who writes a very stimulating blog The Key to the Door, but in the mean time I’m thoroughly enjoying trying some recipes she has sent in along with her stamp of approval for their ease of use when having people over. When I tried this delicious chicken dinner, I didn’t have much time or energy for cooking but the quickness and ease of it meant we got through another arsenic hour scenario and it wasn’t too taxing. Originally from the $120 Food Challenge website, I’ve adapted this a little to serve more people by cooking it in the oven rather than on the stove. Everyone in our family loved this and it’s such a versatile recipe: next time I make it, I’m planning to add a jar of drained and pitted Kalamata Olives and might then call it Oven-baked Chicken Cacciatore! Using the quantities below, this recipe serves 8 and costs around $16 to make. Thanks for sharing, Meredith.
- 8 chicken thigh fillets, (could also use drumsticks)
- 4 tablespoon oil
- 4 brown onions, diced
- 4 cloves garlic, diced
- 1 packet French onion soup mix
- 2x 440g tin diced tomatoes
- 1 cup water
- 4 tablespoons soy sauce
- salt and pepper to taste
- 4 tablespoons chopped parsley (optional)
- Heat oil in a heavy based saucepan or large frying pan and sauté chicken pieces until brown and then place in a large oven-proof casserole dish.
- Add onions and garlic and fry until translucent. Add tomatoes and juices, the soup mixture, water, soy sauce, and season with salt and pepper and a teaspoon of sugar.
- Distribute this mixture evenly over the chicken and bake in a moderate oven for 40 minutes. When cooked, top the whole dish with parsley and serve with rice and greens if desired.
DILL & SMOKED SALMON FRITTATAS


The warmer weather has well and truly arrived and as usually happens, I find myself craving lighter meals such as these delightful Dill and Smoked Salmon Frittatas. The basic recipe for these was given to me by my friend Kara who makes them as finger food, baked in mini muffin tins and topped with a small piece of salmon and dot of sour cream. And if you’re looking for a yummy and easy finger food option, I heartily recommend making them that way. But seeing as this blog is all about easy hospitality, I tried making these a little less labour intensive and with a view to serving as a main. The recipe that follows is Kara’s basic frittata recipe, but with a slightly different methodology. Make these ahead of time and freeze for quick lunches at home or for 6 people coming over for lunch – simply thaw gently and warm a little in a low set oven. Serve with a side salad and some crusty bread. The good thing about these little babies is they are the perfect thing to serve those on a sugar free and carb free diet (minus the side of bread) and they’re also gluten free. Making 12 regular muffin sized frittatas or 48 mini muffin sized hors d oeuvres, this easy, do-the-whole-thing-in-the-food-processor recipe will cost around $13, though less if you purchase the herbs at a green-grocer rather than the supermarket, and the ricotta from the deli rather than the fridge section.
- 8 eggs
- 3 tablespoons dill
- 3 tablespoons chives
- 1/3 cup cream
- 1 cup ricotta cheese
- 1 1/2 cup parmesan cheese, grated
- salt and pepper
- 1 x 415g can smoked salmon, drained with the majority of skin and bone removed.
- In a food processor, put in dill and chives and process until finely chopped.
- Add ricotta, eggs and cream and process again.
- Exchange the chopping for the grating blade and grate half a cups worth of parmesan onto the top of the mixture. Season the mixture with salt and pepper.
- Grease muffin trays well with spray oil and pour mixture in until 2/3 filled.
- Distribute salmon in chunks over the portions and top each with the remaining parmesan cheese.
- Bake at 160 degrees for 20 mins if using mini muffin tins. If using regular sized muffin tins, bake at same temperature for 20 mins, plus a further 5 with the oven cranked up as far as it can go. This cooks the frittatas further and allows them the brown on top.
JAMIE OLIVER’S CHICKEN KORMA

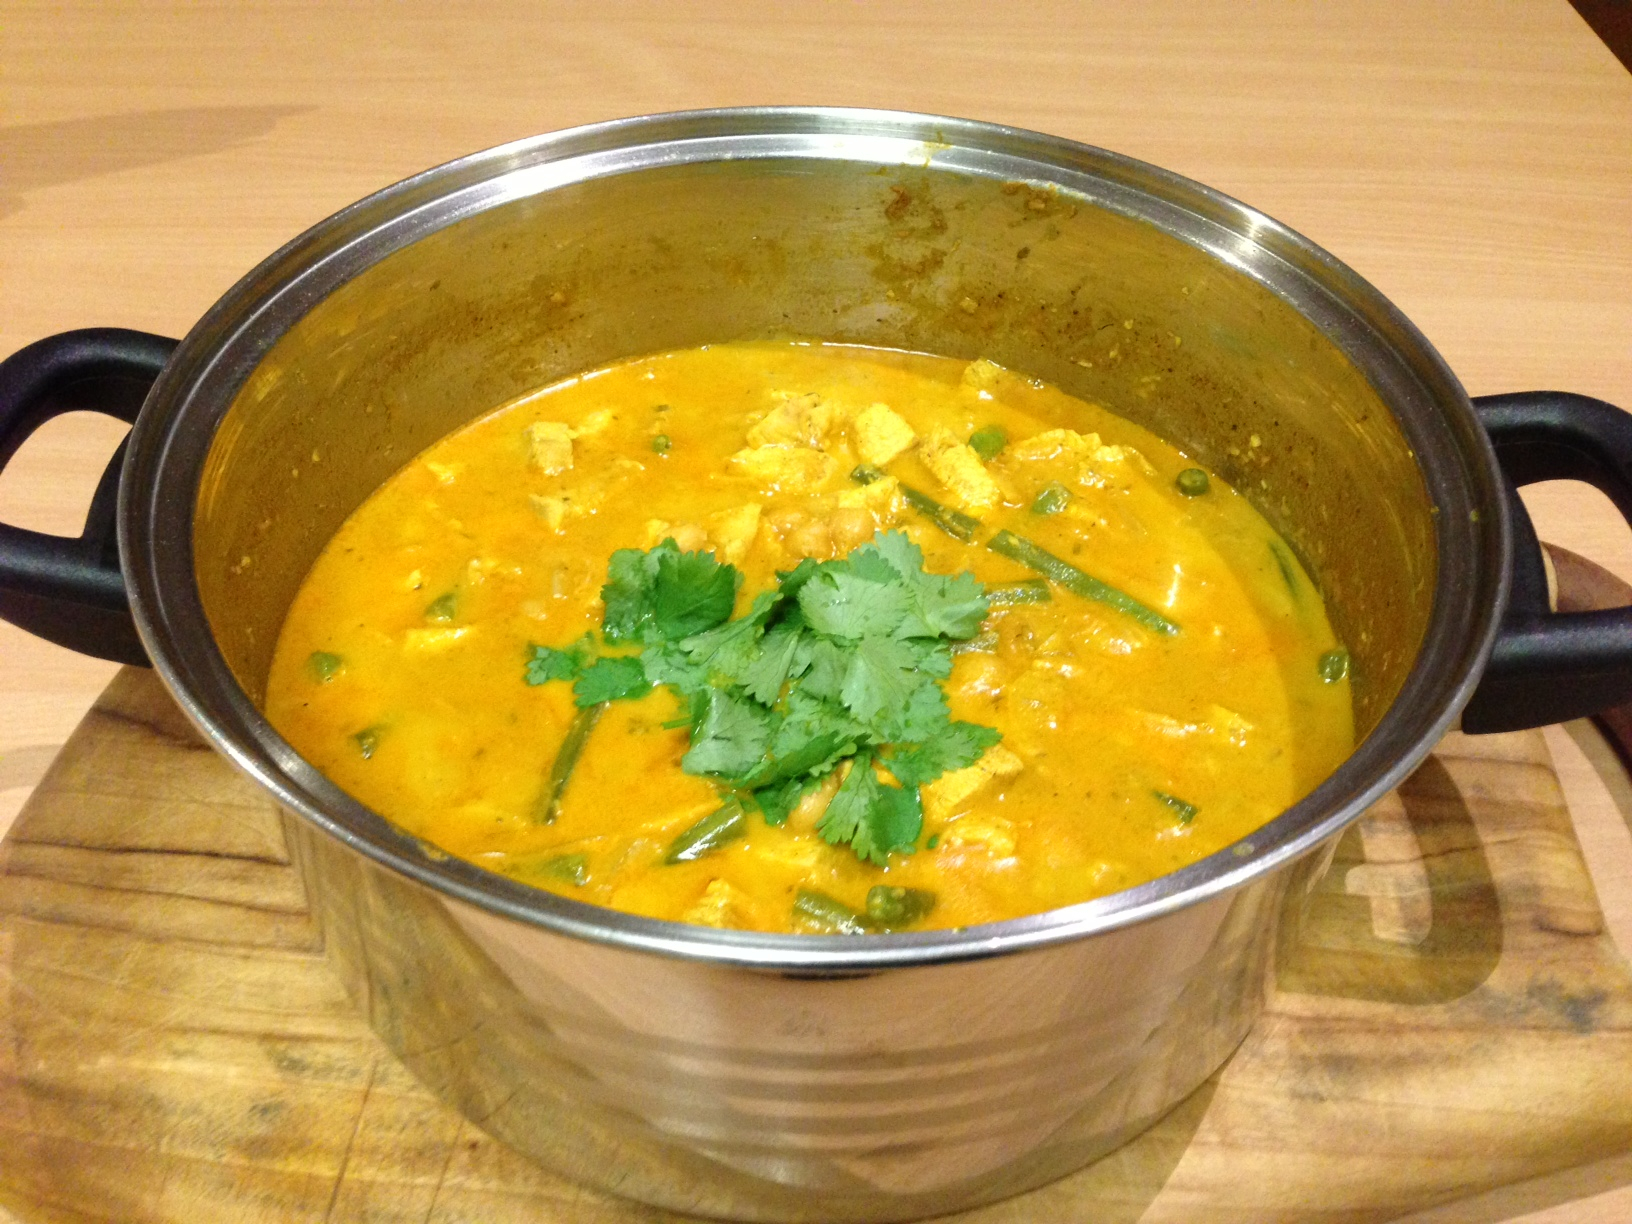
I’m not exactly sure why, but until a few days ago, I have struggled in recent months to want to cook anything new. With no headspace for it, I’ve been in a season of sticking to: old faithful recipes, porridge and weetbix and making one thing last a few nights. But my drought seems to have broken. Perhaps it’s because the weather has turned warmer, or because the kids are on school holidays, but today I tried this blog-worthy recipe, adapted from Jamie Oliver’s Ministry of Food via my friend Kara. It’s all the things this blog is about: not foody-ness – but taste, ease and affordability so that having people over isn’t too stressful. And what a terrific recipe this turned out to be! It can be made ahead of time, or in that last hour between getting home from work and people turning up – because once everything’s in the pot, it’s a simple case of simmering this gluten free meal while doing other things. Depending on the type and price of the chicken you use, this dish will cost between $10-$13 to make and serves 6-8 with rice. Add to this dollops of greek style yoghurt and fresh coriander leaves. I’m loving eating it, even as I type! Thanks for pointing me towards this bonza recipe, Kara.
- 800g chicken thighs or breasts, cut into 2-3cm pieces
- 2 medium onions, halved and sliced thinly
- 1 fresh green chilli, optional (only if you like spicy curries. I left it out)
- A 3cm piece of fresh ginger, peeled and chopped finely
- 1 small bunch of fresh coriander, washed, leaves removed and stalks chopped finely
- 1 x 400g tin of chickpeas, drained
- rice bran or vegetable oil
- Knob of butter
- 1/2 x 290g jar of Patak’s korma curry paste
- 1 x 400ml tin of coconut milk
- A small handful of flaked almonds, plus extra for serving
- 2 heaped tablesoons desiccated coconut
- salt and pepper
- Greek style yoghurt, for dolloping
1. Put the oil in the pan to heat and add onions, ginger and coriander stalks. Stir constantly for ten minutes to ensure it’s become fragrant and hasn’t burnt on the bottom. If using chicken thighs, throw them in for browning now, otherwise if using breasts, hold off til end of step 2.
2. Add the korma paste, coconut milk, half the flaked almonds, chickpeas, desiccated coconut and sliced chicken breasts. Half fill the empty coconut milk tin with water, pour it into the pan, and stir. Let the whole thing simmer away for about half an hour. This is so easy – now just walk away and do other things, like putting the rice on in the rice cooker.
3. Season carefully once the chicken is cooked and become tender. Serve with boiled rice, adding a few spoonfuls of Greek yoghurt dolloped on top. Sprinkle over the rest of the flaked almonds and coriander leaves.
ROASTED PUMPKIN SOUP

My super cool aunt, Jacqueline, gave me this pumpkin soup recipe years ago and since then it’s the only one I’ve used. I’m not a fan of lumpy pumpkin soup and I like mine to taste rich and pumpkiny. The roasting of the pumpkin produces this result with beautiful smoothness. Chop and roast the pumpkin days in advance and simply refrigerate until you want to blend the ingredients together. You can peel the skin off before hand or remove it after roasting – whichever you find easiest, though I think there’s a little more wastage of the pumpkin when you roast with skin on. I purchase my pumpkin from my local cheap-as-chips grocer and can usually pick up a 3kg for around $5. The other ingredients are incidental, especially if you, like me, use powdered stock. Serves 6-8.
- 3kg pumpkin, chopped into smallish pieces and roasted for around 1 hour.
- minimum of 7 cups chicken or vegetable stock (I used powdered. Increase until you have desired consistency)
- 2 tablespoons dijon mustard
- 2 tablespoons honey
- salt and pepper to taste
- Combine roasted pumpkin, stock, mustard and honey in a large stock pot.
- Process using a stick blender until ingredients are combined.
- Heat through, stirring regularly and season with salt and pepper to taste.
- Serve with drizzled cream and fresh bread. Enjoy!
PULLED PORK AND APPLE SLAW LUNCH FOR 10
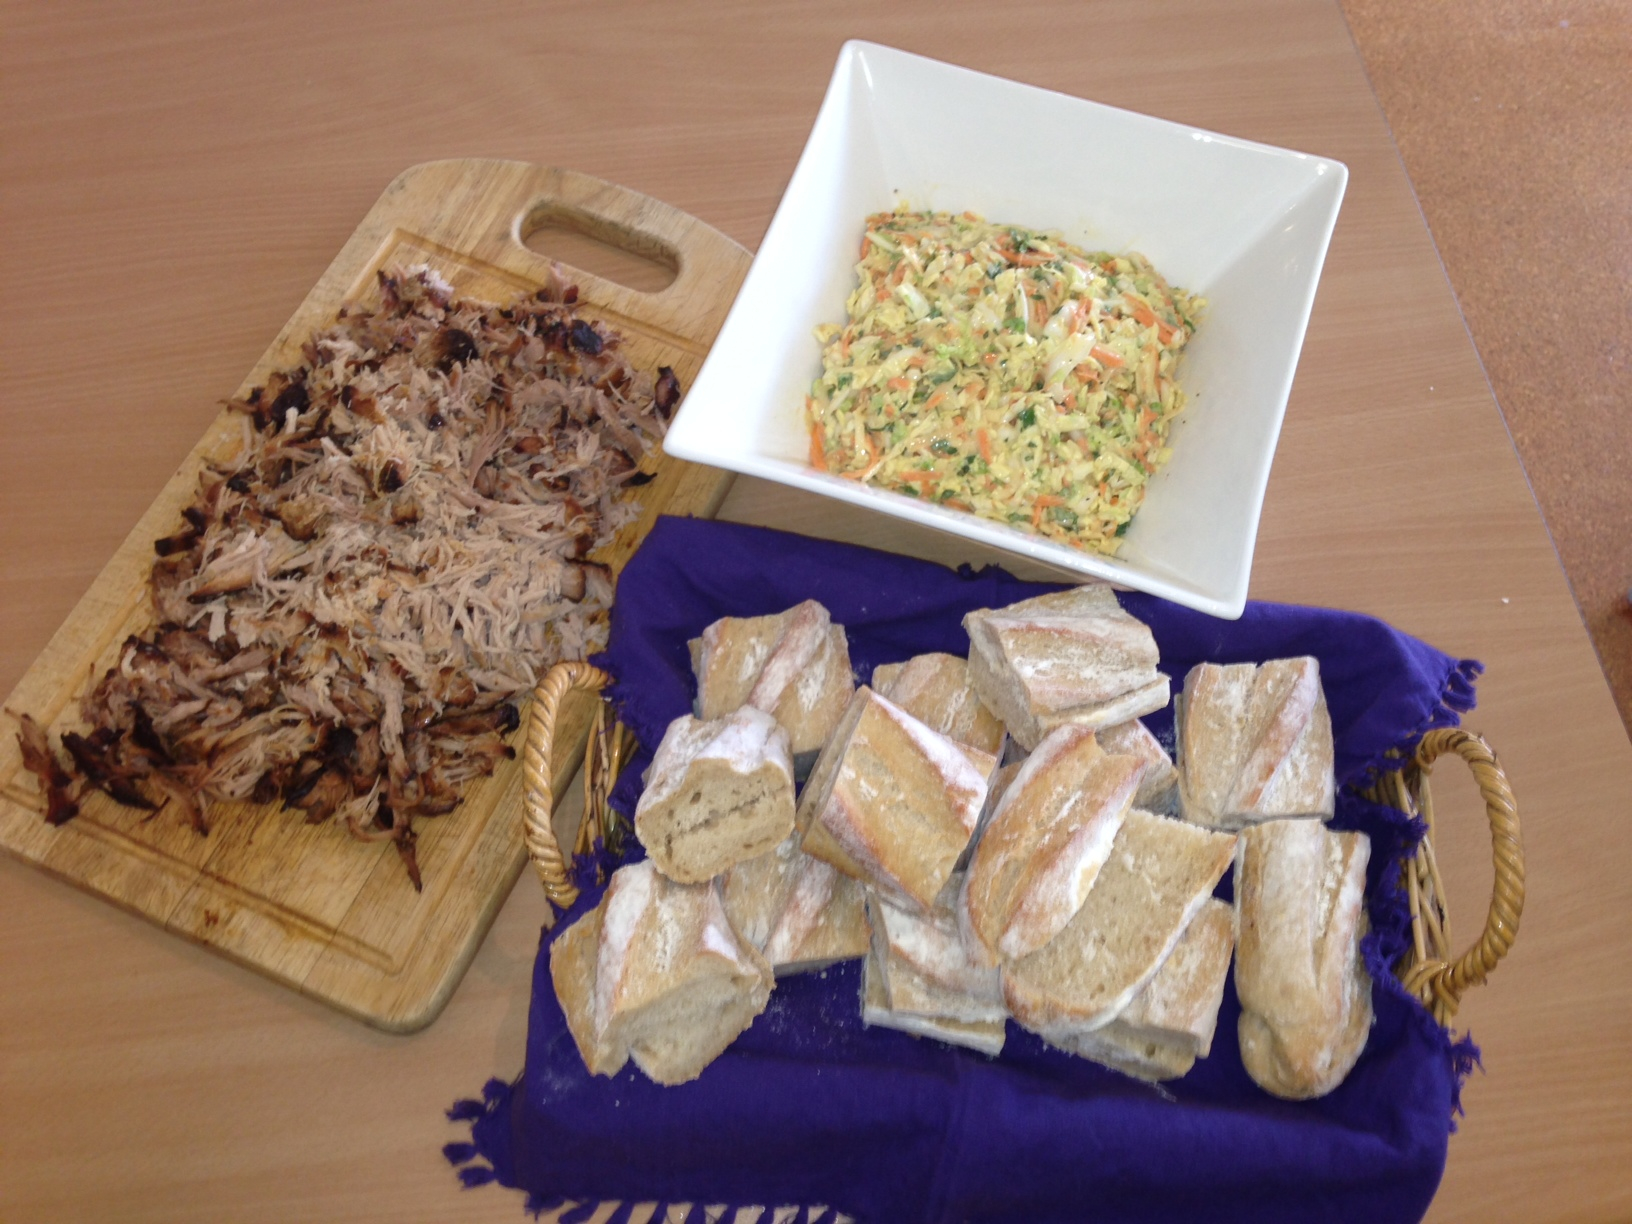
My friend Wendy recently sent in this amazing recipe and having tried it out, I think I’ll be making it time and time again. Utilising all the benefits of a slow cooker, this affordable and tasty meal is just so easy to do. Just put the meat and marinade in a slow cooker 8 hours before your guests arrive. The accompanying apple slaw takes no longer than a standard salad to make and your guests can put it all together themselves during the meal. Wendy made this pork-tastic dinner en-masse for a church dinner recently using two slow cookers and was able to feed everyone affordably in a cinch. I recommend purchasing the pork from a butcher as mine was half the price of my local Woolworth’s. Serving 10 people easily, this recipe costs around $18. Thanks Wendy!
- 2kg pork shoulder
- 1 x 375g bottle BBQ marinade (whatever is cheap, even standard BBQ sauce will do)
Apple Slaw
- 1/2 small savoy cabbage, shredded
- 2 carrots, grated
- 2 small apples, grated
- 1 cup mint leaves, finely chopped (if you have it – if not, don’t stress)
- 3/4 cup mayonnaise
- 1 tablespoon dijon mustard
- 2 tablespoons of lemon squeeze or juice of 1 lemon
- salt and pepper to taste
- 20 bread rolls or french stick/baguette equivalent
- Place pork in a slow cooker and empty all the marinade over it. Replace lid, switch to low and cook for 8 hours.
- Combine cabbage, carrot, apple and mint in a salad bowl. In a separate measuring jug, combine mayonnaise, dijon and lemon juice. Dress slaw mixture with the dressing and toss well.
- Remove pork from slow cooker, and using 2 forks pull the tender pork apart
- Place fresh rolls, pork and apple slaw in the centre of the table, allowing people to put together their own pork and apple slaw rolls.
CHICKEN AND BACON RANCH MACARONI
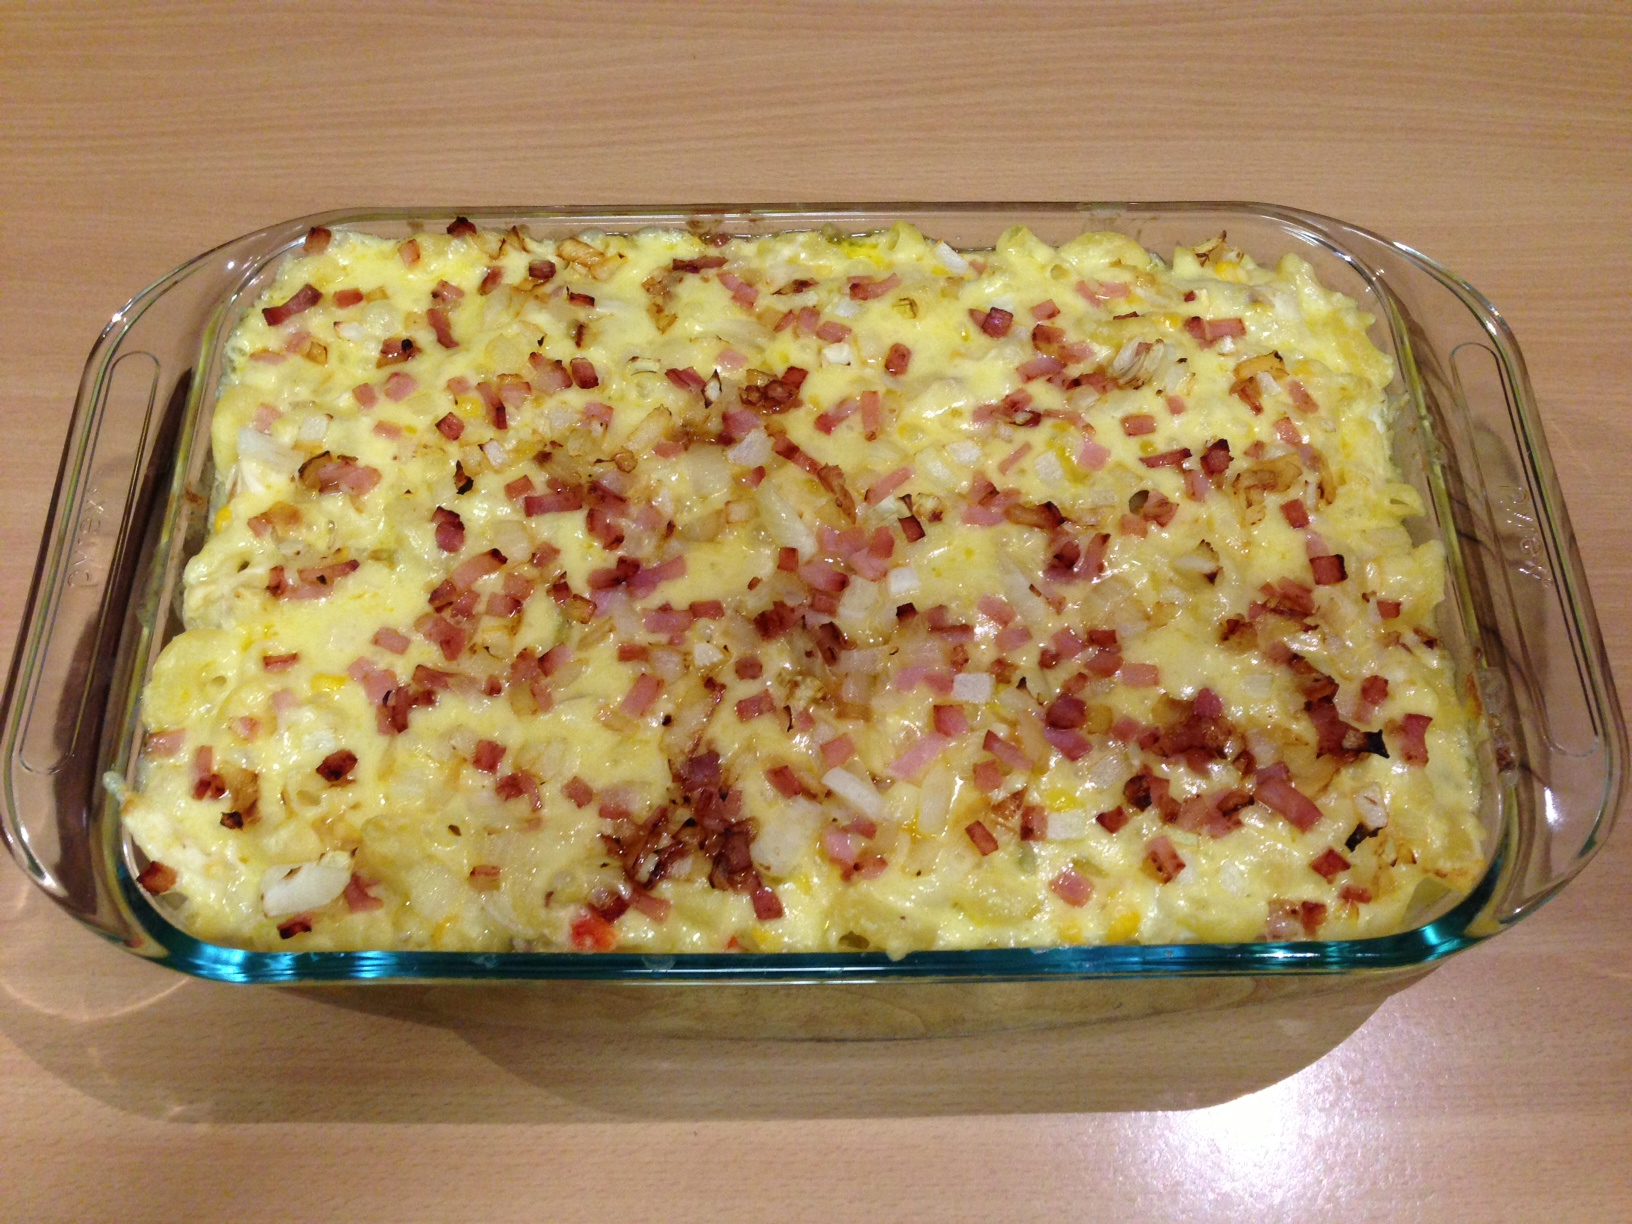
I’m a bit of a sucker for macaroni cheese and have loved it since I was a kid. Recently Steve went away for a week for work, which, for the sake of my sanity, proved to be the perfect time to try this recipe – I made it one of the first nights he was away and then the kids and I ate it every night for the rest of the week. Having long loved mac’n’cheese, I think I can safely say this is my favourite version of it – the ‘secret’ ingredient of chicken soup in the cheese sauce takes this family favourite to a new level. If you’ve got left-over barbeque chicken from Sunday lunch, this recipe is a great way to use it up. Quick and simple to make this recipe makes enough to serve 10 and costs around $12 to make.
- 500g uncooked elbow macaroni
- 3 rashers bacon, finely chopped
- 250g skinless, boneless chicken breast, cut into 1/2-inch pieces
- 2 tablespoon canola oil
- 2 tablespoon plain flour
- 3 cups milk
- 1 cup condensed cream of mushroom or cream of chicken soup, undiluted
- 2 cups grated cheese + 1 cup extra
- 1 onion
- 1 capsicum, diced
- 1 can of corn kernels, drained
- 2 cloves of garlic, crushed
- salt and pepper to taste
- Preheat oven to 180 degrees celcius and cook pasta according to package directions, omitting salt and fat; drain.
- Cook bacon, onion and garlic in a large nonstick frypan over medium heat until crisp. Remove bacon from pan, reserving drippings in pan. Increase heat to medium-high. Add chicken to drippings in pan; sauté 6 minutes or until done.
- Heat oil in a large saucepan over medium heat; sprinkle flour evenly into pan. Cook 2 minutes, stirring constantly with a whisk. Combine milk and soup, stirring with a whisk; gradually add milk mixture to saucepan, stirring with a whisk. Bring to the boil; cook 2 minutes or until thick. Remove from heat. Add cheese, capsicum, corn kernels, frozen peas and salt, stirring until cheese melts. Stir in pasta, two thirds of cooked bacon and chicken.
- Spoon mixture into a large roasting or lasagne dish coated with a little cooking spray. Sprinkle evenly with reserved bacon and extra grated cheese. Bake in oven for 5-10 minutes or until cheese melts, but no longer or it will start to dry out.
CHORIZO PILAF

Boredom with cooking drove me to trawl through the budget section of taste.com today and this three step, all-in-one dish caught my attention in the process. The flavours appealed to me lots: onion, garlic, chilli, cumin and paprika, and the effort level was just right for how tired I was feeling! Sausages of any kind go down a treat with my kids so I decided to give this a try – and I’m glad I did. The kids came back for seconds and the spicy – but not too spicy -flavours warmed us all up just as the evening started to chill. While the original recipe calls for six chorizo sausages, I thought this was a little over the top – four is plenty and you could even get away with three. If spicy food isn’t so much for you, simply halve the amount of chilli listed below. This yummy, simple and cheap recipe costs less than $10 and serves 6. Serve with steamed greens or a side salad.
- 2 tablespoons olive oil
- 4 chorizo sausages, sliced
- 2 brown onions, halved, thinly sliced
- 2 garlic cloves, crushed
- 1 red chilli, deseeded, sliced
- 2 teaspoons paprika
- 1 tablespoon ground cumin
- 2 cups basmati rice
- 4 cups chicken stock (I use powdered)
- 1/2 cup flat-leaf parsley leaves, chopped (if you have it)
- Heat 1 tablespoon of oil in a large saucepan over medium heat. Cook chorizo for 2 to 3 minutes each side or until golden. Cut into circles and drain on paper towels.
- Heat remaining tablespoon of oil in saucepan over medium heat. Add onions. Cook, stirring, for 2 minutes. Add garlic, chilli, paprika and cumin. Cook for a further 2 minutes, stirring, or until soft.
- Stir in rice. Add stock and chorizo. Bring to the boil. Reduce heat to medium-low. Cover. Simmer for 10 minutes. Remove from heat. Stand, covered, for 5 minutes. Stir through parsley, and salt and pepper. Serve.
PORK STIR-FRY
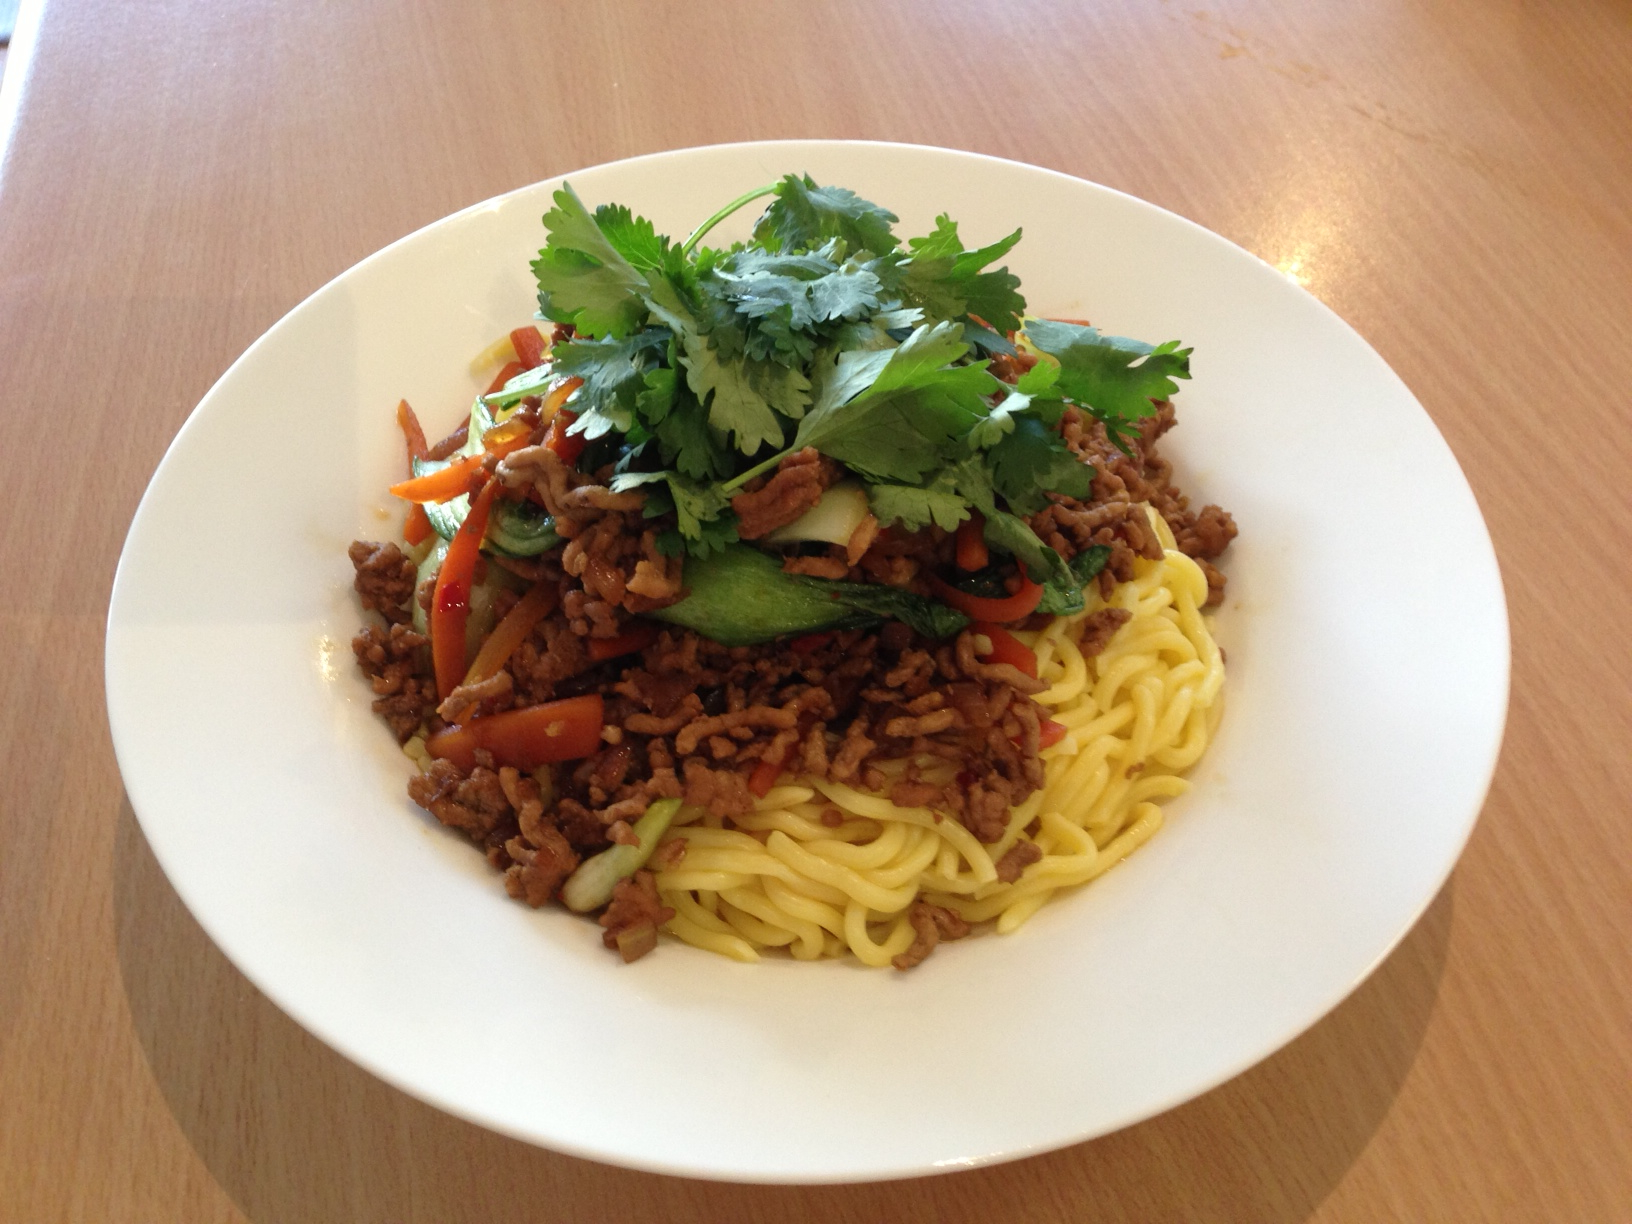
Last week on My Kitchen Rules Jake and Elle won the People’s Choice Award with this yummy dish in the Budget Challenge. The show itself gets on my nerves for lots of reasons, but still, I find myself watching it with some regularity. I was so glad I saw this episode! It was easy to find the recipe online and it truly was a fast, easy and cheap meal to make. And the whole family loved it. I love how it uses mince rather than pieces of expensive meat which I always seems to murder in the stir-frying, resulting in tough bits of meat that are hard to eat. But this pork mince stir-fry is wonderfully forgiving – a great one, I imagine, to teach teenagers to cook for themselves when necessary. At the most, this tasty stir fry will take 15 minutes to prepare and another 15 to cook, and using the quantities listed below will cost around $10 to make. Serves 4, though I stretched it out to serve 6 by adding more noodles and it worked a treat.
- 400g egg noodles
- 1/3 cup kecap manis
- 1½ tbs fish sauce
- 2 tsp vegetable oil
- 1 onion, peeled, finely chopped
- 2 garlic cloves, peeled, crushed
- 500g pork mince
- ½ bunch coriander, chopped
- 1 bird’s-eye chilli, finely chopped
- 1cm-piece fresh ginger, finely chopped
- 2 carrots, julienned
- 1 bunch bok choy, chopped
- Coriander, to garnish
1. Cook noodles in a saucepan of salted boiling water according to packet instructions. Drain noodles and set aside.
2. Combine kecap manis and fish sauce in a small jug.
3. Heat oil in a wok or large deep frying pan over high heat. Add onion and cook for 2 minutes or until onion softens. Add garlic and cook for a further 1 minute. Add pork mince and sitr-fry, stirring with a wooden spoon to break up any lumps, for 5 minutes or until browned. Add remaining ingredients and cook, stirring, for 2-3 minutes. Add sauce and noodles and stir through for 2-3 minutes or until heated through.
4. Garnish with coriander to serve.
Notes:
• You can also use chicken or turkey mince in this dish.
• For variety, this spiced pork mixture would also be great served in lettuce cups or with rice.
• You can add any type of extra vegetables to this dish – try sliced red capsicum, baby corn or bean sprouts.
2 INGREDIENTS PIZZA SCROLLS (Well, almost)


No sooner had I posted Kath’s contribution of 2 ingredients Cookies, did she sent me this next 2 ingredients recipe of Pizza Scrolls. Tonight I found myself trying it out, and oh my goodness, if I put on weight this winter it will be because of these super fast, delicious and comforting pizza delights. And I suppose I should come clean – the 2 ingredients in the title refers only to the amazing bread-like, not-scone-like, base for the scrolls. But I think this is forgiveable as the fillings come from whatever veggies and bits of deli meat you have lying around in your fridge, and although they’re necessary, they’re incidental in ways that keep the food bill down. Rapidly going off in my fridge was some pre-grated cheese, 3 slices of short cut bacon, 4 mushrooms, 4 rings of tinned pineapple and half a red capsicum. So that’s what went in! We enjoyed our scrolls for dinner (and the kids loved them), but they’d be terrific as a weekend lunch option when having friends over and, cut into quarters, would make a yummy and affordable church morning tea option. I didn’t bother costing these cause it wasn’t worth it, given how they came into being. Thanks again, Katherine!
Base
- 2 cups Self Raising Flour
- 1 1/2 cups Natural or Greek Yoghurt
Filling
- Pizza sauce/tomato sauce/crushed tinned tomatoes/pasta sauce, enough to cover the mixture when rolled out to 2cm thick
- Grated cheese, about 2 cups
- 1 onion, diced finely
- Whatever meat and/or veggies you have to use up. Make sure you chop everything finely so that they get caught up in the rolling of the scroll without falling out too much.
- Preheat oven to 200 degrees. Mix flour and yoghurt together. I did mine really quickly using my bench mixer, but this is not at all necessary.
- Knead on a well-floured bench top, adding extra flour to aid in process. Roll the dough out to about 30cm x 20cm, which should end up being around 2cm thick. Don’t stress at all about this – these scrolls are meant to be rustic looking, almost free-form.
- Spread tomato base, sprinkle with whatever fillings you’ve chosen, and using a rubber spatula or egg flip, start rolling at the end closest to your waist, using the spatula underneath the dough to encourage it off the bench and into the roll. Again – don’t worry how lumpy or uneven it is, just aim to get it rolling together.
- Cut your log in the middle using your biggest knife, cutting each section into halves until you have 16 scrolls, each about 2 cm wide. Spread out biscuit style, on lined baking trays, ingredients showing upwards, giving plenty of room for them to rise. Bake at 200 degrees for 10-12 mins. Enjoy immediately or later – whichever you need.
CHILLI BEEF & BEAN PASTA BAKE


Oh my goodness life is busy at the moment. My five year old has started school and there’s so much to get my head around (news, library books, computers, home readers, buddies, making friends at the school gate, getting out the door on time and the endless cycle of making lunches – I could go on). The uni year which has been amping up began to reach one of its crescendoes with O week which started today (exciting times!). There’s been lots of slack dinners lately but thankfully my friend Belinda shared this recipe with me and it lasted us three nights in a row – economical on both time and money. And it’s a sensational tasting dish too. This mexican beef and pasta bake was scoffed down by my kids (perhaps because it wasn’t Weet-bix?) and us grown ups loved it just as much. And don’t worry, it’s not hot in the spicy sense at all. The pictures above represent a double quantity and using those listed below this dish will set you back between $10-12. Serves 6. Thanks Belinda – this one’s already part of our family.
- 200g spiral pasta
- 1 tablespoon olive oil
- 1 brown onion
- 1 red capsicum
- 400g beef mince
- 2 garlic cloves, crushed
- 30g packet Taco Spice Mix (generic is fine)
- 1/2 cup water
- 400g can diced tomatoes (generic is fine)
- 2 zucchinis, chopped
- 400g can red kidney beans, drained (generic is fine)
- 310g can corn kernels, drained (generic is fine)
- 1/2 cup grated cheese
- Preheat oven to 180 degrees or 160 degrees fan-forced. Lightly spray a 2L oven-proof dish with oil. Cook pasta in a large saucepan of boiling salted water until just tender. Drain.
- Meanwhile, heat oil in a large non-stick frying pan over medium heat. Add onion and capsicum and cook, stirring for 5 minutes until softened. Add mince and cook, breaking up any lumps, for 5 minutes or until browned. Add garlic and cook, stirring, for 1 minute or until fragrant.
- Stir in taco spice mix and cook, stirring for 1 minute. Add tomatoes, zucchini and 1/2 cup water and bring to the boil. Reduce heat and simmer, uncovered for 5 minutes or until zucchini is just tender and mixture has thickened. Add pasta, beans, corn and mix to combine.
- Combine mixture into prepared dish, sprinkle with cheese and bake for 20 minutes or until cheese is golden.
WEET-BIX FOR DINNER AND OTHER TIME AND MONEY SAVERS

This post has been bubbling away in the back of my mind for some time as I’ve reflected on the ways I try to save my own sanity and hip-pocket when it comes to feeding our family. What follows are the three main ways I find work for our family. I hope you’ll find them helpful.
1. Weet-Bix or Porridge for Dinner
We seriously do this at least twice a week, more often when life is more hectic than usual. When we first started doing it, our kids were quite little – the eldest around 2 years old. At first, to make it ‘normal’ we used to put some fun music on really loud and dance around the house singing “It’s breakfast for dinner tonight!” but we only had to do that a couple of times and it became a normal part of our family culture. These days the kids don’t bat an eyelid when told it’s a porridge night. Make it special by adding grated apple, a handful of sultanas and a dollop of yoghurt. Home brand quick cooking oats are less than a dollar a packet and I keep large stocks of these in the pantry ready to go.
2. Make Enough for Two Meals
My friend Nicole does this all the time and I often do too. Its cost effective because there are less ingredients used and needed over the course of the week and it saves time only needing to cook every second day. Throw in a porridge night each week and you only need to cook three times.
3. Meat and Three Veg
If you stick to cheaper cuts of meat such as chicken drumsticks, sausages, rissoles and anything that’s on a good special, meat and three veg meals are amongst the easiest and cheapest dinners. My favourite version of this right now is cheap fillets of fish such as Whiting or Basa, tossed in White Wings Crumb in One and panfried in three minutes flat. Just add some microwave steamed veggies and your favourite seasonings such as Tartare Sauce or lemon juice. It tastes terrific and it’s dinner cooked in ten minutes!
What do you do to save time and money when feeding people?
ZUCCHINI SLICE
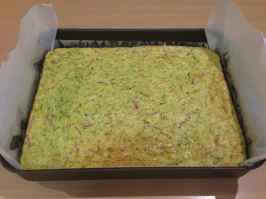
Zucchini Slice has got to be one of my favourite money saving meals and it gets a regular workout around here in the summer months. Rather than spending money on expensive meat for a barbeque when having people over, I often choose some good quality sausages to cook on the barbie accompanied by Zucchini Slice and a fresh salad. As well as being so affordable, this little number has two other benefits: first, from dicing the onions to chopping the bacon, to whisking the eggs and grating the cheese, it can all be made using various blades of the food processor. Second, it can be made up to a couple of days ahead and stored in the fridge to avoid cooking stress on the day your guests come over. To make this slice, originally from the Women’s Weekly, using the quantities that follow, costs around $6 and serves 6+. The photo above is a double quantity which neatly fits a roasting sized dish.
- 375g zucchini, grated
- 1 large onion, diced
- 3 rashers of bacon, sliced or chopped
- 1 cup grated cheese
- 1 cup self raising flour
- 1/2 cup oil (I use rice bran oil)
- 5 eggs
- salt and pepper
- Grate unpeeled zucchini coarsely, finely chop onion and bacon. Combine zucchini, onion, bacon, cheese, SR flour, oil and lightly beaten eggs, season with salt and pepper.
- Pour into a well-greased or baking paper lined lamington tin 16cm x 26cm, bake in a moderate oven for 30-40 minutes or until set and browned.
CRUSTY CHICKEN CASSEROLE

Last weekend we enjoyed the generous hospitality of my husband’s parents, and as always, it was so good to get away and enjoy some good times together – parents, kids and grandparents. My mother-in-law Pauline, is a terrific cook and like my own mother, has taught me lots about hospitality, both specifically and by osmosis. On this recent visit she cooked this delicious, almost retro, chicken casserole for us and it was so tasty, warming and comforting after the car trip from our place to theirs. Our kids devoured it that night and again the next. It’s dead easy and it’s one of those dishes that could easily stretch to serve more by adding extra veggies, rice or bread to the offering. For all these reasons, I’m pretty sure I’ll be making it often. Depending where you buy your veggies from, this dish costs around $18 to make (less still if you use a green grocer), and easily serves 8.
FILLING
- 1 BBQ chicken
- 1 onion, chopped
- 2 shallots, chopped
- 1 stick celery, chopped
- ¼ cup water
- 3 rashers bacon, sliced
- 60g mushrooms, sliced
- 440g can of Cream of Chicken Soup (Campbell’s is nicest)
- 300g carton sour cream (I use homebrand light)
- Optional: 400g can corn kernels, drained (we love corn!)
CHEESE BATTER TOPPING
- 1 cup SR Flour
- 1 capsicum (can be half red, half green)
- 2 eggs
- 1 cup grated cheese
- ½ cup milk
- Remove chicken meat from bones while chicken is still warm (much easier), and shred or chop meat roughly.
- Place chopped onion, shallots, celery and water in pan, bring to boil, reduce heat, simmer covered for 15 mins (Pauline’s alternative tip: stick the lot in a covered microwave safe dish and zap for 2 mins).
- In a hot frypan, add bacon and sliced mushrooms and cook for 3 mins (again, Pauline suggests cooking the bacon and mushrooms in same covered microwave dish for about 2 mins)
- Combine the soup, sour cream, chicken, cooked vegetables, corn (if using) and bacon mixture. Pour into ovenproof dish.
- Make cheese batter: Mix flour, capsicum, lightly beaten eggs, cheese and milk until just blended.
- Spread cheese batter on top of casserole and bake uncovered in moderate oven for 30-40 mins. Serve with rice and salad.
BIRCHER MUESLI

I’ve always loved Bircher Muesli. Actually, I’m pretty happy with oats of any kind and porridge is an any-time-of-the-day thing at our place, often for dinner on a slack winters night. Despite my love of all things oatey, I’d never even thought to try making my own Bircher Muesli, so when Anna sent me this dead easy and uber-cheap recipe, I was keen to give it a go. I am so glad I did! Perfect for breakfast or brunch hospitality, I’m sure I’ll be making this refreshing and comforting mix of oats, apple, almonds and yoghurt again and again. The quantity that follows makes enough for 4 decent serves, so just multiply away to suit the number of friends you’re serving. Just remember with this one to make it at least a day ahead – and enjoy the benefit of not having to do much the day people come over. Total cost less than $3, with fruit to serve additional.
- 1 cup rolled oats (not quick oats)
- 1-2 grated apples
- ½ cup apple juice
- 1 large handful sultanas (I used craisins cause I was out of sultanas)
- ½ handful of roughly chopped, unsalted almonds
- ¼ cup vanilla or Greek yoghurt (you’ll need a little extra for serving too)
- ¼ cup milk
- 1 teaspoon honey
- Chopped fruit and/or frozen berries for serving
1. Mix all the ingredients together in a bowl. Cover with cling wrap and refrigerate overnight.
2. In the morning it should be the consistency of cold porridge. Stir and if necessary add a little bit more yoghurt or milk to increase the creaminess.
LEMON, ZUCCHINI AND CHICKEN PASTA

This awesome recipe comes from my friend Kate, via taste.com.au. A tasty, cheap, easy and filling dinner for 6 people. Using around half a BBQ chicken, this recipe pairs well with Open Chicken Sandwiches with Lemon and Almonds during a working week or a weekend of having people over – 2 yummy meals that use just one chicken between them. Kate suggests adding a handful of pine nuts to the the zucchini fry-up and if zucchini doesn’t float your boat, add half a bag of baby spinach leaves to the hot pasta mixture at the end and watch them wilt up beautifully. Totalling around $8 to make this is a recipe I’ll be using again and again. Thanks Kate!
- 500g bowtie pasta or similar
- 100g butter, chopped
- 2 zucchini, coarsely grated
- 2 yellow zucchini, coarsely grated
- 1 garlic clove, crushed
- 2 cups shredded cooked chicken (about half a chicken)
- 2 green onions, thinly sliced
- 1 large lemon, rind finely grated, juiced
- 1/4 cup chopped flat-leaf parsley leaves
- grated parmesan cheese, optional, to serve
- Cook pasta in a saucepan of boiling salted water, following packet directions, until tender. Drain and set aside.
- Meanwhile, heat 30g butter in a large, deep-sided frying pan over medium heat. Add zucchini and garlic and cook, stirring, for 5 minutes or until zucchini is soft. Add chicken and cook, stirring, for 4 minutes or until heated through.
- Add pasta, remaining 70g butter, green onions, lemon rind, 1/4 cup lemon juice and parsley to chicken mixture. Cook, stirring, over low heat until heated through. Sprinkle with parmesan, if using. Season with salt and pepper. Serve.
OPEN CHICKEN SANDWICH WITH LEMON & ALMONDS

My friend Lisa made me something like this from a Donna Hay magazine for lunch last week and it was so yummy I had to make it again – only I could not find the recipe anywhere! So I had to make it up as I went and thankfully the chef type friend who helped eat my version said it worked! Pair this recipe with the pasta dish I’m blogging about tonight, to use just one BBQ chicken to make two tasty and affordable meals. Apologies for the half-eaten sandwich in this photo – got a bit excited eating it before remembering to photograph it. Serves 6 people with 2 open sandwiches each and costs less than $12 to make.
- 1/2 BBQ chicken, shredded while warm (much easier than when cold from the fridge)
- 1 loaf of sourdough bread or similar
- 120g slivered almonds
- a couple of lugs of olive oil
- 1/2 bag baby spinach or 1 cup basil leaves roughly torn
- 1/2 tub spreadable cream cheese
- juice of 1/2 lemon
- zest of a whole lemon
- salt and pepper to taste
- Slice sourdough into at least 12 slices and spread cream cheese across one side of each, followed by a layer of baby spinach or basil. Divide shredded chicken evenly among each slice, placing it on top of cream cheese and greens.
- In a frypan place slivered almonds, lemon zest and olive oil. Cook on low heat until almonds are brown, but not burnt. Remove from the heat and add lemon juice, stirring the mixture well.
- Top open sandwiches with almond and lemon mixture. Season with slat and pepper. Serve 2 slices per person.
PUMPKIN, CAULIFLOWER AND LENTIL CURRY

It was so lovely catching up with my friend Katrina last weekend. Over lunch she raved about this healthy and easy dinner she’d recently tried out and by the end of her description I was keen to give it a go too. I don’t find it easy to cook tasty vegetarian dishes, and have felt the need to have a few more recipes of this kind up my sleeve when caring for vegetarian folk. And Katrina was right – this little number ticked all the boxes: easy to cook, healthy in nature, tasty, affordable and freezable. To lower the GI, carbohydrate and fat content, Katrina helpfully suggests replacing the pumpkin with sweet potato, leaving out the cream altogether and serving it without rice because this curry is nutritionally complete on its own. She also suggested a dollop of greek style yoghurt on top which tasted great. Originally from Notebook Magazine, when served with rice, this vegetarian dish serves 6 people and costs around $7 to make.
- 1 tbs olive oil
- 1 brown onion, finely chopped
- 3 tbs mild curry paste
- 1 tbs finely grated ginger
- 400g can diced tomatoes
- 1 1/2 cups (375ml) water or vegetable stock
- 1/2 cup (105g) brown lentils, rinsed
- 1/2 cup (115g) red lentils, rinsed
- 600g butternut pumpkin, seeded, peeled, cut into 3cm pieces
- 1/2 (about 600g) cauliflower, cut into florets
- 1 cup (150g) frozen peas
- 1/4 cup (60ml) cream
- Coriander leaves, to serve
- Heat oil in a large saucepan over medium heat. Add onion and cook, stirring, for 3 minutes or until onion softens. Add curry paste, curry leaves and ginger and cook, stirring, for 1 minute or until aromatic. Add tomatoes and water and bring to a simmer.
- Add combined lentils and cook, stirring occasionally, for 15 minutes or until lentils are almost tender. Add the pumpkin and cauliflower and cook, stirring occasionally, for a further 10 minutes or until pumpkin is tender. Add peas and cream and stir to combine. Remove from heat. Taste and season with salt and pepper.
ASIAN NOODLE SALAD

Though not here yet, summer is on its way. And while signs of winter can still be seen, as daylight saving time began in NSW last weekend, our barbeque has been beckoning us. Today we had good reason to give in and so enjoyed our first of the season. And what’s a barbie without some yummy fresh salads? Originally from my friend Amy, the following Asian Noodle Salad is my all time favourite salad. It’s so tasty and filling it could easily be eaten on its own as summer style main course. For these reasons, it’s a terrific option when needing to cater for vegetarian friends and can you believe, this scrummy salad is also egg, dairy and gluten free. As if it couldn’t get any better, this very large salad is so affordable, costing around $8 to make and serves 15+ people as an accompaniment or 8 served as a main.
SALAD
- 1 x 250g packet of rice stick noodles (clear flat ones, come in a variety of widths)
- 1 x 250g packet of bean shoots
- 1 small bunch of coriander, leaves picked from stalks (cheapest from a grocer)
- 1 bunch of shallots (8-10 stalks)
DRESSING
- 4 tablespoons soy sauce
- 4 tablespoons peanut oil
- 2 tablespoons sesame oil
- 2 tablespoons lime or lemon juice (fresh is great, but I always use squeeze from fridge)
- Cook noodles for a couple of minutes only, until soft, in a large pot of rapidly boiling water. Drain using a sieve or colander and run lots of cold water through the noodles to stop the cooking process. Rinse out pot with cold water to cool it down, ready to use again for combining the salad ingredients.
- Place cooked noodles, coriander leaves, bean shoots and chopped shallots in the cooled down pot. Set aside.
- In a jar with a tight lid, shake together soy sauce, peanut oil, sesame oil and lime/lemon juice.
- Pour dressing over all the ingredients in the pot and toss well using tongs. Transfer to a large salad bowl and serve at table. Enjoy!
BUTTER CHICKEN

My friend Cathy is a great example of someone who practices hospitality. She knows how to make food taste good and she cares for others by unashamedly choosing do-able meals that aren’t trying to impress, but instead hit the spot in ways that don’t break the bank. Recently Cathy sent me a number of her favourite recipes that do all these things and I’m excited to share the first of these with you. The Butter Chicken recipe that follows is delightfully easy – choose to cook this crowd pleasing favourite in either the slow cooker or in a sealed casserole dish for a few hours in the oven. Doubling the measurements listed below neatly fills a 5.5L slow cooker, and doing so is my favourite time saver, fulfilling more than one purpose with just one venture in the kitchen. If you decide to make extra to freeze, here’s a tip I read in a magazine years ago: spray the inside of plastic containers with olive or canola spray before filling. This will create a film that protects the containers from the stain of the red coloured sauce. The quantities that follow serves 10 people and costs under $15 to make.
- I kg chicken thighs, chopped into chunks
- I onion, roughly chopped
- I jar of Patak’s Butter Chicken paste (not the sauce)
- I x 400g tin of diced or crushed tomatoes
- I x 420g tin of chickpeas, drained
- 150ml cream
- Handful of chopped coriander
- Brown chicken and onion in frypan.
- Put in a slow cooker or a heavy based casserole dish (covered) with the whole jar of butter chicken paste, tin of tomatoes and chickpeas.
- Cook for 2 hours in the oven, or 3 hours on high in the slow cooker or most of the day if set to low.
- Season with salt and pepper and add cream and coriander just before serving.
- Serve with basmati rice and microwaved pappadums.
- Raita (natural yoghurt mixed with grated or chopped cucumber) is also a yummy accompaniment.
NIGELLA LAWSON’S VEGEMITE SPAGHETTI

As in most households, I suspect, Sunday night dinners get very slack in this house. ‘Breakfast for dinner’ (yes, Weetbix and porridge) get regular guernseys here – thankfully the kids like it. Every now and then, Sunday night dinner goes beyond slack to the absolute trashy, and tonight it was just that. A few months ago I heard of Nigella Lawson’s Vegemite Spaghetti and it intrigued me. Vegemite and cheese are winners in my tastebud book, so vegemite pasta topped with grated cheese throughly appealed. I was absolutely not disappointed. While I hate to think how bad it is for me (carb heavy, no protein, no vegetables), I think it’s set to become a Sunday night favourite in this house. Despite its not-so-healthy specs, it really is very cheap to make, so much so it’s not worth costing. If you’re a Vegemite fan in other gastronomic contexts, go on, give it a go!
- 375g dried spaghetti
- 50g unsalted butter
- 1 teaspoon Vegemite
- freshly grated parmesan or tasty cheese to serve
1. Cook the spaghetti in a large pot of salted boiling water according to directions. Drain and rinse under water keeping a cup of the pasta water.
2. In the same pan, put on the heat and evaporate the water and then melt the butter and add the Vegemite and a tablespoon of the pasta water and mix to dissolve. Add the cooked pasta and more pasta water to combine if necessary. Serve with grated parmesan or tasty cheese if you like.
DONNA HAY’S SPICED CHICKEN & CHORIZO COUSCOUS

Thankfulness and relief fill my heart whenever I stumble over a recipe like this one. Donna Hay’s Spiced Chicken & Chorizo Couscous from No Time to Cook proved to be delightfully fast to make in just one pan, flavoursome and inexpensive to make. My kids ate stacks of it, asking for more long past their usual limit and it was so simply done that I was able to talk on the phone at length while making it, which happens so rarely in my household in this stage of life. A few comments about Chorizo: I’ve noticed they regularly come on special for half price at the deli at my local Woolworth’s about once every two months, so I tend to buy up then and freeze them in small quantities for meals like these. Even so, this tasty crowd pleasing dinner, which serves 6-8 costs no more than $14 to make.
- 1 onion, coarsely chopped
- 2 x chicken breasts (400g total)
- 2 x Chorizo sausages, sliced thinly into half moon shapes
- 1 teaspoon chilli flakes
- 4 cloves garlic, peeled and thinly sliced
- 2 (500g) cups instant couscous (generic brands are fine)
- 2 (500ml) cups chicken stock (I used powdered, reconstituted with water)
- 1 cup (250ml) water
- 100g fresh baby spinach
- 1 cup pitted Kalamata olives (optional – leave out to reduce cost if necessary. I’ve done this before and it’s still very yummy)
- Place onion, chicken, chorizo, chilli and garlic into a non-stick frying pan over medium-high heat and cook for 5-6 minutes or until chicken is browned.
- Add couscous, stock and water to the pan, cover and simmer over low heat for 2 minutes or until couscous is tender. Stir spinach and olives through couscous mixture and serve immediately.
SPAGHETTI ALLA CARBONARA

The other night I was in need of a quick dinner option that would use what I already had in the fridge/cupboard and save a trip to the shops. Taste.com.au came up with this answer and having never before made Carbonara properly, that is, traditionally – I decided to give it a go. The whole family chowed down on this dinner and asked for more. This yummy ‘sometimes’ dinner would be an easy end to a day gone wrong or a simple, achievable meal for a large group. Total cost $3 and serves 6+. Enjoy!
- 500g spaghetti
- 1 tbs extra virgin olive oil
- 1 clove garlic, bruised
- 150g piece pancetta or bacon, rind removed, finely chopped
- 4 eggs, at room temperature
- 40g (1/2 cup) grated parmesan, plus extra, to serve
1. Cook pasta in a large saucepan of boiling salted water for 8 minutes or until al dente. Drain, reserving 125ml (1/2 cup) cooking water.
2. Meanwhile, heat oil in a large, deep frying pan over medium heat. Add garlic and pancetta, and cook, stirring, for 6 minutes or until both are light golden. Discard garlic and remove pan from heat.
3. Whisk eggs, parmesan and 1 tsp freshly ground black pepper in a bowl (don’t add salt as cooking water and pancetta are salty). Add reserved hot cooking water and whisk until well combined.
4. Return frying pan to medium heat. Working quickly, add hot pasta and toss for 2 minutes or until well coated with oil and pancetta. Remove pan from heat, add egg mixture, then toss for 1 minute or until egg mixture is creamy and warmed through (the heat from the pasta and pan will cook and slightly thicken the egg mixture without scrambling it).
5. Divide carbonara among plates and scatter with extra parmesan. Serve immediately.
MANGO CHICKEN CURRY

My wonderful mother-in-law gave me this recipe years and years ago. Every now and then my husband says “We haven’t had that mango curry in a while” and I’m always surprised I don’t think to make it more often. This not-at-all hot curry gets devoured quickly, is easy-peasy to make and so affordable. It’s a great option for hospitality because you can do all the preparation in advance, long before people arrive, and simply leave the stir-frying until you’re about to eat – cause there’s no more than 10 minutes cooking time for this dish. Ensure rice on the go in a rice cooker while people arrive and you really won’t have much to do in the kitchen when things are getting underway. The quantities listed below serves 6 and is easily doubled when cooked in a wok for a larger group. This flavoursome dinner costs around $10.
- 2 large chicken breast fillets, thinly sliced
- 1x440g can mango cheeks, thinly sliced (home brand is fine)
- 1 tablespoon yellow curry powder
- 1 tablespoon sesame oil
- 2 cloves garlic, crushed
- 6 spring onions, white ends chopped roughly, green stalks thinly sliced
- 1 tablespoon wholegrain mustard
- 1/2 cup chicken stock (powdered or cubed is fine)
- 2 carrots, peeled and julienned
- 100g snow peas, thinly sliced
- 1/3 cup sour cream
- salt & pepper to taste
- In a large frypan or wok on maximum heat, cook sesame oil, garlic and white ends of spring onions until fragrant.
- Add chicken strips and fry until brown on all sides. Turn pan down to low and add carrots, curry powder, mustard and stock. Simmer for 5 mins.
- Add green stalks of spring onions, snow peas and sour cream. Season with salt and pepper. Just before serving, gently fold through thinly sliced mango cheeks. Serve with rice.
BEEF & EGGPLANT PASTA BAKE

When I stumbled across this recipe, I was so excited to try it because I’d not much cooked Greek style food before and the whole thing promised to be easy, yummy and affordable, which is just what this blog is about . It proved to be excellent and I’m thrilled with the nutritional value of it too. This recipe was originally published in Good Taste magazine and it scores a fantastic 4/5 stars on taste.com.au. Enjoy the fact that the veggie components mean it can be eaten on its own or serve with a side salad and some crusty bread. Depending on the cost of eggplant (worth a trip to the grocer for this one!), this dish, which serves 6-8 will cost around $12 to make.
- 105g (1/2 cup) risoni
- 125ml (1/2 cup) olive oil
- 1 large (about 450g) eggplant, thinly sliced lengthways
- 1 tbs olive oil, extra
- 1 brown onion, finely chopped
- 1 carrot, peeled, finely chopped
- 1 celery stick, ends trimmed, thinly sliced
- 2 garlic cloves, thinly sliced
- 500g beef mince
- 2 tbs tomato paste
- 1 x 400g can diced tomatoes
- 1 tsp dried or fresh oregano
- 250g Greek-style natural yoghurt
- 1 egg, lightly whisked
- Ground cinnamon, to dust
- 2 tbs chopped fresh mint (if you have it)
- Cook the risoni in a large saucepan of salted boiling water following packet directions. Drain.
- Meanwhile, heat half the oil in a large frying pan over medium-high heat. Add 3-4 eggplant slices and cook for 3 minutes each side or until tender and slightly golden. Transfer to a plate lined with paper towel to drain. Repeat, in 3 more batches, with the remaining oil and eggplant, reheating the pan between batches.
- Heat the extra oil in a large saucepan over medium heat. Add the onion, carrot, celery and garlic, and cook for 4 minutes or until soft.
- Increase heat to medium-high. Add the mince and cook, stirring with a wooden spoon to break up any lumps, for 5-6 minutes or until the mince changes colour. Add the tomato paste and stir until well combined. Add the tomato and oregano, and stir until well combined. Taste and season with salt and pepper. Stir in the risoni.
- Preheat oven to 180°C. Spread the mince mixture over the base of a 2L (8-cup) capacity ceramic baking dish. Arrange the eggplant, overlapping slightly, over the mince mixture to cover. Combine the yoghurt and egg in a bowl. Pour over the eggplant and spread evenly. Bake for 25-30 minutes or until the yoghurt is just set. Dust with cinnamon. Sprinkle with the mint to serve.
SPICY LAMB FLATBREAD PIZZAS

I first tasted this delicious home made pizza when my friend Lisa made it for me around this time last year. It was so flavoursome and best of all, affordably priced and quick to make – just the ticket when having people over. Having enjoyed a winter-full of soups, casseroles and slow cooked meals, lately I’ve been craving lighter and greener dinner options, and this delightfully healthy pizza, originally from Good Taste Magazine, fits the bill exactly. And since some lovely friends served up a very similar dinner when hosting us for dinner last weekend, once again, I’ve got the taste for dinners such at this! Do feel free to fiddle with options for topping (we love it with the addition of mushrooms) and if making for more than 4, simply multiply the number of bases needed to cater for half a large flatbread per adult. One last tip when making home made pizzas like these: flatbread labelled Lebanese Bread is half the price of anything similar that’s labelled as a pizza base – and the taste of the finished product is much the same. This easy, yummy affordable and healthy dinner will set you back less than $7.
- Olive oil spray
- 1 red onion, halved, thinly sliced
- 1 red capsicum, halved, deseeded, thinly sliced
- 300g lean lamb mince
- 1 tsp ground cumin
- 1 tsp ground paprika
- 1 tsp ground coriander
- 2 tbs currants
- 2 tbs chopped fresh continental parsley
- 80ml (1/3 cup) passata (tomato pasta sauce)
- 2 pieces wholemeal Lebanese bread
- 1 bunch rocket, trimmed, shredded
- 130g (1/2 cup) low-fat natural yoghurt
- Preheat oven to 220°C. Heat 2 large baking trays in the oven for 10 minutes.
- Meanwhile, heat a large non-stick frying pan over medium heat. Spray with olive oil spray. Add the onion and capsicum. Cook, stirring occasionally, for 4-5 minutes or until soft. Increase heat to high. Add the mince. Cook, stirring with a wooden spoon to break up any lumps, for 4-5 minutes or until the mince changes colour. Drain off any residual fat. Add the cumin, paprika and coriander. Cook, stirring, for 1-2 minutes or until aromatic. Remove from heat. Stir in the currants and parsley.
- Divide passata and mince mixture among bread. Place on the trays. Bake for 8-10 minutes or until bases are crisp.
- Cut each pizza into quarters. Top with rocket and serve with the yoghurt.
BIRYANI

Recently a friend posted this yummy recipe on my facebook wall and tonight I tried it out. Before finishing his second mouthful my husband asked me to make it again soon! As promised, this Biryani recipe originally from Super Food Ideas was dead easy to make and the smell of it that permeated the house whilst cooking was divine. Including the yoghurt but not the pappadums, this meal cost an affordable $11 to make 4 large serves, though you could use less chicken to make it cheaper if required. Thanks Katrina, for this terrific contribution.
- 750g chicken thigh fillets, trimmed, cut into 3cm pieces
- 1/2 cup Tikka Masala curry paste
- 1 tablespoon vegetable oil
- 1 tablespoon butter
- 2 large brown onions, thinly sliced
- 1 cup basmati rice
- 1 1/2 cups chicken stock
- 1 cup thick Greek-style yoghurt
- 1/3 cup mint leaves
- 8 small pappadums, cooked, to serve
- Combine chicken and curry paste in a ceramic bowl. Cover. Refrigerate for at least 3 hours, or overnight if time permits.
- Preheat oven to 180°C. Heat oil and butter in a frying pan over medium heat until sizzling. Add onions. Cook for 15 minutes or until caramelised. Transfer chicken to an 8-cup capacity ovenproof casserole dish. Spoon onions over chicken.
- Place rice into a sieve. Rinse under cold water until water runs clear. Sprinkle rice evenly over onions. Place stock into a microwave-safe jug. Microwave on HIGH (100%) power for 2 minutes or until hot. Pour stock over the back of a metal spoon over rice. Cover with foil then cover with a lid. Bake for 1 hour 45 minutes or until rice is tender (Start checking from 1 hour – mine didn’t need nearly as long as this). Season with salt and pepper.
- Place yoghurt into a bowl. Finely chop 2 tablespoons of mint leaves. Stir through yoghurt. Spoon biryani into bowls. Top with yoghurt mixture and remaining mint leaves. Serve with pappadums.
MASSIVE MASSAMAN CURRY

My friend Julie contributed this lovely mild curry recipe and I’m so pleased with the result! Originally from Charmaine Solomon’s Hot & Spicy Book, the whole thing was very easy to make and so tasty. It cooks on the stove for quite a while but pretty much uses just the one pot – and it was no trouble to do other jobs around the place while this yummy curry simmered away. The recipe that follows cost around $25 to make but made no less than 3L, which, served with rice serves approximately 15 people. This recipe is delightfully freezer friendly and can be made in advance for church dinners, weekend hospitality or keeping in the freezer. Thanks for sharing, Julie!
- 2 kg of chuck steak, cut into chunks
- 2 tins of coconut milk
- 5 tbsp massaman curry paste
- 10 baby potatoes or 1kg potatoes peeled and cubed, whole OR 1 kg of pumpkin peeled and cubed
- enough small onions for one per person or 4 large, cut into chunks
- 4 tabs fish sauce
- 4 tabs lemon or lime juice
- 1 1/2 tbsp palm sugar (at all Asian grocers) or 4 tabs brown sugar
- 1 cup unsalted peanuts (easily left out in the case of allergy)
- 1 cup fresh basil leaves
1. Put chuck steak in large saucepan or stovetop casserole pot with one tin of coconut milk and one tin of water. Add more water if the steak is not covered. Simmer on very low heat with lid on for one and half to two hours, until steak is almost tender. Remove beef from saucepan and set aside. Keep all the liquid.
2. In the same pan heat one tin of coconut milk until thick and oily and slightly reduced. Add curry paste and cook until fragrant.
3. Add meat and liquid back in with sauces, sugar, onions and potatoes and cook approximately 45 mins until potatoes are cooked and liquid has reduced and thickened slightly (If using pumpkin, don’t add until 20 minutes before serving).
4. Add peanuts and basil leaves just before serving. Serve on rice with green beans or broccoli.
CHICKEN & LEEK RICE

This one pot dinner was contributed by Louise a few months ago, but I’ve only just got around to giving it a go tonight. And I’m so glad I did! This was such an easy, yummy and affordable meal – exactly the kind of recipe this blog is about. Originally from Good Taste magazine, this tasty recipe made oodles and will definitely be one I grab when I next need a fuss free meal for a fair few people. As well as all these things, what I really like about this recipe is the fact that you probably already have all of the ingredients in the cupboard and it utilizes only one pot, so there’s not much washing up. And one more thing: to increase time spent with guests, you can prepare this recipe to the end of step 1 up to 2 hours ahead. Store in the fridge until ready to finish if off. Total cost is around $10 and serves 6+ adult size portions.
- 6 (about 1kg) chicken thigh cutlets
- 1 tbs plain flour
- 1/2 tsp Chinese five spice
- 60ml (1/4 cup) olive oil
- 2 carrots, peeled, coarsely chopped
- 1 leek, ends trimmed, halved lengthways, washed, coarsely chopped
- 3 garlic cloves, thinly sliced
- 600g (3 cups) long-grain rice
- 1L (4 cups) chicken stock
- 1/2 cup fresh continental parsley leaves
- Place the chicken, flour and Chinese five spice in a sealable plastic bag. Season with pepper. Seal and toss to coat.
- Heat the oil in a large heavy-based saucepan over medium-high heat. Add the chicken and cook for 2-3 minutes each side or until browned. Transfer to a plate.
- Add the carrot, leek and garlic to the pan and cook, stirring, for 3 minutes or until the leek softens.
- Add the rice and stir to combine. Add the stock and stir until well combined. Return the chicken to the pan. Cover and bring to the boil. Reduce heat to medium-low and simmer, covered, for 12-15 minutes or until all the liquid is absorbed. Set aside, covered, for 10 minutes to stand. Season with extra salt and pepper and sprinkle with the fresh parsley leaves to serve.
THAI CHICKEN & CORN CAKES

I made this modified Ainslie Harriott recipe for the first time last night and everyone loved it. The kids devoured these yummy Thai chicken and corn cakes and I loved them not just for taste but also for simplicity: everything just goes in the food processor for blitzing. And it was so affordable: the total cost being less than $10 (and it made 20 rissole sized cakes which is two dinners worth in this house). Next time I make hot finger food I’m going to roll them into little balls to dip in its sauce using a toothpick for a yummy starter. These Thai chicken and corn cakes are freezer friendly, which makes this recipe my new favourite.
- 3 skinless chicken breasts or 5 thighs (approximately 750g)
- 1 egg
- 2 garlic cloves
- 1 tbsp Thai red curry paste
- 50g breadcrumbs
- 1 x 400g tin corn kernels, drained
- half bunch fresh coriander leaves
- 4 spring onions, sliced
- 2 tbsp sesame or peanut oil
sweet chilli sauce
- 4 tabs sweet chilli sauce
- 1 teasp soy sauce
- 1 teasp fish sauce
- 5cm piece cucumber, peeled, seeded and finely chopped (optional)
- Roughly chop the chicken breasts and put all ingredients (minus the oil and sauce ingredients) together in the bowl of a food processor. Process until combined evenly, though ingredients should still be visibly distinct to the eye.
- With wet hands, pat mixture into 20 rissole sized cakes and pan fry on each side for 3-5 minutes, in a very hot fry pan using sesame or peanut oil.
- If desired, combine sauce ingredients in a dish (though sweet chilli sauce straight from the bottle is great with this dish too.
- Serve with mashed potato and steamed vegetables or a salad of asian greens. Makes 20 cakes, and serves 6+ adults.
TANDACO SOUTHERN FRIED CHICKEN

Though it’s true I’m not the biggest fan of packet mixes (they aren’t that cheap really, and often don’t taste that great), this Southern Fried Chicken coating mix is simply awesome. It doesn’t have that hideous packet mix ‘fake’ flavour, it goes a surprisingly long way and best of all, it’s one of the fastest ways get a decent dinner done at the drop of a hat. I tend to keep multiple packets of this in reserve for when the day ends much more crazily than was first planned or when the opportunity to have people over arises out of the blue. Use this shaker chicken mix on any type of chicken you like – drumsticks for affordability – wings for hot finger food that pleases a crowd – or thighs and breasts for a quick meat and three veg dinner. Simply coat chicken pieces in the mixture and roast in a very hot oven in a roasting dish splashed with olive oil and/or butter, at around 200-220 degrees, making sure you turn them before they burn. The chicken should develop a lovely brown stickiness all over. 1 packet of this Southern Fried Chicken coating does a bit more than 1kg chicken. Enjoy!
COTTAGE PIE WITH CHEESY MASH CRUST


I have always loved a good Cottage Pie and so have my family. It’s just so warming to eat and very easy to make. Every time I cook this, the kids devour the lot and it’s one of my favourites because it can be made en masse for the freezer or for a crowd of people if necessary. After our first child was born a lovely friend made us two of these to get us through those first newborn weeks – one for dinner that night and one for our freezer. She delivered them in oven-ready disposable foil trays and since then I have copied her serving idea stacks of times. If you’re keen to make this for a crowd (such as for a camp or church dinner), you might find it easy to use some of those massive disposable oven trays from the BBQ section of the supermarket. Using the quantities provided below this meal will cost you less than $13 and will easily feed 6 (maybe more).
For Mince Mixture
- 1kg beef mince
- 2 lugs of olive oil
- 1 onion, peeled and roughly chopped
- 2 sticks of celery, trimmed and diced
- 1 carrot, peeled and diced
- 100g bacon, thinly sliced
- 2 cloves of garlic, finely chopped
- 3 sprigs of fresh thyme, leaves picked or 1 tablespoon dried from pantry
- 1 x 400g can of diced tomatoes
- 3/4 cup frozen peas (if desired)
- 250ml beef stock
- 1/2 cup red wine (if you have it)
- 2 tablespoons corn flour
For Cheesy Mash Crust
- 1kg potatoes, peeled and thinly sliced
- 2 knobs of butter
- a few dashes of milk
- 1/2 cup finely grated parmesan cheese (or tasty if that’s all you’ve got)
- sea salt and freshly ground black pepper
- In a large pan (such as casserole pan, electric frypan or large stovetop frypan), add a little olive oil and cook the bacon on high heat until cooked and coloured. Add onion and mince and cook until everything is browned. Drain off any fat or liquid that results by elevating one end of the pan and decanting with a small cup or large spoon.
- Reduce the heat to low and add celery, carrot, garlic, thyme, tinned tomatoes, peas, beef stock and red wine. Allow the mixture to simmer for half an hour.
- While mince mixture is simmering, peel and slice potatoes, and boil covered with water until very soft and ready for mashing. Drain, add butter and milk until potato is a yummy mash. Add grated parmesan and season with salt and pepper.
- In a cup, mix corn flour with 1/4 cup water and add to mince mixture to thicken. Allow mince to thicken by turning up the heat for just a minute or two.
- Transfer mince mixture to a making dish. Top with potato and parmesan mash using a fork to give the potato a rough, textured finish. Bake in a hot oven of 220 degrees for 10 mins or until golden brown. Serve alone or with fresh crusty bread.
STEPHANIE ALEXANDER’S HOMEMADE PESTO WITH PASTA AND CHORIZO


I am a big fan of stir-through pasta sauces and regularly use store-bought ones for ease of use and lowering stress when it comes to meal times and hospitality. There are some really great tasting ones out there and I heartily encourage their use if it means making hospitality easier. Having said that, the recipe that follows for home-made basil pesto is just so easy and yummy that I had to share it with you. The bright green and powerfully flavoured pesto that results is worlds apart from its perfectly-fine supermarket counterparts. This Stephanie Alexander recipe is one that I’ve cherished for many years because of its taste, ease, affordability and versatility: make it ahead of time and store in fridge for a later use, such as a main pasta dish or on sandwiches or even as a dip with crackers and cheese. My favourite way to use it tossed through hot spirals of pasta with pan-fried chorizo cut into half-moon shapes with chunks of fresh capsicum. The quantities that follow make 250g of pesto and the photo above is a double quantity in a 500g jar. Depending on where you source your basil from, this little jar of basil bliss will set you back around $4.
- 1 cup firmly packed basil leaves
- ½ cup extra virgin olive oil, plus extra to seal
- ¼ cups pine nuts
- 2 cloves garlic, crushed
- Sea salt
- 60 grams parmesan, grated
- Put basil leaves, olive oil, pine nuts, garlic and salt in a blender or food processor and blend/process until smooth. Stop the machine once or twice and scrape down the sides with a spatula. Remove cutting blade and change blade to a fine grate. Put parmesan through the processor into the bowl on top of the basil mixture. Remove blade and mix well (or grate cheese with a grater and add to basil mixture and mix well).
- Spoon pesto into a clean and dry 250 ml-capacity screw-top jar. Press down with the back of a spoon to ensure there are no air pockets and seal with a film of olive oil. Store in the refrigerator.
JAMIE OLIVER’S POT ROAST MEATLOAF

We’d spent the day packing boxes, cleaning and packing a moving truck and at the end of it all we were emotionally and physically exhausted. Some dear friends had invited us for dinner that night, knowing that we would otherwise be having takeaway. As we wearily sat up at the table, this yummy meatloaf by Jamie Oliver is what they served up. Man, did it hit the spot! The filling meatiness energized us again and the warm, content feeling it gave was so very comforting. Over dinner, these friends allowed us to just be ourselves and didn’t expect anything of us after such a full-on day. We reminisced, and laughed together despite the tiredness and sadness we were feeling. It was one of those special times of togetherness expressed by these friends in humble generosity and it’s a memory that I treasure dearly. The meatloaf itself was the best I’d ever had and now whenever I make this dish, I think of that evening of genuine hospitality. Everything in this meal can be made ahead of time, so it’s perfect for having people over. The recipe that follows is mostly the original, though I’ve fiddled a little with the quantities to maximise size and affordability. Total cost, $10 and it serves 6.
- 2 medium onions
- olive oil
- sea salt and freshly ground black pepper
- 1 level teaspoon ground cumin
- 1 heaped teaspoon ground coriander
- 12 plain crackers, such as water crackers, Jatz or Clix
- 2 teaspoons dried oregano
- 2 heaped teaspoons Dijon mustard
- 1kg beef mince
- 1 egg
- 2 cloves of garlic
- ½ – 1 fresh chile, to your taste (leave out if you don’t like a little spiciness)
- 1 teaspoon smoked paprika
- 2 tablespoons Worcestershire sauce
- 1 x 400g can of chick peas, drained
- 2 x 400ml cans of diced tomatoes
- 2 tablespoons balsamic vinegar
- 2 sprigs fresh rosemary (dried is fine, if that’s all you’ve got)
- 6-8 slices of bacon
- 1 lemon
To make your meatloaf
- Preheat the oven to full whack.
- Peel and finely chop one of the onions—don’t worry about technique, just chop away until fine. Place in a large frying pan on a medium high heat with 2 lugs of olive oil and a pinch of salt and pepper.
- Add the ground cumin and coriander. Fry and stir ever 30 seconds for around 7 minutes or until softened and lightly golden, then put into a large bowl to cool.
- Wrap the crackers in a kitchen towel and smash until fine, breaking up any big bits with your hands. Add to the other bowl of cooled onions with oregano, mustard and ground beef. Crack in the egg, and add another good pinch of salt and pepper.
- With clean hands, scrunch and mix up well. Move the meat mixture to a board, then pat and mold into a large football shape. Rub it with a little oil. You can either cook it straight away or put it on a plate, cover and place in the refrigerator until needed.
- Place the meatloaf in a Dutch oven-type pan or baking dish, put into the preheated oven, and turn down the temperature immediately to 200 degrees celsius. Bake for a half an hour.
To make your meatloaf sauce
- Peel the other onion and chop into 1/4-inch pieces. Peel and slice the garlic. Finely slice the red chile. Place the onion, garlic and chile in a large pan on a medium high heat with 2 lugs of olive oil, the paprika, and a pinch of the salt and pepper.
- Cook for around 7 minutes, stirring every 30 seconds until softened and lightly golden. Add the Worcestershire sauce, chick peas, tomatoes and balsamic vinegar.
- Bring to a boil then turn the heat down and let it slowly simmer for 10 minutes.
- Taste the sauce and season with salt and pepper if needed.
To finish off and serve your meatloaf
- Pick the rosemary leaves off the woody stalks and put them into a little bowl. Remove the meatloaf from the oven and pour all the fat from the pan over the rosemary leaves and mix up well.
- Spoon your sauce around the meatloaf. Lay the slices of bacon over the top of the meatloaf and sauce. Scatter over the rosemary leaves.
- Put the pan back in the oven for 10 to 15 minutes, until the bacon turns golden and the sauce is bubbling and delicious. Serve with a mashed potato and steamed veg and some wedges of lemon for squeezing over—this will add a nice sharp twang.
SLOW COOKER SATAY

Here’s another slow cooker recipe to get you through the winter months. Our family really enjoyed this because the sauce isn’t too spicy, yet it has a definite satay flavour. This satay sauce can be used with your choice of beef or chicken such as drum sticks or diced thigh fillets. Doubling this recipe will almost fill a 5.5L slow cooker and will provide you with extra meals for no extra hassle. After researching my local area, I found that Coles had the best price for chuck steak ($8 per kilo), though I have seen it cheaper on special at various places. Quantities given below serve 6+ people and costs around $12 to make.
- 1kg diced beef (chuck or rump works best)
- 1 large onion, sliced
- 2 carrots, peeled and sliced into half moon shapes
- 1 400g can lite coconut cream
- 1 tab ground cumin
- 1 tsp curry powder
- 1/2 tsp coriander flakes (or fresh if you have it)
- 2 tabs soy sauce
- 2 tabs lime juice (I use squeezie from the fridge)
- 4 cloves garlic, crushed
- 2 tsp ground ginger
- 250 grams good quality peanut butter, (homebrand won’t do in this case!)
- salt and pepper to taste
- Place beef or chicken in the slow cooker along with the onions, carrots, spices, lime juice, garlic and peanut butter. Mix well to coat the meat in the flavours.
- Pour coconut cream over the seasoned meat and again, mix well.
- Cook on low for 8 hours. Check the flavour and season according to taste with salt and pepper. Serve on rice or mashed potato with steamed snow peas, broccoli and capsicum.
DONNA HAY’S PUMPKIN, RICOTTA & BASIL LASAGNE

- 1.2kg ricotta (buy it from the deli, not the fridge section, much cheaper!)
- 160g grated parmesan
- 6 tbsp chopped chives (if you have it)
- 8 tbsp shredded basil (if you have it)
- 1 rounded tbsp finely grated lemon rind
- sea salt and cracked black pepper
- 4 tbsp coarsely chopped oregano leaves (if you have it)
- 1.25 litres tomato passata
- 450g-600g lasagne sheets
- 1.5kg pumpkin peeled, seeded and sliced thinly (2-3mm)
- 100g grated mozzarella
- Preheat oven to 180C/160C fan/gas 4.
- Combine ricotta, half the grated parmesan, chives, basil, lemon rind, salt and pepper in a bowl and mix well. Stir oregano into passata.
- Place a layer of lasagne sheets into the base of a greased 20cm x 35cm baking dish (about 7cm deep, 3.5-4 litre capacity). Top with a third of the pumpkin and spoon over a third of the passata mixture. Top with a third of the ricotta mixture and another layer of lasagne sheets. Repeat layers, ending with a layer of lasagne sheets and the remaining ricotta mixture.
- Sprinkle with mozzarella and the remaining parmesan, cover with aluminium foil and bake for 1½ hours.
FAST FRENCH CHICKEN DINNER

I have a recipe for a yummy but somewhat complicated french chicken casserole, which is just not very achievable in a busy week. It’s unfortunate, because it tastes so good! The recipe that follows is my attempt to get around this problem. Using all the same ingredients, I’ve fiddled a bit to make something very similar in less than half an hour. If you’re worried about the fat content in the cream, feel free to replace it for lite and creamy evaporated milk, and if you don’t like mushrooms just leave them out. I hope you enjoy this fast, easy, affordable and gluten free dinner. Total cost less than $12 and serves 6.
- 2 chicken breasts, cut diagonally into 4cm (ish) lengths
- 4 rashers bacon, cut into strips
- 1 leek or red onion or brown onion (nicest with leek, but don’t go and buy one if you have onions)
- 200g mushrooms, sliced
- 400ml cream
- 1/2 cup fresh parmesan, finely grated
- 6 sprigs of fresh thyme (parsley and shallots work too. Just make do)
- In a large frypan, brown off bacon, leek and mushrooms. Remove from pan and set aside.
- Return pan to heat and brown chicken pieces on all sides, but leave uncooked in the middle. Return mushrooms, leek and bacon to pan with the chicken and pour over cream and white wine. Simmer gently with lid on for 15-20 mins stirring relatively often to prevent catching.
- While chicken is simmering, prepare any vegetables you’d like to serve it with (mash potato, carrots, beans and broccoli work well).
- Sprinkle thyme and grated parmesan over the chicken mixture and stir gently until melted and combined. Allow mixture to thicken and season with salt and pepper. Serve on mashed potato or rice with steamed vegetables.
SLOW COOKER BEEF STROGANOFF

Beef Stroganoff is a winter staple in our house. It’s a great choice for warming up on a cold night and it’s the sort of dish that stretches easily to accommodate others at the last minute. The recipe that follows started out as a Woman’s Weekly recipe from the 80’s but has morphed over the years into something that works in the slow cooker and takes my family’s tastebuds into account (we like it quite tomatoey). Please know that this recipe copes well with the addition of veggies such as carrots and green beans, which stretches it even further and improves the nutritional value – simply throw them in the slow cooker about an hour before serving. If you don’t have a slow cooker or need to make this in the late afternoon, simply halve the amount of beef stock and cook the whole thing in an electric frypan. The only catch is, that you will need to let it simmer away for no less than 1 hour to ensure the beef is nice and tender. Finally, a couple of comments about slow cookers: remember the versatility of using a slow cooker. I’ve often made this recipe after dinner when there’s less disruption and let the stroganoff cook overnight on low. In the morning it’s ready to divide up and freeze, refrigerate until dinner time or even give away to someone who needs it. Also, it’s important to know that getting something like this going in the slow cooker can take a good half an hour (though, that’s all it will require of you), so consider increasing the quantities to completely fill it – providing you with lots of meals for the future and the most economical use of your time. Doubling this recipe completely fills a 5.5L cooker. With the quantities listed below this dish will cost under $15 and serves 8.
- 1kg beef – rump (dearer) or chuck (cheaper) steak, diced or cut into thin strips
- 3/4 brown paper bag mushrooms, peeled and quartered
- 2 onions, sliced
- 3 cloves garlic, crushed
- half cup plain flour or cornflour
- olive oil for browning
- 2 cups beef stock
- half a large jar tomato paste
- half cup sour cream
- salt and pepper to taste
1. Toss strips of beef in flour and brown in a frypan on very high heat, a little at a time until the whole batch has been browned.
2. Add sliced onions, garlic, mushrooms, stock, tomato paste and stir well. Allow to simmer for a few hours or put it all in the slow cooker on LOW for around 8 hours.
3. Just before serving, stir through the sour cream and serve on either rice or fettacine.
HEARTY CHICKEN & VEGETABLE SOUP

Katrina put me onto this soup recipe a few weeks back and I thought I’d give it a go today. I tried it today because we’ve got a big week ahead (one of our kids is having their tonsils and adenoids out tomorrow), I wanted a meal to give away and I wanted to put the rest in the fridge for the number of lunches and dinners we’ll need quickly in the days to come. For all these reasons, I doubled the quantities and I really enjoyed the ease of this recipe – it only took around 20 minutes of peeling and chopping before sticking it on the stove to simmer. The ingredients list tells you to use chicken lovely legs, but today at my butcher, drumsticks were on special and lovely legs were not. I decided the saving in cost was worth the 5 extra minutes to remove the skin from each drumstick, and seeing as the recipe requires the removal of bones, I figured it didn’t matter that each leg was not shortened. The end result was yummy, full of good meat and healthy vegetables. Total cost, less than $8 and feeds 6-8. Thanks for the link, Katrina!
- 2 tablespoons olive oil
- 1 leek, halved, washed, thinly sliced
- 2 garlic cloves, crushed
- 1 large carrot, peeled, diced
- 2 sticks celery, diced
- 2 small zucchini, diced
- 1 swede or turnip, peeled, diced
- 1 1/4 cups dry soup mix, rinsed
- 8 cups chicken stock (I use powder cause it’s cheaper)
- 1kg skinless chicken lovely legs (or drumsticks)
- Heat oil in a large saucepan over medium heat. Add leek and garlic. Cook, stirring, for 2 minutes or until soft but not coloured. Add carrot, celery, zucchini and swede. Cook for 2 minutes. Stir in soup mix, stock, chicken and 1 cup cold water. Increase heat to high. Bring to the boil.
- Reduce heat to low. Simmer, partially covered, stirring occasionally, for 1 hour or until soup mix and vegetables are tender.
- Remove chicken legs from soup. Allow to cool slightly. Remove meat from bones. Roughly chop chicken meat and add to soup. Season with salt and pepper. Ladle soup into warmed bowls. Serve with bread if desired.
- Packet dry soup mix is a combination of split peas and lentils. You can find it near the chickpeas in the supermarket.
DONNA HAY’S SPICED FISH WITH SESAME-GINGER NOODLES

Another recipe from Donna Hay’s No Time to Cook, my friend Sonja made this for us for dinner last year – in my kitchen, so I just got to sit back and watch! I couldn’t believe how fast and yummy the whole dish was and so was keen to give it a go myself. When left to my own devices with no recipe, I normally really struggle to cook asian food that doesn’t all taste the same, but this simple recipe gets the balance of these readily available flavours just right without any stress. This recipe feeds 4 and calls for 4 firm white fish fillets, and I couldn’t believe that the 4 HUGE Basa fillets I picked up from the deli at Coles cost $4.80. The whole meal cost less than $8 and no more than 20 mins to make. I keep coming back to this recipe for all these reasons of simplicity and affordability, but also because I always think our family should be eating more fish and my brain struggles to think of anything but tuna (which not everyone loves). If you use gluten free rice stick noodles (such as Chang’s), this recipe is gluten and dairy free. And finally, if you don’t like much spiciness in asian food, go easy on the thai curry paste – and if you do like it spicy, go ahead and knock yourself out.
- 2 tsp sesame oil
- 2 tabs sesame seeds
- 2 tabs fresh ginger, grated
- 6 shallots or green onions, roughly chopped
- 2 tabs fish sauce
- 200g dried rice stick noodles
- 4 tsp red curry paste (if you’ve only got green in the fridge, that’s fine too)
- 2 tabs olive oil
- 4 firm white fish fillets
- 2/3 cup fresh coriander (if you have it and if you like it)
- 2/3 cup fresh mint leaves (if you have it and if you like it)
- Place a medium non-stick frypan over low heat, add sesame oil, seeds, ginger, shallots and fish sauce and cook for 2-3 mins. Remove sesame mixture from pan and set aside. Wipe pan clean.
- Place noodles in a heat-proof bowl, cover with boiling water for 10 mins until separated and tender.
- Combine curry paste and oil in a bowl and brush over both sides of the fish. Return the pan to low heat, add the fish and cook for 5 mins each side or until the fish is cooked through.
- Drain noodles, stir through sesame mixture and divide between plates. Top with fish and herbs to serve as well as steamed boy-choy if you’re keen.
DONNA HAY’S BALSAMIC CHICKEN STACK

I spotted this recipe a few days ago in Donna Hay’s No time to Cook. The recipe looked so yummy and easy that I had to give it a go and we all devoured it. Seriously, it took no longer that 20 minutes to cook the whole dinner and I was amazed at how moist the chicken turned out. This recipe allocates 1 small chicken breast per person, but ours were bigger, so we only used half a breast each (and with veggies underneath that was more than enough for each of us). So I’m thrilled that this ticks the affordable box as well as those of taste and ease. As well as all these things, this recipe is gluten, diary and egg free! The recipe that follows serves 4 and will cost no more than $10. Hope you enjoy it.
- 1 cup balsamic vinegar
- 2 tablespoon oregano leaves (dried is fine, fresh is better)
- 4 tablespoons brown sugar
- 1 teaspoon cracked black pepper
- 4 x small chicken breast fillets, halved lengthways
- 4 x spring onion, finely sliced or 1/2 cup basil leaves (roughly torn)
1. Decide what veggies you want to serve this with (I suggest steamed carrots, beans, broccoli and mashed potato) and get them going. Meanwhile, place vinegar, oregano, sugar and pepper in a medium non-stick frying pan over medium heat and cook for 3-4 minutes, or until the liquid has thickened slightly.
2. Add chicken and cook for 3-5 minutes each side, or until cooked through.
3. Stack up your chosen veggies on each plate (mashed potato works best on the bottom). Place pieces of chicken across the top. Drizzle the dish with the remaining vinegar mixture from the pan. Top with spring onions or bits of torn basil.
SANG CHOY BOW

We had one of the best of dinners tonight – not in the sense that the food was particularly wonderful, but in the sense that we thoroughly enjoyed hanging out with friends over a yummy, healthy dinner that was certainly good enough. I’ve been making this recipe for years and I love how interactive it is. The bits and pieces for each parcel were passed backward and forward over the table and people made up their rolls to suit their tastes. Originally from the Woman’s Weekly Cookbook, Low Carb, Low Fat, I’ve tweaked the recipe to be made in rice paper rolls, rather than lettuce leaves. I also add rice vermicelli noodles and fresh coriander to the table of fillings, to make the whole thing go further. Do feel free to make it work for you by adding crunchy vegetables or whatever fillings takes your fancy. Although the ingredients include pork and beef mince, I should tell you that I’ve often made this only on beef mince if that’s what I’ve got in the freezer, and it still tastes great. This recipe costs no more than $8 and serves 4 people generously. This recipe works well for bigger crowds simply by doubling or quadrupling the quantities.
- 1 tablespoon sesame oil
- 1 medium brown onion
- 2 cloves garlic, crushed
- 300g pork mince
- 300g veal or beef mince
- 1/4 cup oyster sauce
- 1/4 cup soy sauce
- 1 red or green capsicum
- 1 packed bean sprouts
- 3 shallots, roughly chopped
- iceberg lettuce leaves or rice paper rolls
- Extra elements to add to each roll (optional): rice vermicelli noodles, fresh coriander leaves and baby spinach leaves
- Heat oil in a wok; stir fry brown onion and garlic until onion softens. Add both minces; stir fry until cooked through. Add sauces and capsicum, reduce heat; simmer, uncovered, stirring occasionally 3 minutes.
- Just before serving, stir in sprouts and shallots. Serve in the centre of the table with little bowls of fresh coriander, baby spinach, rice vermicelli noodles and whatever vegetables you like. Wrap all these elements in your choice of lettuce cups or rice paper rolls . If opting for the latter, use a bowl of warm water from the kettle in the centre of the table to soften each rice sheet before wrapping the mince filling.
DONNA HAY’S OVEN BAKED RISOTTO


I first came across this recipe in Donna Hay’s Instant Entertaining and it’s now one of my favourites for large group catering, freezing for later or giving away when someone needs a meal. It’s such a hands-off recipe and is so versatile, allowing you to add whatever flavours you like. Tonight I’ve added chicken, sun-dried tomato and mushroom, though I’m keen to try it with ham, roast pumpkin and pine nut. The possibilities here are endless, so go with whatever you like or what needs using up in your fridge. For this variation, I added the sun-dried tomato strips to the stock and rice at the beginning so that they were nice and tender to eat and allowed about 50g of chicken per person. Total cost less than $10 and these quantities feed 12.
- 3 cups arborio rice
- 8 cups chicken stock (I use powdered, reconstituted with boiling water)
- 2 cups finely grated parmesan cheese
- 80g butter
- salt and pepper
- 500-600g chicken thigh fillets
- 1 small jar sun-dried tomatoes (cut into strips)
- half a bag of mushrooms, sliced
- parsley and or shallots (if you have them)
- Preheat the oven to 180 degrees.
- Place rice and stock (and sun-dried tomatoes) in a large roasting dish and stir to combine. Cover tightly with foil or a lid and bake for 45 mins or until most of the stock is absorbed.
- While the rice is cooking, cook up whatever add-in elements you like (in this case, fry the pieces of chicken and saute sliced mushrooms).
- Pull rice out of the oven, stir in the parmesan, butter and salt and pepper. Stir for 3-4 minutes until the risotto is thick and creamy. Add in extra elements and stir again. Add extra flavour with a handful of finely chopped parsley and spring onion. Serve with a side salad or top with steamed greens.
SUPER FAST PASTA

A friend made this dish for both our families for dinner last year and since then I’ve made it lots. The thing I remember about dinner that night was that my friend wasn’t caught up in the kitchen preparing dinner for the 9 of us- she was hanging out with us almost the whole night. Despite this, dinner was so delicious. This was a recipe I had to have! This super fast pasta is no stress at all to make and it’s the sort of food that brings people together as they munch down on these comfort carbs. A great recipe for inexpensive catering, and probably only a ‘sometimes’ dinner, but very, very yummy! Serves 6.
- 300g bacon or ham, sliced into thin strips
- half a bag of mushrooms, thinly sliced
- 1 leek or 1 small onion or 6 chopped spring onions
- 300ml cream or sour cream
- 500g packet of pasta such as spirals or penne
- salt and pepper
- handful of fresh parsley, finely chopped (if you have it)
- Put water on to boil in a pot large enough to cook the pasta.
- In the meantime, cook onions, mushrooms and bacon on high heat in a wok. Add cream and simmer on low heat until pasta is cooked.
- Drain cooked pasta and add to the wok. Toss the sauce and pasta together, season with salt and pepper and throw in the parsley. Enjoy!
FARMHOUSE CHICKEN PIE


I just love this delicious recipe! It’s a regular in our house because it’s full of healthy vegetables and due to the chicken and pastry involved, the kids happily demolish it. Originally a Woman’s Weekly recipe, I adapt it a little to include carrots and whatever vegetables happen to be rapidly going off in my fridge. Feel free to use any cut of chicken you like. We tend to buy a barbecue chicken for lunch after church on Sundays, and then use what remains of it for chicken pie on Monday night. This recipe is not at all difficult and it’s a good one to give away because it’s all in just the one dish. It takes quite well to being frozen (if you freeze it before cooking the pastry), and so makes for an easy dinner after a big day. These pies can also be made in ramekins for good portion control and a dainty look or, at the other end of the spectrum, in disposable foil oven trays for camps or giveaway meals.
- 2 tablespoons olive oil
- 400g chicken thigh fillets, diced
- 1 clove garlic, crushed
- 1-2 onions, diced
- 1 can corn kernels, drained
- 1 carrot, diced
- 1 red or green capsicum, diced
- 1/2 head broccoli, cut into tiny florets
- 1 tablespoon fresh parsley, chopped (if you have it)
- salt
- freshly ground black pepper
- 1-2 sheets of frozen puff pastry, defrosted
- 50g butter
- 2 tablespoons plain flour
- 750ml (3 cups) chicken stock or white wine
Heat olive oil in a large saucepan until hot, add the chicken pieces and saute for 2-3 minutes and remove from pan. Add to empty pan: garlic, onions, broccoli, and carrot and cook for approximately 5 minutes, or until vegetables have just started to soften. Add drained corn and diced capsicum, then quickly remove the vegetables from the pan and set aside in a bowl until required.
To make the sauce that binds it all together: Return pan to the heat, add the butter and flour and mix to form a paste. Pour in the chicken stock gradually, whisking constantly to incorporate the roux. When sauce has thickened, add the chicken and vegetables to combine. Place this pie filling in the bottom of an oven proof dish big enough for 6.
Top the pie filling with puff pastry and brush the top with an egg or milk wash. Bake in a preheated 220°C oven for 10 minutes, or until pastry has risen and is golden in colour. Serve in the centre of the table with crusty fresh bread.
DONNA HAY’S SIMMERED CHICKEN WITH BASIL

I first tried this recipe when a lovely friend provided us with this meal after the birth of our daughter. I’ve adapted it a little and added beans for a little extra nutrition. This is a quick recipe to make and costs around $7. Serves 4+ and is really easy to adapt for bigger groups by allocating 100g of chicken per person (thanks for this maths tip, Cynth!). This recipe is also dairy, egg and gluten free if you go with white wine instead of stock.
- 2 chicken thigh fillets or 1 large breast fillet (total 400g), thinly sliced
- 1 tablespoon olive oil
- 1 onion, thinly sliced
- 400ml can crushed tomatoes
- 60ml white wine or chicken stock
- 1 teaspoon sugar
- 1/2 cup roughly chopped basil leaves
- 1/2 cup pitted kalamata olives
- handful fresh green beans, head and tailed
- salt & pepper to taste
- shaved parmesan cheese (to serve on top)
- Heat oil in a large frying pan over high heat. Add the onion and garlic and cook for 2 mins until soft.
- Add the chicken and cook until brown in colour. Add the tomatoes, wine/stock and sugar. Simmer over low heat for around 10 mins so chicken cooks all the way through.
- Add a handful of green beans and simmer a further 5 minutes.
- Just before serving, throw in the basil and olives. Season with salt & pepper.
- Serve on rice or mashed potato.
HOMESTYLE QUICHE

I love quiche, but am not such a fan of the really fancy ones (you know the ones with artichoke hearts, asparagus and marinated eggplant etc…). I just like homestyle ingredients in my quiche, which is good I suppose, because it keeps the cost down. When I make the following quiche for my family, it gets totally demolished. This recipe is easy to do in large quantities using rectangular pie tins (see discussion in Serving Up) and makes 5 dinner sized portions. Total cost less than $6.
- 5 eggs
- 200 grams bacon, diced finely
- 1 onion, diced finely
- 1 cup grated cheese
- 1/2 cup milk
- 1 red or green capsicum
- 1 1/2 pieces ready rolled puff pastry
- salt and pepper to taste
- chopped parley (if you have it)
1. Get pastry out of freezer to thaw on the bench while you make the quiche filling. Preheat oven to 180 degrees.
2. Combine diced onion, bacon, capsicum, grated cheese and parsley in a medium sized mixing bowl.
3. In another smaller bowl, lightly beat the eggs, add milk and mix.
4. Grease the inside of the tart tin (I use olive oil or canola spray) and fit the pastry into the tin tightly, making sure all the pastry joins up.
5. Fill the tart tin evenly with the filling mixture and then pour egg and milk mixture gently over the top. Season with salt and pepper.
6. Cook in the oven at 180 degrees for 25 mins (though I would start checking earlier).
CHICKEN WITH ONION SAUCE

Once, before Steve and I were married he made this for me and some friends for dinner and it has become a winter staple in our family. To this day the recipe we use is from Steve’s Year 9 Food Technology project book, complete with hand-drawn pictures for presentation and all the processes highlighted in different colours. Originally a Woman’s Weekly recipe, it’s one of those recipes that would be considered very 80’s these days, but I kid you not- everyone always comes back for more. It uses chicken drumsticks which are so very affordable and all the other ingredients are standard pantry items. These quantities makes enough for 4 people, but I always double or triple it depending on numbers. To increase the nutritional value, I will often add some long green beans into the pot to simmer just at the end. This recipe can easily be cooked in a slow cooker. Just follow the steps exactly and replace the oven for the slow cooker. The slow cooker tends to give you a tender ‘shank’ type finish while the oven will keep the structure of each drumstick. With the measures provided this dish will set you back no more than $5. You can serve it on rice but our family likes it best on mash potato.
- 1kg chicken drumsticks
- 2 tablespoons oil
- 1 brown onion, sliced
- 400g can crushed tomatoes
- 1 packet french onion soup mix
- 1 tablespoon soy sauce
- 1 cup water
- 3 teaspoons cornflour
- 1 tablespoon water, extra
1. Heat oil and half the butter in frying pan, add drumsticks and brown.
2. Drain fat from the pan, add remaining butter and sliced onion, cook until tender
3. Add the undrained crushed tomatoes, soup mix, soy sauce and water. Heat through.
4. Place chicken in oven-proof dish, pour the sauce over, cover and bake in a moderate oven for 34 mins.
5. Remove chicken, pour sauce into pan, stir in blended cornflour and extra water, stir until sauce boils and thickens. Pour over chicken.

Where did you buy the Butter Chicken paste from? I can only seem to find the simmer sauce.
Hi Liv. I got it from Woolworths central Wagga.
Hey Jane,
Another winner! Thankyou!
We’re slowly working our way through your recipes and are loving it!
Thanks for sharing 🙂
Hi Lou. Glad you liked it! We’ve done it a few times now – perfect for post church lunch with friends. Thanks again, Wendy for sending it in!