ITALIAN AMARETTI WITH FRECKLES

Some of the people I love most in my life are gluten intolerant or suffer from coeliac disease, and seeing as hospitality is about bringing people together, I like to have yummy options up my sleeve that they can enjoy without having to go for something different to everyone else. Even better when something is dead easy, fast to make and freezer friendly too. And you don’t need to have special dietary requirements to enjoy these beautiful little buttons of goodness – everyone can enjoy these dense, chewy and nutty numbers with a kiss of chocolate on top for good measure. With ingredients at full price, this recipe from taste.com.au costs $18 to make, and while that’s a bit on the dear side for a batch of bikkies, the recipe makes an enormous 48 and isn’t at all disappointing like gluten-free biscuits tend to be.
- 500g almond meal
- 400g caster sugar
- 4 egg whites
- 1 tablespoon vanilla
- half a large packet of Allen’s freckles
1. Preheat oven to 160°C. Line two baking trays with non-stick baking paper. Place almond meal, sugar, egg whites and vanilla essence in a large bowl. Beat with a wooden spoon until well combined.
2. Roll teaspoonfuls of the mixture into balls. Place on the trays. Press a freckle onto the top of each ball.
3. Bake for 15-18 minutes or until light golden. Set aside to cool slightly on the trays before transferring to a wire rack to cool completely.
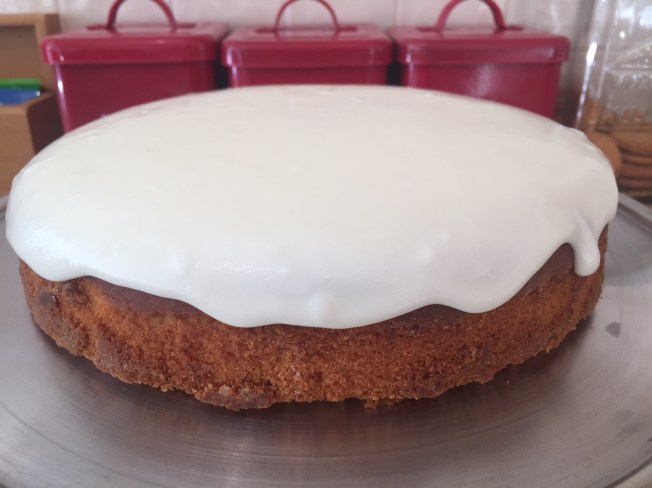
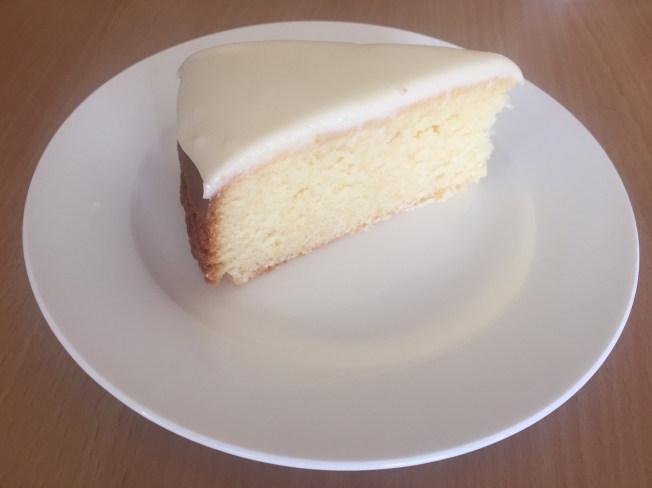
CHOCOLATE CAKE
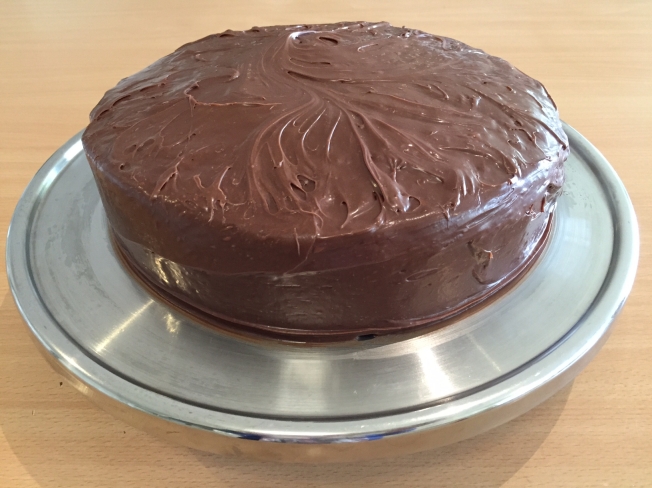
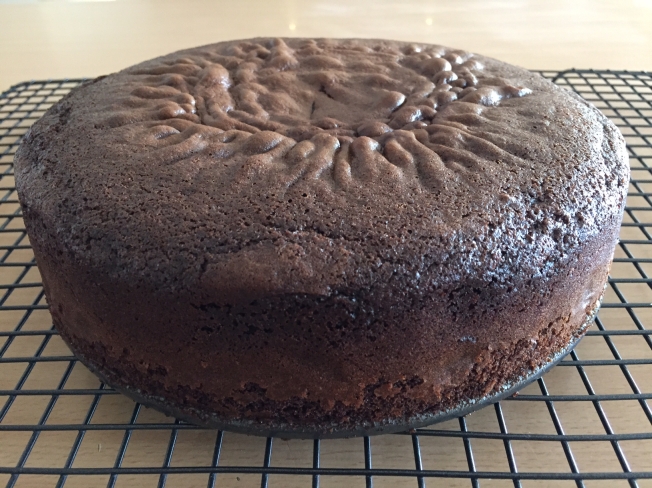
Earlier in the year my friend Jacqui gifted me with this gorgeous chocolate cake, ready to eat along with the recipe below, telling me how it’s a favourite in her extended family. We so enjoyed the cake she gave us and I’ve been keen to try it myself ever since, except for me, the ‘year’ has become the new ‘month’ and time has got away way too quickly. But as of yesterday afternoon it’s school holidays around here, and as much as I LOVE school holidays (no driving, sport, lunches, homework and washing uniforms) the thing that has the potential to drive me quite up the wall during this time is the constant question “Mum, what can I eat?”. So the ducks of need + time + energy have lined up and I’ve finally got around to making this lovely and dead-easy cake myself. This moist cake cooks evenly and comes out shiny and rich looking, but best of all it’s light and chocolatey and very easy to eat. Costing less than $3 to make with ingredients you’re bound to already have in the pantry, this cake is simply awesome. Thanks for sharing it with us, Jacqui.
- 1 1/2 cups self raising flour
- 1 cup sugar
- 4 tablespoons cocoa
- 1 level teaspoon bi-carb soda
- 1 teaspoon vanilla
- 1 cup milk
- 110g butter, softened to room temperature
- 2 eggs
- Grease and line a deep 20cm round cake tin, and preheat oven to 150 degrees.
- Beat all the ingredients except the eggs together for about 2 mins. Add the eggs and beat for a further 2-3 minutes.
- Transfer cake mixture to greased and tin and smooth out evenly.
- Bake for around 50 mins, but start checking earlier with a skewer so cake doesn’t dry out.
- Ice with a simple mixture of icing sugar, butter, cocoa and a dash of milk, though as you can see I’ve used a jar of Betty Crocker’s chocolate icing cause it needed using up in my stores.
AMY HEAP’S LEMON BREAD
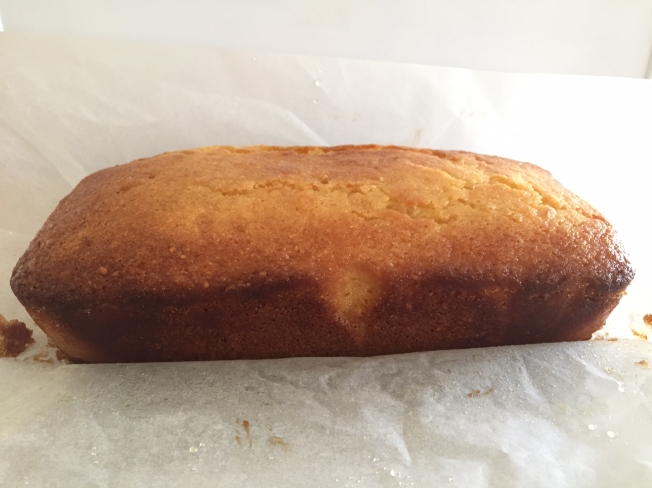
Since blogging about my prolific lemon tree lots of friends have sent me their winning lemon recipes, and so I’ve been enjoying the process of trying them out as needed, photographing and blogging about them (sorry I’m not faster at it… life doesn’t generally afford me the fun of cooking just for the sake of it!). Next cab off the lemon rank is Amy’s Lemon Bread, which she tells me is probably the cake she’s made more than any cake ever, and the one she still makes most often. This lovely loaf took little time and only a few dollars to make, lasted a good week in my take cake keeper and worked well with cream as dessert when needed. Thanks for sharing, Amy.
For the cake:
- 90g of butter
- 1 cup castor sugar
- 2 eggs
- 1 1/2 cups plain flour
- 1 tsp baking powder
- pinch salt
- 1/2 cup milk
- 1 dsp grated lemon rind
- 1 tbsp lemon juice
- 1/2 cup almond meal
For the lemon syrup:
- 2 tbsp lemon juice
- 1/2 cup castor sugar
- Preheat oven to 180 degrees.
- In a small saucepan or microwave jug melt butter and mix in the sugar. Transfer to a large bowl, and add eggs one at a time, mixing well as you go.
- Add sifted dry ingredients alternately with milk and then fold in lemon rind, juice and ground almonds.
- Pour into a greased or lined loaf tin and bake in moderate oven for 50-60 minutes, though start checking earlier if you’re oven is hottish or fan-forced.
- While cake is in the oven, prepare the syrup by stirring lemon juice and sugar in a small saucepan over low heat until the sugar dissolves.
- When cake is cooked and still hot and in the tin, gradually spoon over the lemon syrup. Allow to cool completely in the loaf tin.
NIGELLA LAWSON’S BANANA BREAD (Or my Rapidly Rotting Fruit Loaf)

This easy-peasy banana bread has become my frequent go-to for using up fruit that’s quickly losing freshness in my fruit bowl. Originally from Nigella Lawson’s excellent book, How To Be A Domestic Goddess, this banana bread is cheap to make, freezer friendly and super versatile. If bananas have become over-ripe I often throw them straight in the freezer whole, skins and all, and then thaw them out to use another time – upon defrosting the insides just slop right out of their skins, and don’t even need mashing. And this recipe copes really well with almost anything you want to throw at it: old, bruised strawberries, rhubarb, a drained can of pineapple chunks/crushed pineapple, a handful of nuts, crystalized ginger… whatever floats your boat. Just keep the bananas!) The loaf pictured above features rotten bananas, too-far-gone pears and a handful of frozen raspberries from the freezer, and cost about $5 to make.
- 175 grams plain flour
- 2 teaspoons baking powder
- ½ teaspoon bicarbonate of soda
- ½ teaspoon salt
- 125 grams unsalted butter (melted)
- 150 grams caster sugar
- 2 large eggs
- 4 small very ripe bananas (mashed)
- 1 teaspoon vanilla extract
Preheat the oven to 170ºC and line a loaf tin with baking paper. Put the flour, baking powder, bicarb and salt in a medium-sized bowl and, using your hands or a wooden spoon, combine well.
In a large bowl, mix the melted butter and sugar and beat until blended. Beat in the eggs one at a time, then the mashed bananas, along with any other fruit you’ve decided to use – just blitz it in your food processor first. Then, with your wooden spoon stir in vanilla extract and any other ‘bits’ you want – nuts, raspberries etc… Add all this to the flour mixture, then scrape into a loaf tin (23 x 13 x 7cm) and bake in the middle of the oven for 1-1¼ hours (start checking at 1 hour). When it’s ready, an inserted toothpick or fine skewer should come out cleanish. Leave in the tin on a rack to cool, and eat thickly or thinly sliced, as you prefer. Also can be toasted and spread with butter for a yummy brunchy breakfast.
DONNA HAY’S LEMON SOUR CREAM CAKE
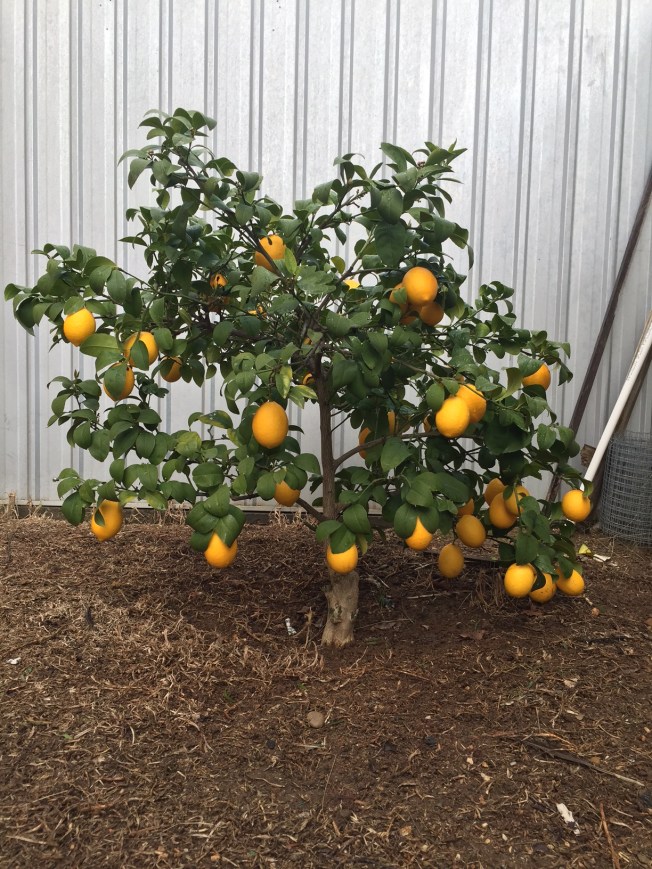
So my lemon tree is going bananas (check out my heavy-laden little tree!), which has seen me searching high and low for good lemon recipes. Ages ago a friend made this lovely cake for me when visiting with them and it was such a delightful thing to eat – zesty and fresh with a lovely depth and moistness resulting from the addition of sour cream. And trying it out proved so simple I could do it while catching up with an old friend on the phone. Make this cake in whatever shape you like – a ring tin is a lovely option, or do as I did and use a regular 22cm round one. This cake is a great when you’re in a rush cause it doesn’t matter at all if you need to ice it while it’s still a little warm – the drizzled glaze effect is perfect for this cakey genre. Turn it into a terrific dessert by serving with a dollop of cream and enjoy the cost effectiveness of this affordable option, which costs around $6.80 if you need to purchase lemons from a shop, and $3 less if you scrump some lemons from elsewhere.
For the cake
- 220g butter (melted or at room temp)
- 330g caster sugar
- 2 eggs
- 120g sour cream or cream or greek yoghurt
- 60 ml lemon juice / juice 3 lemons
- 2 Tbsp lemon zest / zest 2 lemons
- 300 g all purpose flour
- 2 tsp baking powder
For the lemon icing
- 320g icing sugar (sifted)
- 1 Tbsp lemon juice
- 2 Tbsp water (boiling)
- Preheat the oven to 160°C if fan forced or 170 degrees otherwise. Grease and line a 22 cm round or ring tin with flour and butter or baking paper.
- Place the butter, sugar, eggs, sour cream, lemon juice and zest in a stand mixer or food processor and mix well until batter is well combined and smooth.
- Add the flour and baking powder and whisk until smooth.
- Pour the mixture into a greased pan and bake for 40-45 minutes (or until a skewer inserted comes out clean). Cool in the pan for 10 minutes. Turn out onto a wire rack and take off the pan. Let it to cool completely.
- To make the lemon icing: place the icing sugar, juice and water in a bowl and mix to combine. Drizzle over the cake.
CARAMEL CHOC-CHIP FUDGE BARS

In my favourite baking cookbook, Belinda Jeffery’s Mix & Bake, there’s a recipe for Walnut and Caramel Bars that is awesome for many reasons, except that nobody at our place likes walnuts at all (my husband feels especially ripped off when they taunt him by randomly turning up in chocolate brownie), so I’ve avoided this recipe until now. I had a spare packet of Nestle milk chocolate chips hanging around in the pantry, and it occurred to me that this recipe could be just as good with the combination of chocolate and caramel flavours. And wow – it turned out beautifully! The base of this slice is lovely and short – pastry-like, buttery and crumbly without falling apart, and in the oven, the topping forms another three layers to create a total of four with the base: first a thin layer of caramel, followed by messy choc-chips underneath a layer of meringuey goodness that settles on the top. And I love the versatility of this one – it’s been used at our place for dessert with friends over for dinner, lunch box treats and afternoon tea following a big day. The quantities that follow make a very large slice in a 30x20cm tin, and produces approximately 40 pieces (for a regular lamington sized tin, just halve the recipe). Worst case scenario this massive slice costs just under $9 to make, but less if you stock up on chocolate chips when they’re on special or use a Homebrand variety.
BASE
- 320g plain flour
- 140g caster sugar
- 250g butter
TOPPING
- 4 eggs
- 140g castor sugar
- 140g brown sugar
- 2 teaspoons vanilla extract
- 2 tablespoons plain flour
- 2 teaspoons baking powder
- 1 teaspoon ground cinnamon
- 1 teaspoon salt
- 1 x 250g bag Nestle chocolate chips
- Preheat oven to 180 degrees and line a large 30x20cm slice/roasting tin with baking powder.
- Throw all the ingredients for the base into a food processor and process until pastry has formed and is well-combined. Press mixture into lined tin, setting aside the food processor to use again later (don’t bother washing it up) and use fingers or the back of a spoon to ensure pastry is evenly spread in the tin. Place in oven for 20 minutes or until golden brown.
- While base cooking, combine flour, baking powder, cinnamon and salt in a small bowl and set aside.
- Throw the two sugars, eggs, vanilla extract into the food processor and combine well. Add the dry ingredients from the small bowl and process again. Remove blade from the bowl of the food processor and stir in chocolate chips.
- Allow the base to cool for 10 minutes (doesn’t have to be completely cool) and spread the topping mixture evenly over the base. Bake again for 20 minutes, though start checking earlier. Once the topping seems set and brown, remove from the oven. It should still be a little wobbly as it will set further as it cools. Cut when cool. Enjoy!
ORANGE, POPPY SEED AND SOUR CREAM MUFFINS
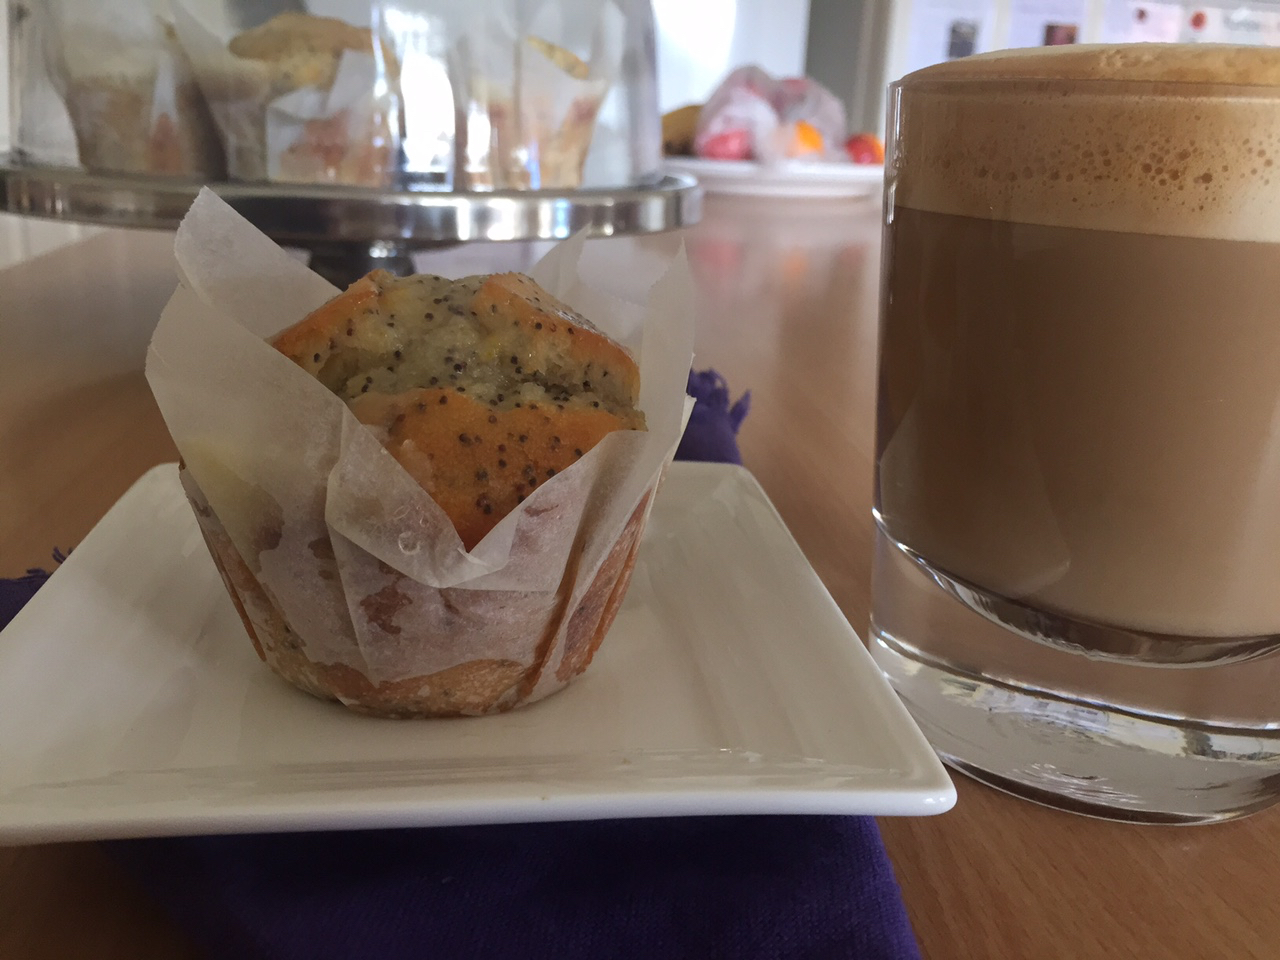
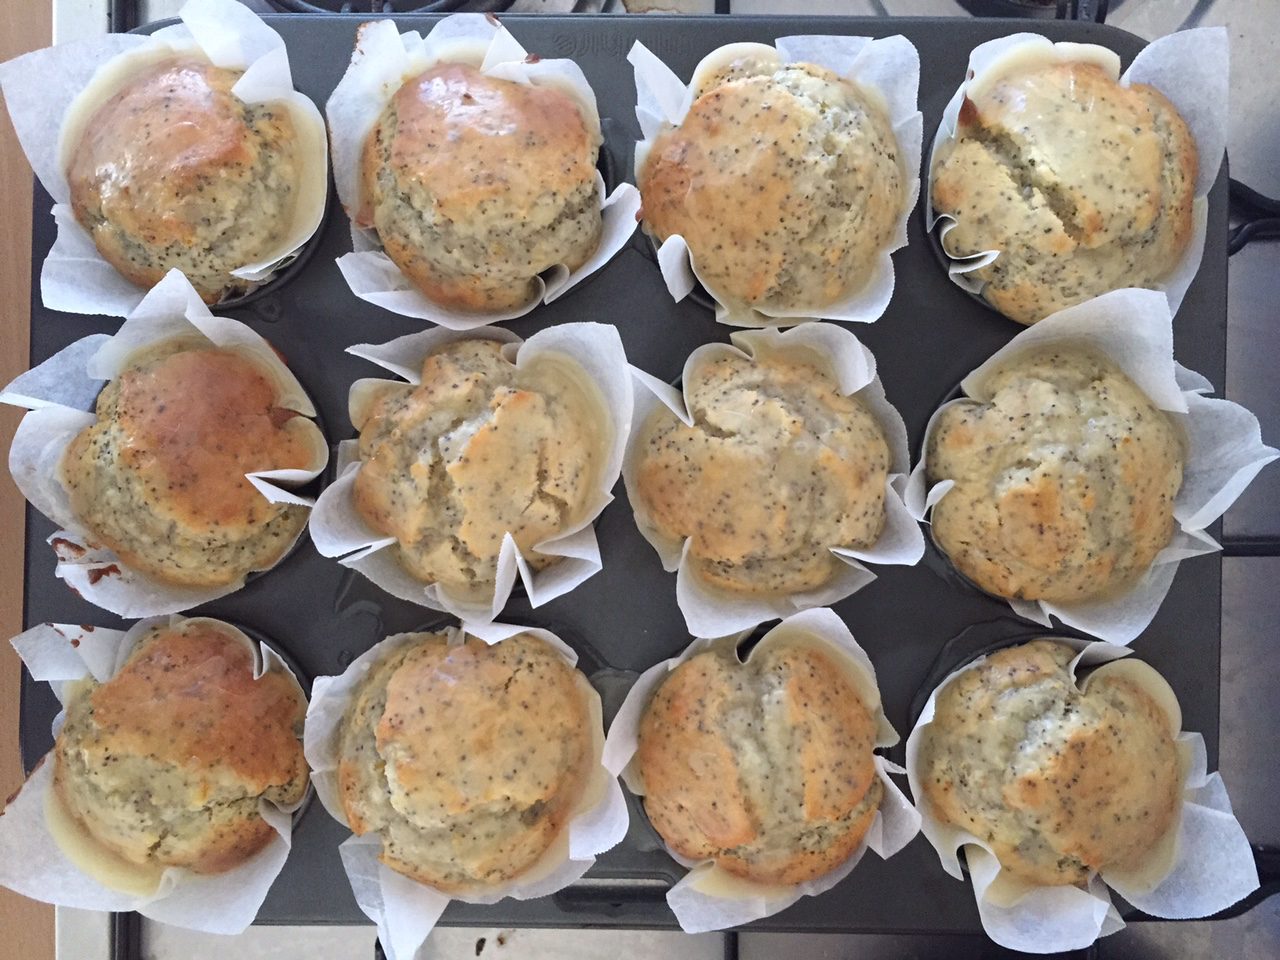
Recently, I was sucked in by the cover of Donna Hay magazine, which was adorned with the most gorgeous looking muffins. And despite needing to keep one good eye on reality (the deal-breaker for me was the feature in the middle of the mag which promised to help me pull off a wintery family picnic by the sea at which even the kids would eat freshly caught crab and indulge in home-made lemon jelly desserts – each with a fresh sprig of thyme), I have enjoyed reading the issue. Just for fun, yesterday I thought I’d have a go at making some of Donna’s made-over front cover muffins, but unsurprisingly, there were no chia seeds or ricotta cheese in my stores, so I gave Donna’s muffins a middle of the road make-over of my own, swapping chia, ricotta and lemons for oranges, poppy seeds and sour cream. These freezer friendly muffins were simple and affordable to make and the result was lovely fat and tasty, moist, fluffy and delicate muffins, which took about 10 mins to get in the oven and cost around $4.
- 2 ½ cups self raising flour
- 1 cup caster sugar
- 2 tablespoons orange zest
- ¼ cup poppy seeds
- 1 cup sour cream
- 2 teaspoons vanilla extract
- 1 cup greek yoghurt
- ½ cup vegetable oil (I use rice bran)
Orange Drizzle Icing
- 1 cup icing sugar
- 2 tablespoons orange juice
- Preheat oven to 180 degrees and distribute muffin cases among a 12 hole muffin tray (I like to use baking paper for this – just cut into squares, turn a small glass upside down and mould each paper square with 2 hands around the glass to get the needed shape).
- Mix the first four (dry) ingredients in a large bowl and set aside. Mix the wet ingredients in a smaller bowl and then combine with the dry, mixing until combined, but only just.
- Divide batter among lined muffin holes and bake for 20-25 minutes.
- While muffins are baking, mix sugar and juice together to make the drizzling icing. When muffins are brown and spring back slightly when touched, remove from oven and drizzle icing all over, glazing each. If you prefer the icing thicker and more like a topping, wait for muffins to cool before drizzling.
PEANUT BUTTER AND CHOC-CHIP SLICE

Often my dislike of baking biscuits sees me attempting to turn a biscuit recipe into one for a slice, and yesterday my friend Charmaine’s Facebook photo of her Peanut Butter Biscuits had me once again starting down this path. And yay – I think it worked! What follows is a slight variation (I added choc-chips) on the original recipe by Paula Deen, which results in a mouth-watering and chewy slice. It took me all of 5 minutes to mix up and whack this gluten free dessert option into a tin and then into the oven – just in time for a friend popping in for afternoon tea. Using the quantities below, this slice makes 24 pieces and costs under $6 to make, less if you prefer to leave out the chocolate. Thanks for the recipe, Charmaine.
- 500g good quality peanut butter
- 400g caster sugar
- 2 eggs
- 150g choc chips (homebrand are fine)
- dash of vanilla extract
- 2 tablespoons raw sugar
- Preheat oven to 180 degrees
- Combine all ingredients except raw sugar in a bowl and box well. Press into a lined 20 x 30cm slice tin using clean, wet hands. Sprinkle raw sugar evenly across the top of slice.
- Bake for 35-40 minutes (slice should be brown on top, firm around the edges and fudgey in the middle. If slice browns quickly, cover in foil for remainder of cook time. and allow to cool before cutting. Boil the kettle for tea and enjoy.
HOMESTYLE APPLE SLICE

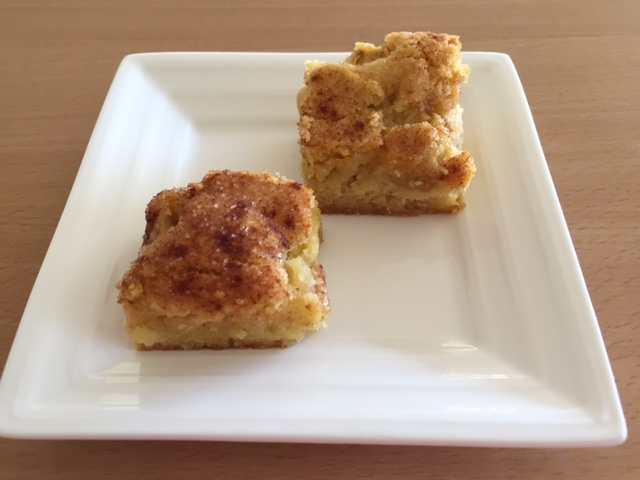
In the town I live there’s a terrific little fresh fruit and veggie shop that sources second quality, locally grown produce and I love it for many reasons: first, it’s cheap (if you shop there you can feed a family of four their fruit and veg for a week for around $10) and second, for the most part, the money you pay for the produce stays local. As a mum of two constantly hungry, growing kids, I’m so grateful for their everyday price of $1.50 per kg for red and green apples – this alone is worth the second trip to another store when doing the shopping! So when I saw this recipe floating around on Facebook a few months ago, the thought of making it didn’t make me panic at the price. It was such a simple slice to make, the result being a warm, fudgey, heart-warming offering – versatile enough to be morning or afternoon tea, or an easy dessert when served with cream or ice-cream. Using apples from Woolworth’s at $6/kg this recipe costs around $8 to make, though it works fine replacing the fresh apples with tinned ones too, making the cost $7. The quantities below fill a large roasting dish and yields 30-40 pieces of slice or enough dessert for a crowd of 30.
- 4 cups self raising flour
- 2 cup sugar
- 6 apples, peeled, cored and diced (I use the slinky apple machine) or 1.5 tins pie apple
- 250g butter or margarine
- 2 eggs
- 2 tabs sugar extra
- 1 tablespoon cinnamon
1. Preheat oven to 180 degrees and line a large roasting dish with baking paper.
2. In a large bowl, toss apples with self raising flour and sugar in a medium mixing bowl.
3. Melt butter in a small saucepan on the stovetop or in a small bowl in the microwave, and allow to cool a little. Stir in egg.
4. Pour butter and egg into the apple mixture and mix until combined.
5. Spoon into baking dish and evenly sprinkle extra sugar and cinnamon on top.
6. Bake at 180c for 35 to 40 minutes or until the top is golden brown and a skewer inserted into the middle comes out clean. If it goes brown very quickly, cover with foil and return to oven for remainder of the cook time. Eat while still warm with a scoop of icecream for dessert or store for snacking on with a cup of tea or coffee.
APPLE & PEACH CRUMBLE
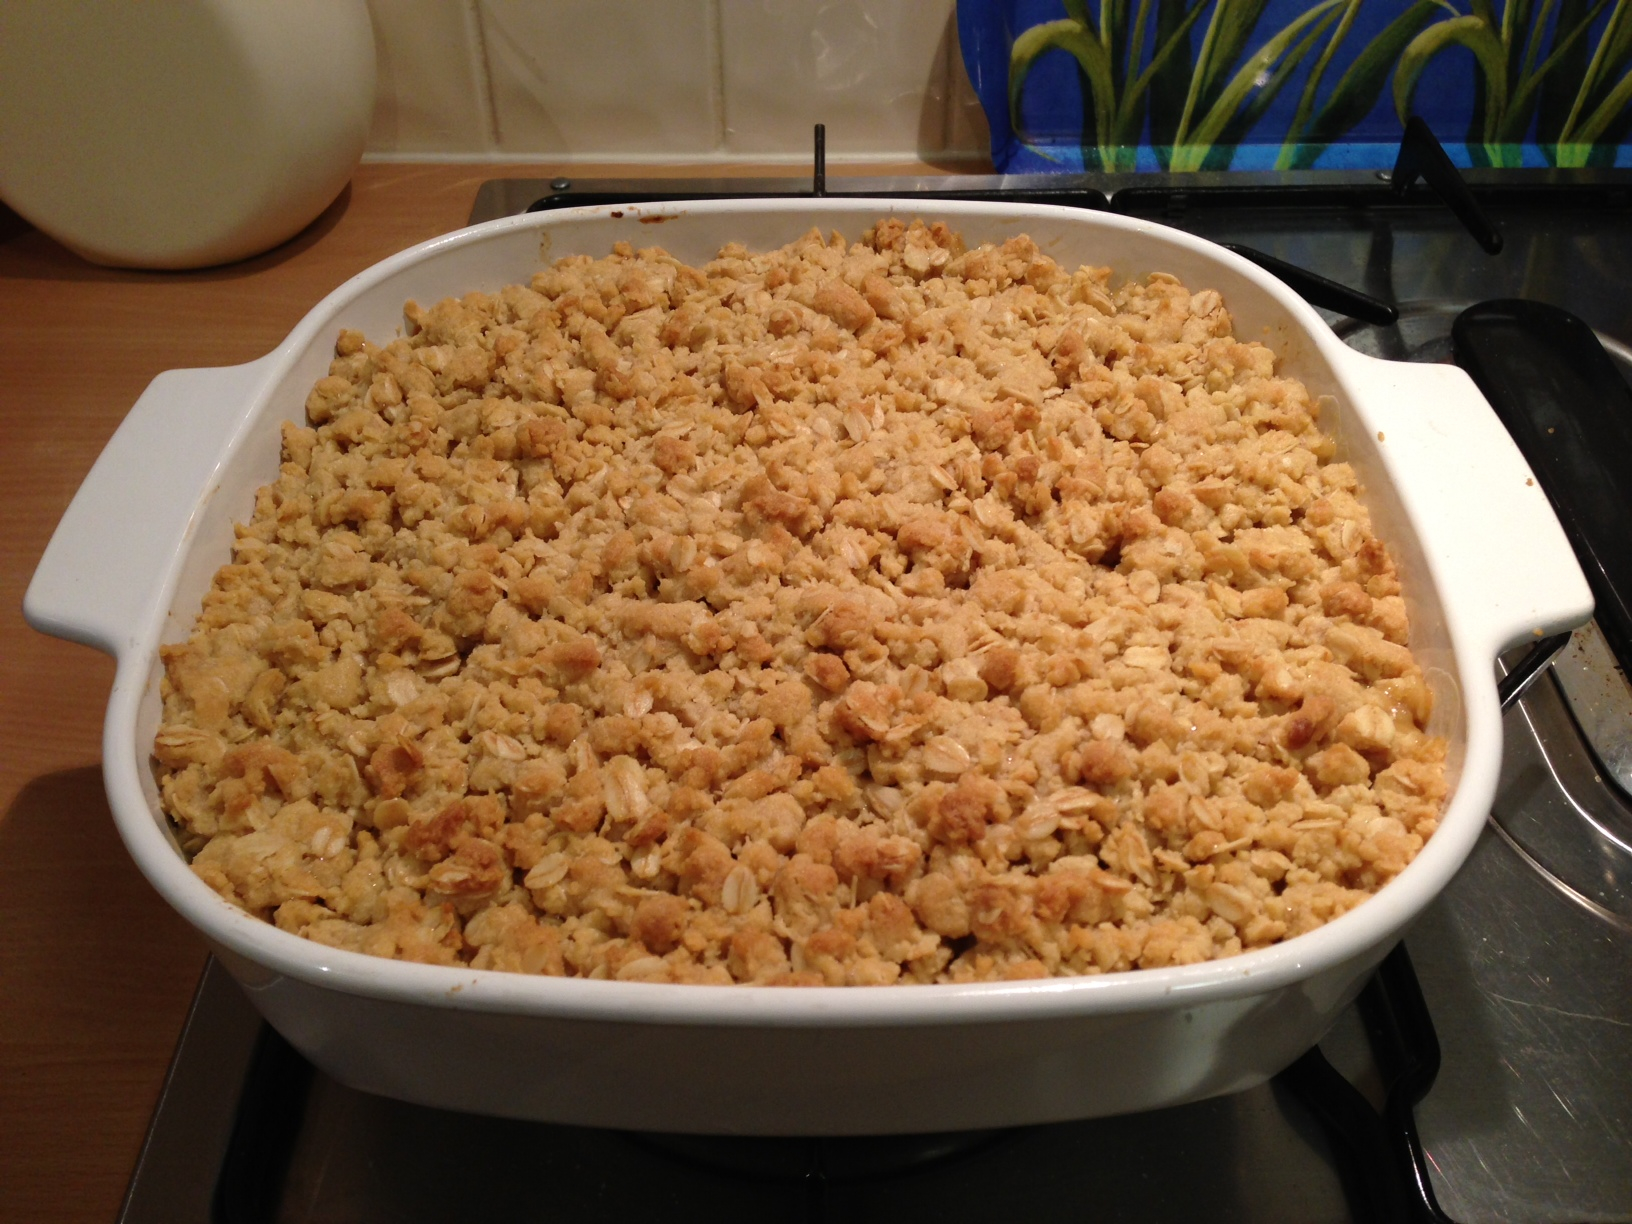
I feel almost as silly blogging about Apple Crumble as I did blogging about Honey Joys. It’s such a simple dessert to make, and there are tonnes of terrific recipes for it out there already. But for what it’s worth, here’s mine. When it comes to Apple Crumble, I’m a big believer in there needing to be as much crumble as there is fruit, that it should be crunchy and chewy all at once, and served with a spoonful of icecream. And in the middle of winter, how lovely is any dessert that has hot and cold elements in the same bowl? I can’t come at any recipes that call for butter to be rubbed into flour, so this one simply asks you to mix melted butter with the dry ingredients. Apple Crumble is so fast to make, and all the ingredients are easily stocked in the pantry, ready to go when needed. The recipe below serves 8-10 people, is quite fast to make, and costs around $9. Enjoy!
- 1 x 800g can peaches, drained
- 1 x 800g can pie apple
- 2 cups plain flour
- 1 cup brown sugar
- 1 cup rolled oats
- 250g butter, melted
- Preheat oven to 180 degrees and place peaches and pie apple in a medium sized baking dish.
- Combine all other ingredients in a bowl and mix together until combined, but mixture should still consist of lots of little lumps.
- Spread lumpy mixture evenly over the apple and peaches in the roasting dish and bake for 25 minutes or until golden. Serve with icecream, cream or custard.
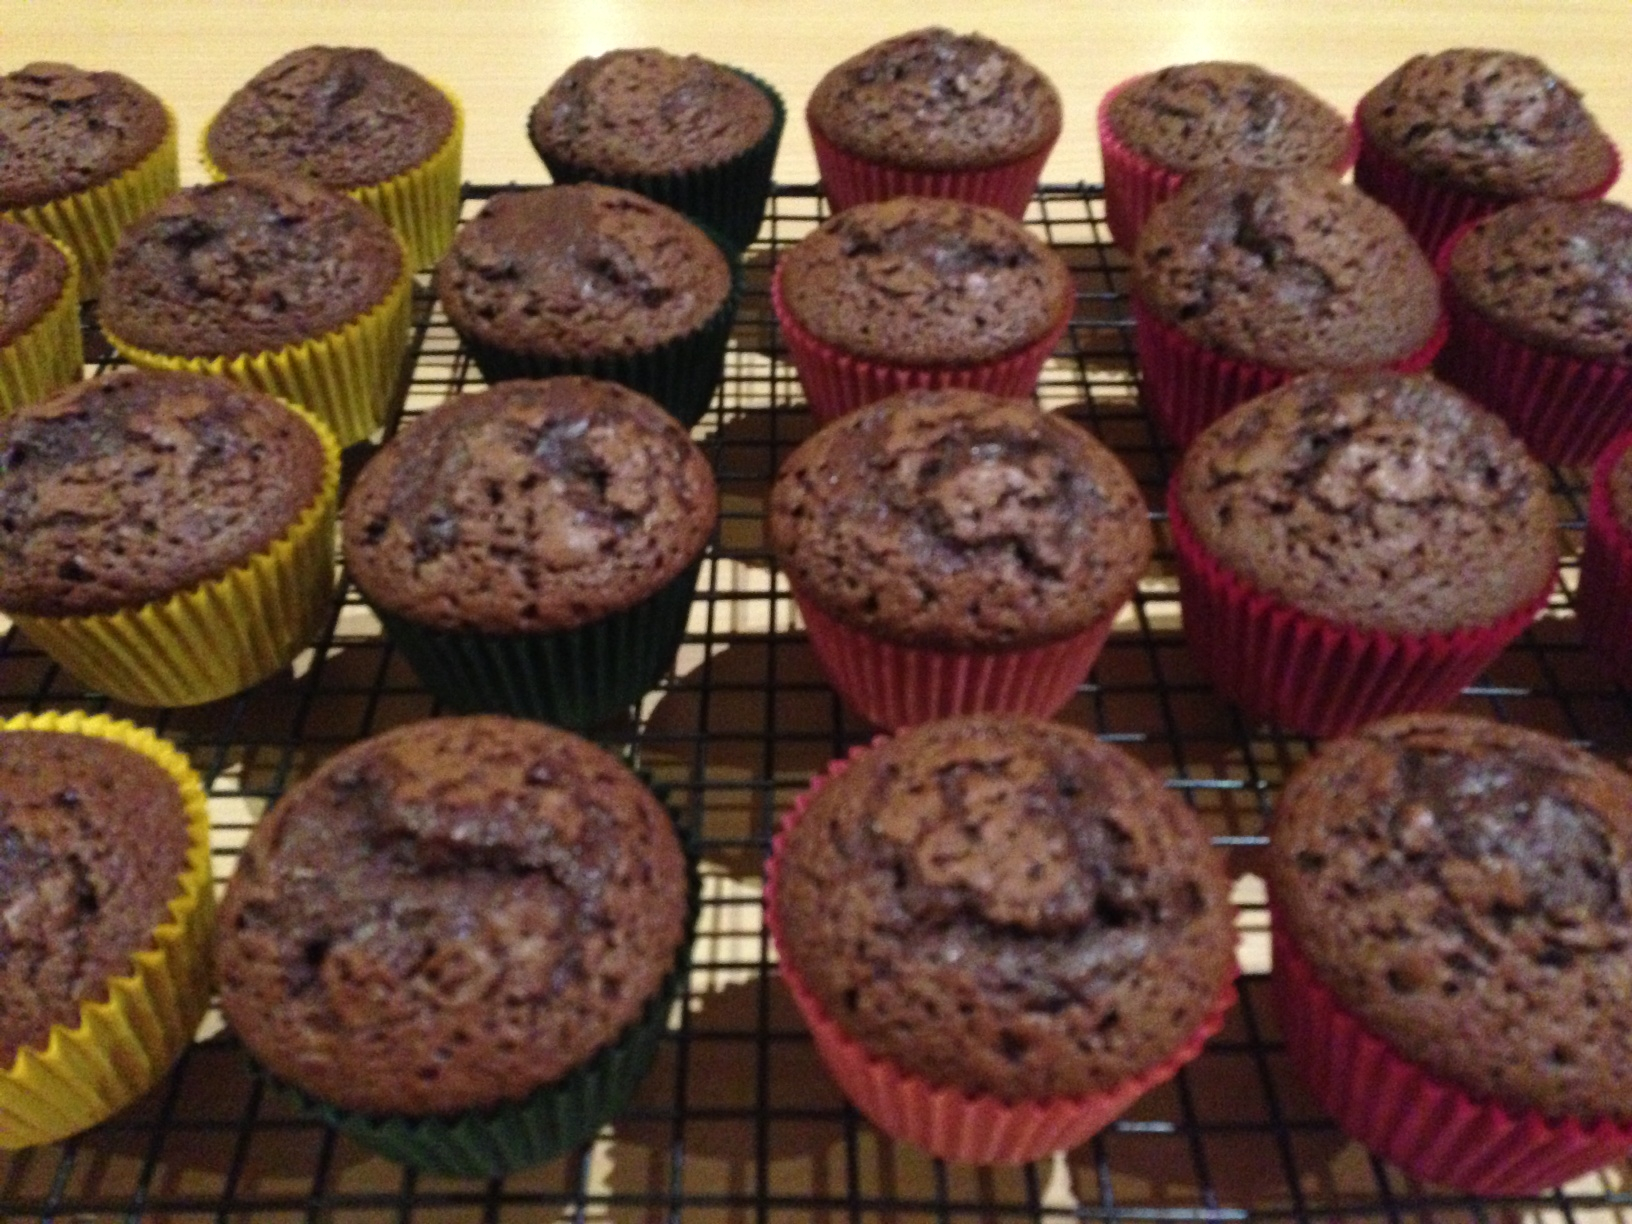
BIG BATCH TRIPLE CHOCOLATE MUFFINS

Sometimes you just need recipe for a big batch of something sweet – church morning teas, a terms worth of kids’ little lunches in the freezer or munchies for a group weekend away. These fudgey muffins hit the spot in many ways are super easy to make. You’ll notice this recipe deliberately calls for home brand choc-chips – this is because they are much smaller than the more expensive ones and go much further through the batter. Which results in much more chocolatey muffins overall – and they just happen to be the cheapest option! Using the quantities below, this recipe makes 70+ muffins and costs $17 to make, which is under 25c per muffin. Enjoy!
- 7 1/2 cups self raising flour
- 1 1/2 cups cocoa
- 2 cups brown sugar
- 3 x 250g packets home brand dark choc chips
- 1 x 375g packets white choc melts
- 1 1/2 cups vegetable oil
- 3 eggs
- 3 cups milk
- Preheat oven to 180 degrees (170 degrees if fan-forced) and distribute muffin cases among two 12 hole muffin trays.
- Combine dry ingredients in a large mixing bowl or a large, plastic all-purpose basin.
- In a separate bowl, combine eggs, vegetable oil and milk with a whisk and pour into the dry ingredients.
- Mix the dry and wet ingredients together, but don’t over-mix – everything should be only just combined.
- Use two dessert spoons to half fill each muffin hole and place trays in oven for 20 minutes – although if you, like I do, prefer them a bit uncooked in the middle, start checking earlier.
COCONUT POACHED PEARS
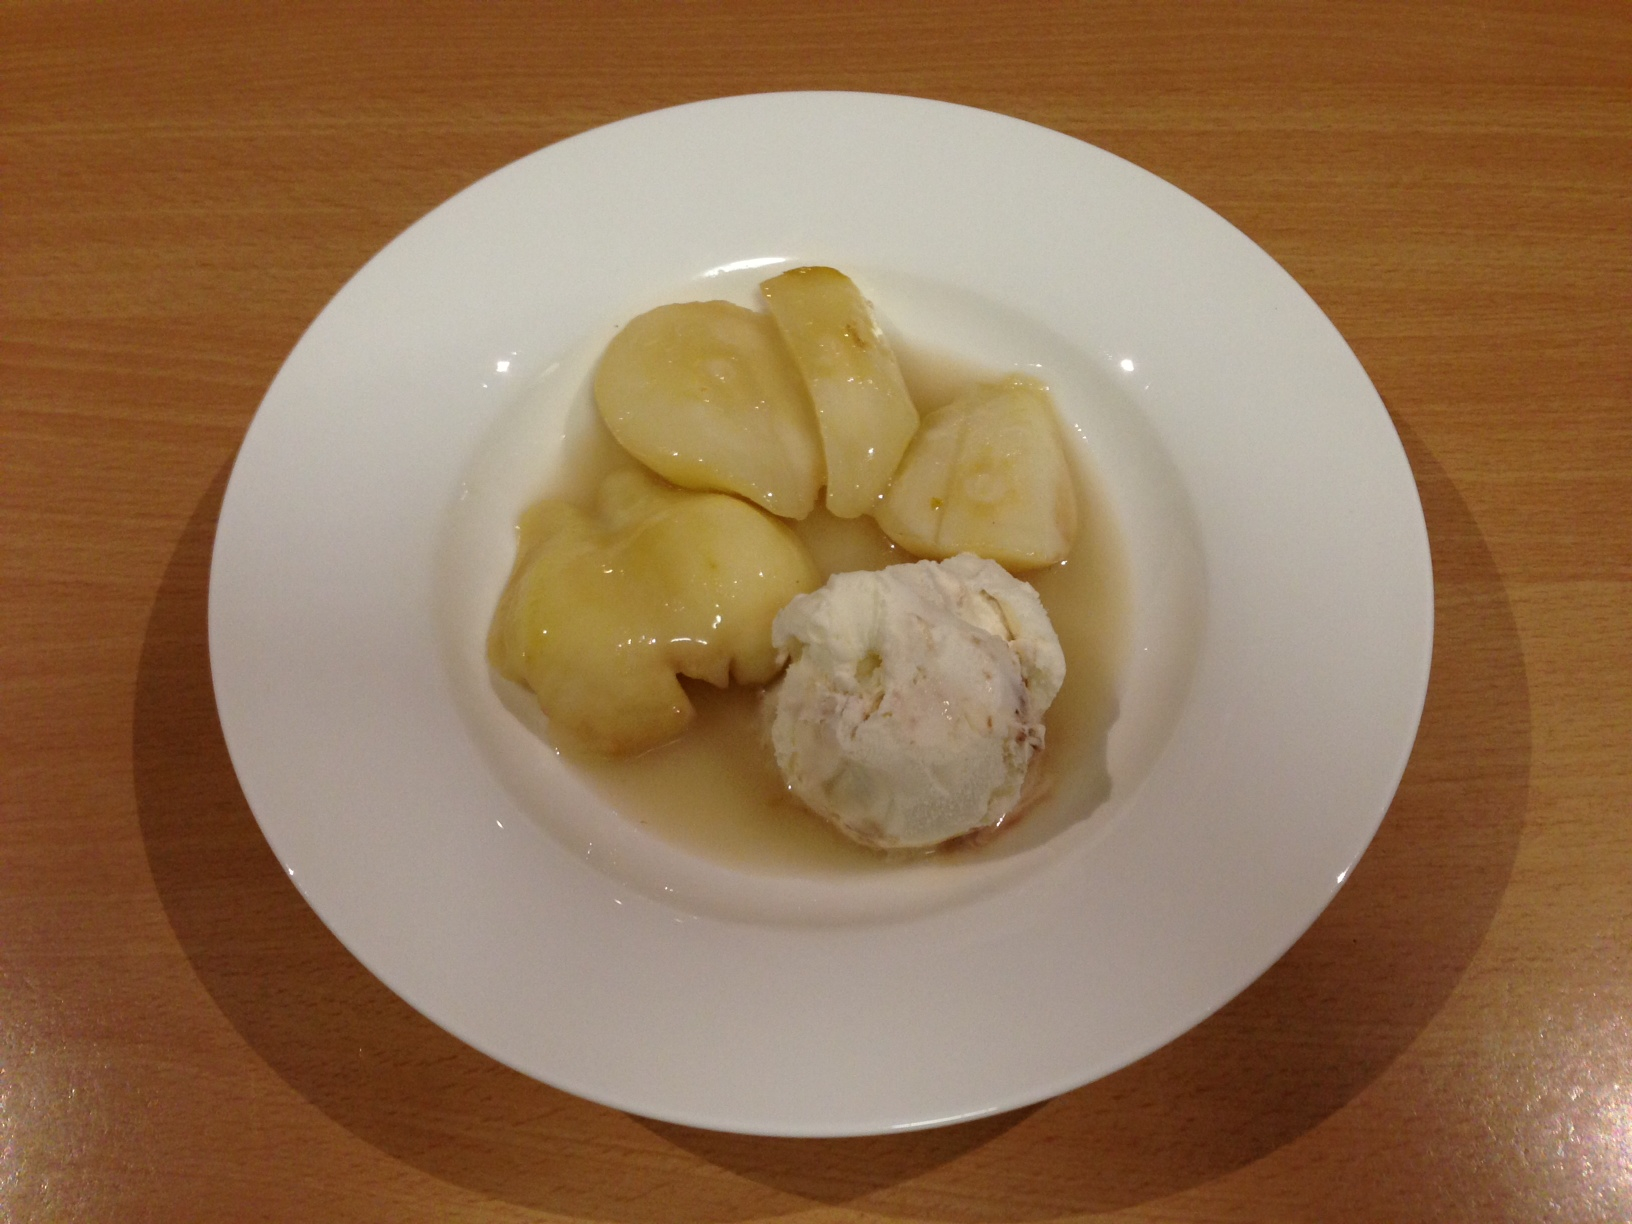
I love a dessert recipe that can be whipped up on the spot when having people over – the sort that take only a little time to make and for which the components need not be prepared beforehand at all. This recipe for delicate and tasty poached pears was given to me by my friend Emma and it was a lovely light finish to dinner – the short cooking time having allowed for mains to settle a little. For a large group of people, Emma suggests doubling the recipe and making them ahead of time, so they can be quickly warmed in the microwave and served whenever you need them. You’ll notice I didn’t bother trying to keep my pears whole, but of course if you’d like them so, use a deeper saucepan than the stovetop roasting dish I opted for, so that the pears sit deeply in the liquid when cooking. The quantities below serve 4 and costs less than $5 to make. Thanks for this wonderful recipe, Em!
- 2 cups Coconut Milk
- 1/3 C Caster Sugar
- 1 Cinnamon Stick
- 4 Ripe Pears, peeled, halved
- Place coconut milk, sugar and cinnamon into a saucepan over med-low heat until sugar dissolves. Do not let the milk boil as it will separate.
- Add the pears and cook 15 mins, or until soft, but not falling apart. Turn once.
- To serve, place pears in bowls and serve with the liquid and vanilla ice-cream. Delish!
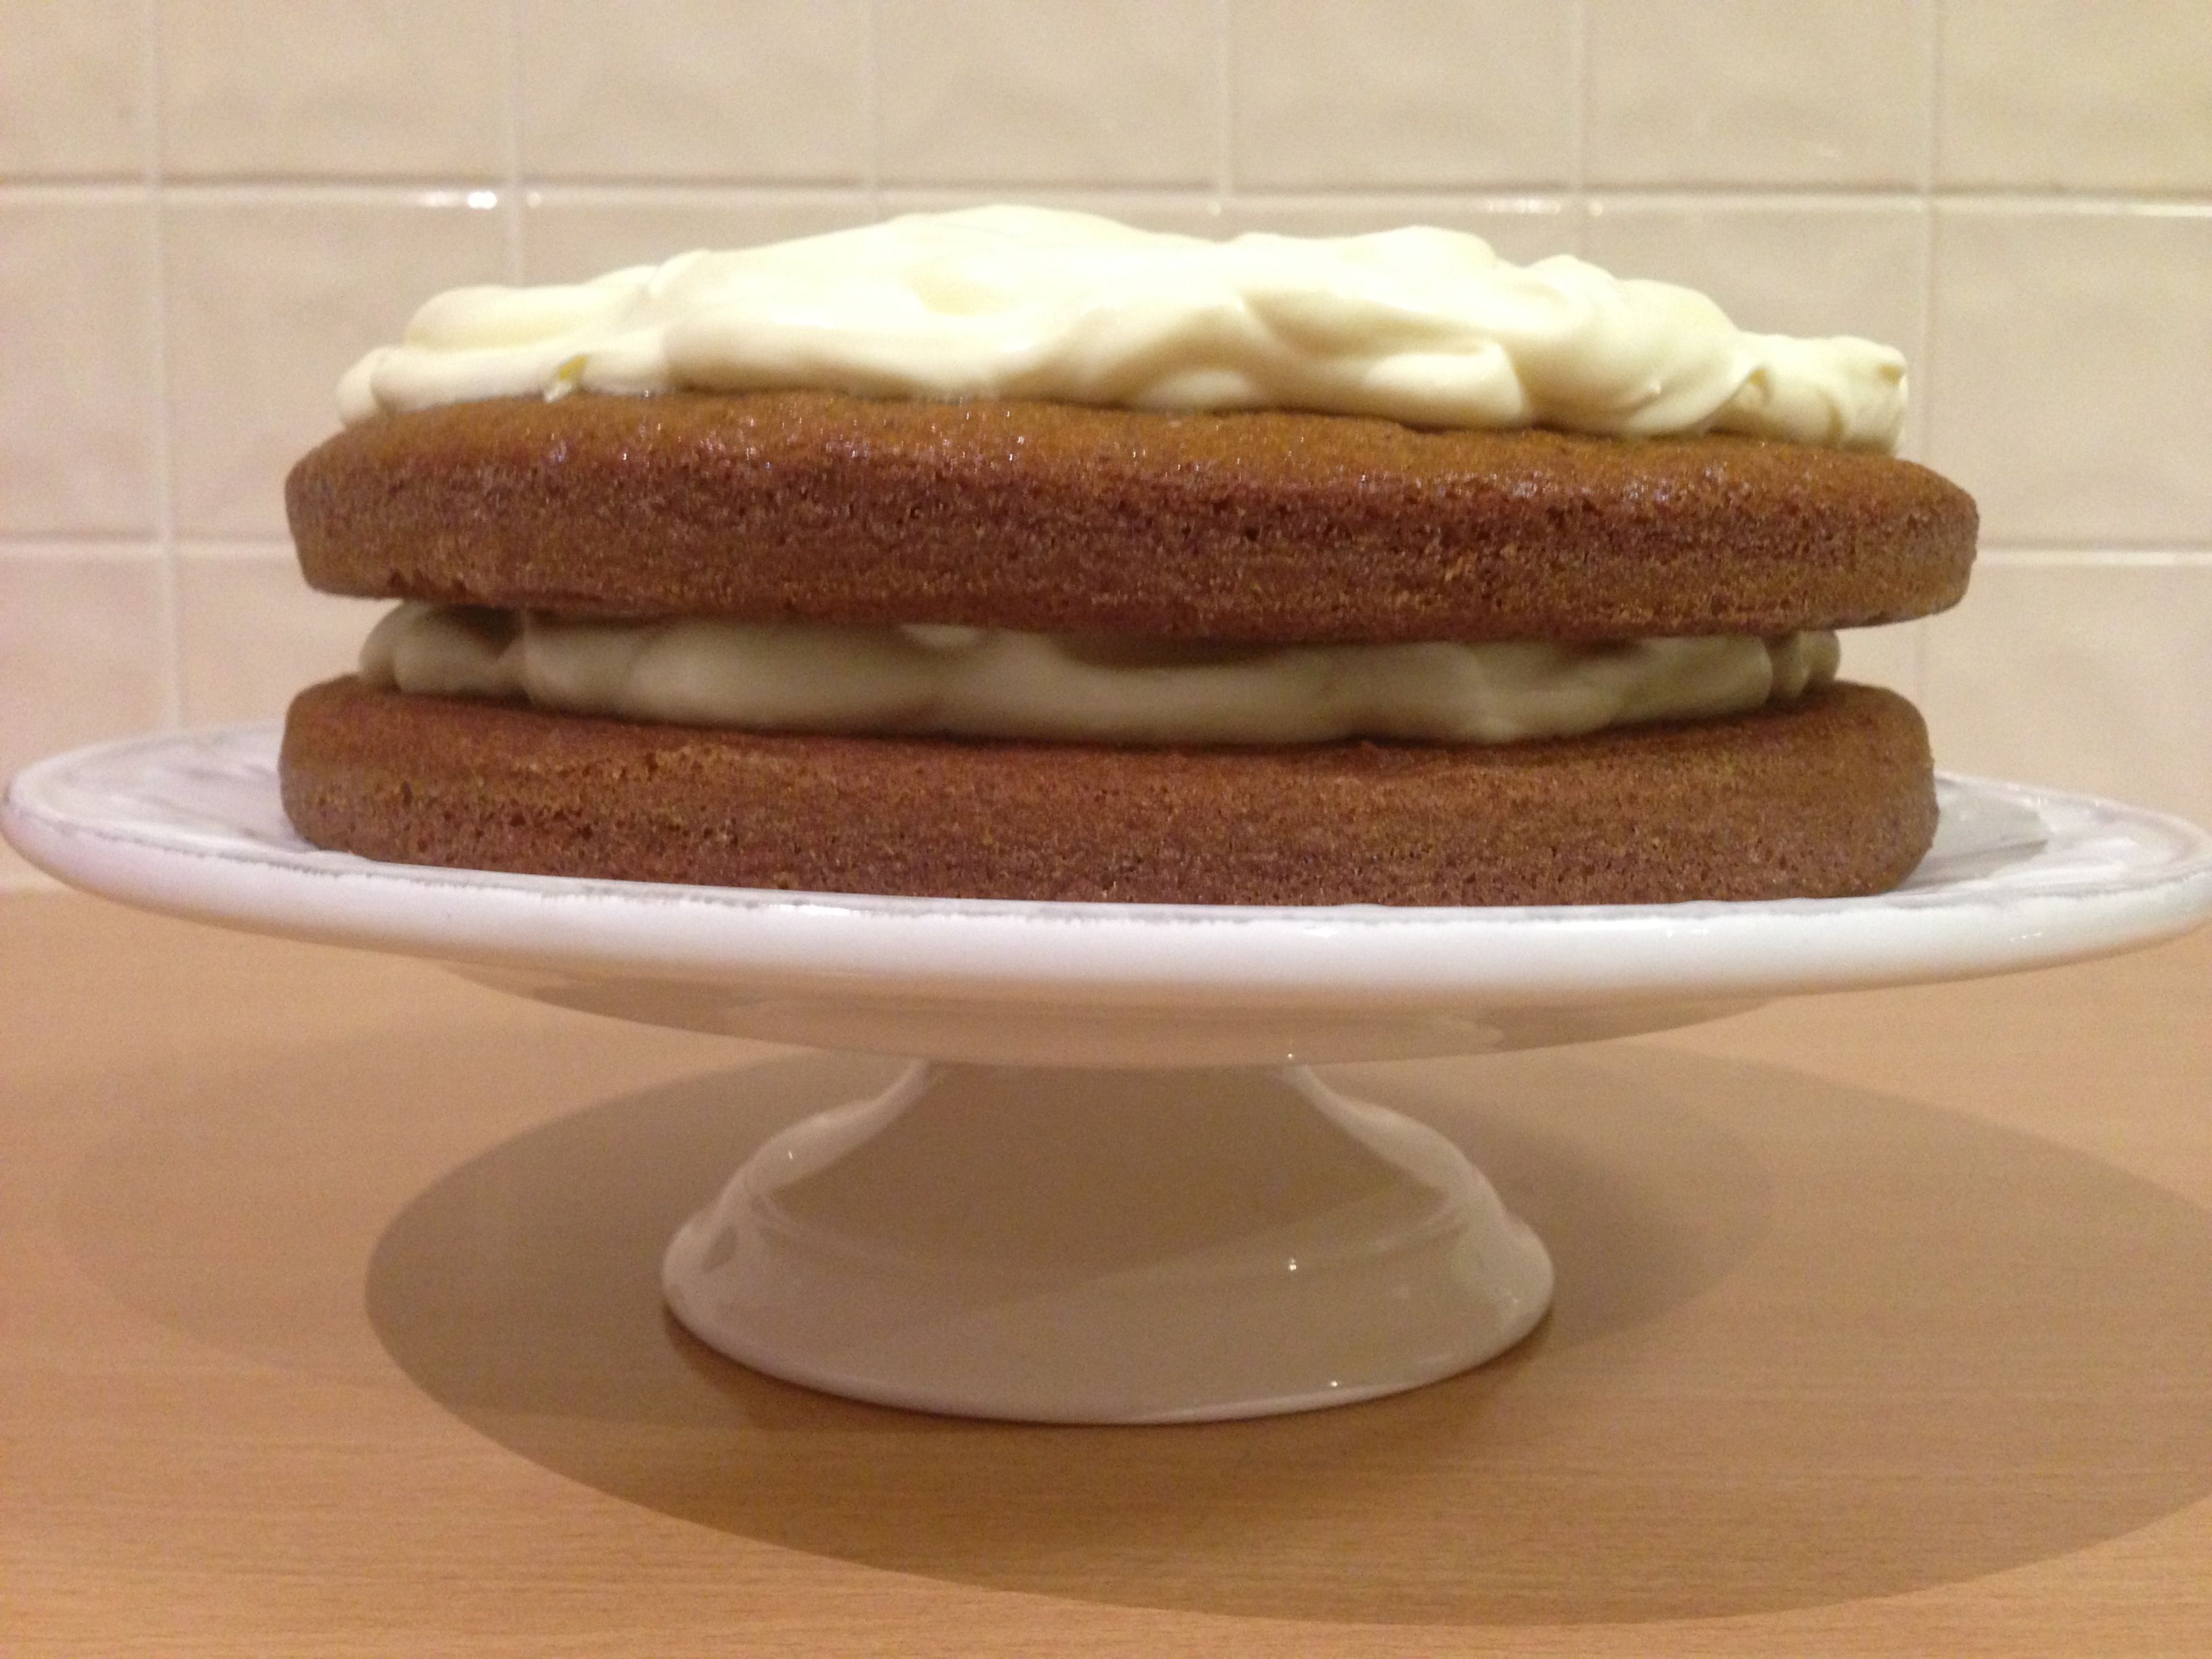
BELINDA JEFFERY’S MOST FABULOUS BANANA CAKE

When I was growing up, my mum’s favourite sweet was Banana Cake, so for as long as I can remember, it’s been my favourite too. To this day, I still prefer a carrot, apple or banana cake over the richness of their various chocolate counterparts (but hey – they’re all good, cause they’re all cake). So when I first started working my way through Belinda Jeffery’s Mix & Bake, this amazing recipe was the first cab off the rank, and I found it well-deserving of its name. Apart from the actual baking, every part of this recipe is made in the food processor which makes everything easy. And if you don’t already know this, I’ll share with you a tip my sister-in-law Jo taught me years ago: when bananas go off, you can throw them in the freezer whole – skins and all. When you want to use them, defrost them in the sink and stick the insides straight into whatever you’re baking. The freezing and thawing process causes the still edible insides to go to mush which means you don’t need to do any mashing. And over-ripe bananas make the best choice for banana cake anyway. This lovely big cake serves between 10 and 12 people and costs around $7.
Cake Mixture
- 1 1/2 (225g) cups plain flour
- 3 teaspoons baking powder
- 3/4 teaspoon salt
- 1/2 teaspoon bicarb soda
- 2-3 large very ripe bananas
- 1 2/3 (370g) cups caster sugar
- 2 eggs
- 125g butter, at room temperature, cut into smallish chunks
- 100ml butter milk (or a 100ml mixture of half yoghurt and half milk – I do this all the time)
- 1 1/2 teaspoons vanilla extract
Cream Cheese Icing
- 125g cream cheese, at room temperature, cut into smallish chunks (homebrand is fine)
- 75g butter, at room temperature, cut into smallish chunks
- 250g icing mixture
- 1 teaspoon vanilla extract
1. Preheat oven to 180 degrees (170 for fan forced) and line or grease and flour a deep 26 cm ring tin. Because this is a quite a large cake, if your round or ring tin isn’t very deep, you might like to cook the leftover mixture in a loaf tin – if so you’ll need to line/grease that too.
2. Put the flour, baking powder, salt and bicarb soda in the food processor and blitz briefly. Tip the mixture into a spare bowl and set aside.
3. Stick the bananas in the food processor and blitz until smooth. Add in sugar and eggs and process again for one minute. Add the butter and process again until mixture is thick and creamy. Add buttermilk or yoghurt and milk mixture and vanilla extract and blitz in quick spurts until combined. Add the flour mixture and continue this process until just combined – don’t overdo it.
4. Stick the bananas in the food processor and blitz until smooth. Add in sugar and eggs and process again for one minute. Add the butter and process again until mixture is thick and creamy. Add buttermilk or yoghurt and milk mixture and vanilla extract and blitz in quick spurts until combined. Add the flour mixture and continue this process until just combined – don’t overdo it.
5. Pour mixture into the ring tin and smooth out the mixture. Bake for 30-35 minutes or until a fine skewer comes out clean. The cake won’t have risen much as its quite a dense and moist cake. Cool the cake in the tine for 7 or so minutes and then loosen the inside and outside circles of the cake from the tin using a sharp knife. Turn onto a wire rack to cool completely.
6. For the cream cheese icing blitz the cream cheese and butter together until smooth. Add all the other ingredients and process again until you have a smooth, thick but spreadable icing. Ice the cake according to your preference once it’s completely cooled.
HONEY JOYS

I can’t really believe I’m blogging about Honey Joys. They’re such an Australian baking classic, yet I often forget about them as an option when needing to make a quick sweet something. My 7 year old son reminded me about them the other day, when he came home from a party asking if we could make them at home and I found myself wondering why I don’t make them more often.The recipe that follows is straight off the back of the Kellogg’s Cornflakes box and it really is dead easy and very cheap to do. If you need to make these gluten free, just exchange the cornflakes for the gluten free variety in the health food section of the supermarket, and do feel free to use homebrand flakes when making these as you really cannot tell the difference. The quantities below make 24 patty cake sized Honey Joys and costs around $2.
- 90g butter
- 1/3 cup sugar
- 1 tablespoon honey
- 4 cups cornflakes or gluten free cornflakes
- 24 patty papers
- sprinkles on top (if desired)
1. Preheat oven to 150 degrees celcius/130 degrees if fan forced. Distribute patty papers among the patty cake tins.
2. In a microwaveable bowl or small saucepan melt together all the ingredients except cornflakes.
3. Put cornflakes in a larger bowl and pour over sticky butter syrup, combining gently but well.
4. Distribute mixture with 2 dessert spoons among the patty papers. Sprinkle with sprinkles if desired. Bake in the oven for 10 minutes. Allow to cool before eating.
BELINDA JEFFERY’S COCONUT AND CARAMEL SLICE

Belinda Jeffery’s Mix & Bake is one of my all-time favourite cookbooks and it is the delightful original source from which I’ve adapted this Coconut and Caramel Slice. Pretty much every recipe in this book is a taste winner and it makes a wonderful gift for those who love to bake. This easy slice is excellent for hospitality because it makes a large quantity in one baking effort (so you can cater for more than one event in one baking session) and the coconutty caramel flavour atop the crumbly vanilla base it so very hard to go past. The quantities below make a very large slice and costs $8 to make (up to 40 pieces), though if you don’t need such a large amount, simply halve all the quantities and you will have a slice that neatly fits into a standard 28x18cm sized lamington tin for around $4. Easily freezable and with a refrigerated shelf-life of over a week, this is a great option to keep ahead of a busy week of hospitality opportunities or for even just a moments quiet rest with a cuppa and a good book.
Base
- 2 1/4 cups/335g plain flour
- 1/2 cup/80g icing sugar
- 250g cold butter
- 1 teaspoon vanilla extract
Topping
- 3 eggs
- 2 tablespoons coconut cream
- 1 tablespoon milk
- 2 teaspoons vanilla extract
- 45g butter, melted and cooled
- 1 cup/220g firmly packed brown sugar
- 1 tablespoon plain flour
- 1 1/2 cups/105g shredded coconut
- 50g flaked almonds for topping
- icing sugar for dusting (optional)
- Preheat oven to 180 degrees, (170 if fan forced) and line a large 32x24cm slice tin with baking paper.
- Combine all the ingredients for the base in a food processor and press evenly into the bottom of the tin. Set food processor aside and don’t wash it up yet. Bake the base for 20-25 mins until slightly golden. Set aside to cool. Reduce oven to 150 degrees, (140 if fan forced).
- While the slice is cooling slightly, put sugars and flour in the already used food processor and process together. Pull out the blade and gently stir in the shredded coconut. Set aside.
- In a large bowl, combine eggs, coconut cream, vanilla extract and melted butter using a whisk. Gently fold dry ingredients from the food processor into this wet mixture. Gently tip the whole topping mixture over the base and spread evenly. Sprinkle over the flaked almonds and bake for around 45 minutes, though start checking earlier. Slice is cooked when the topping feels set and the whole thing is evenly golden.
- Cool to room temperature and cut into squares or fingers as desired. This slice cuts especially well when cut with a large, sharp straight-edged knife and after spending some time in the fridge. Enjoy!
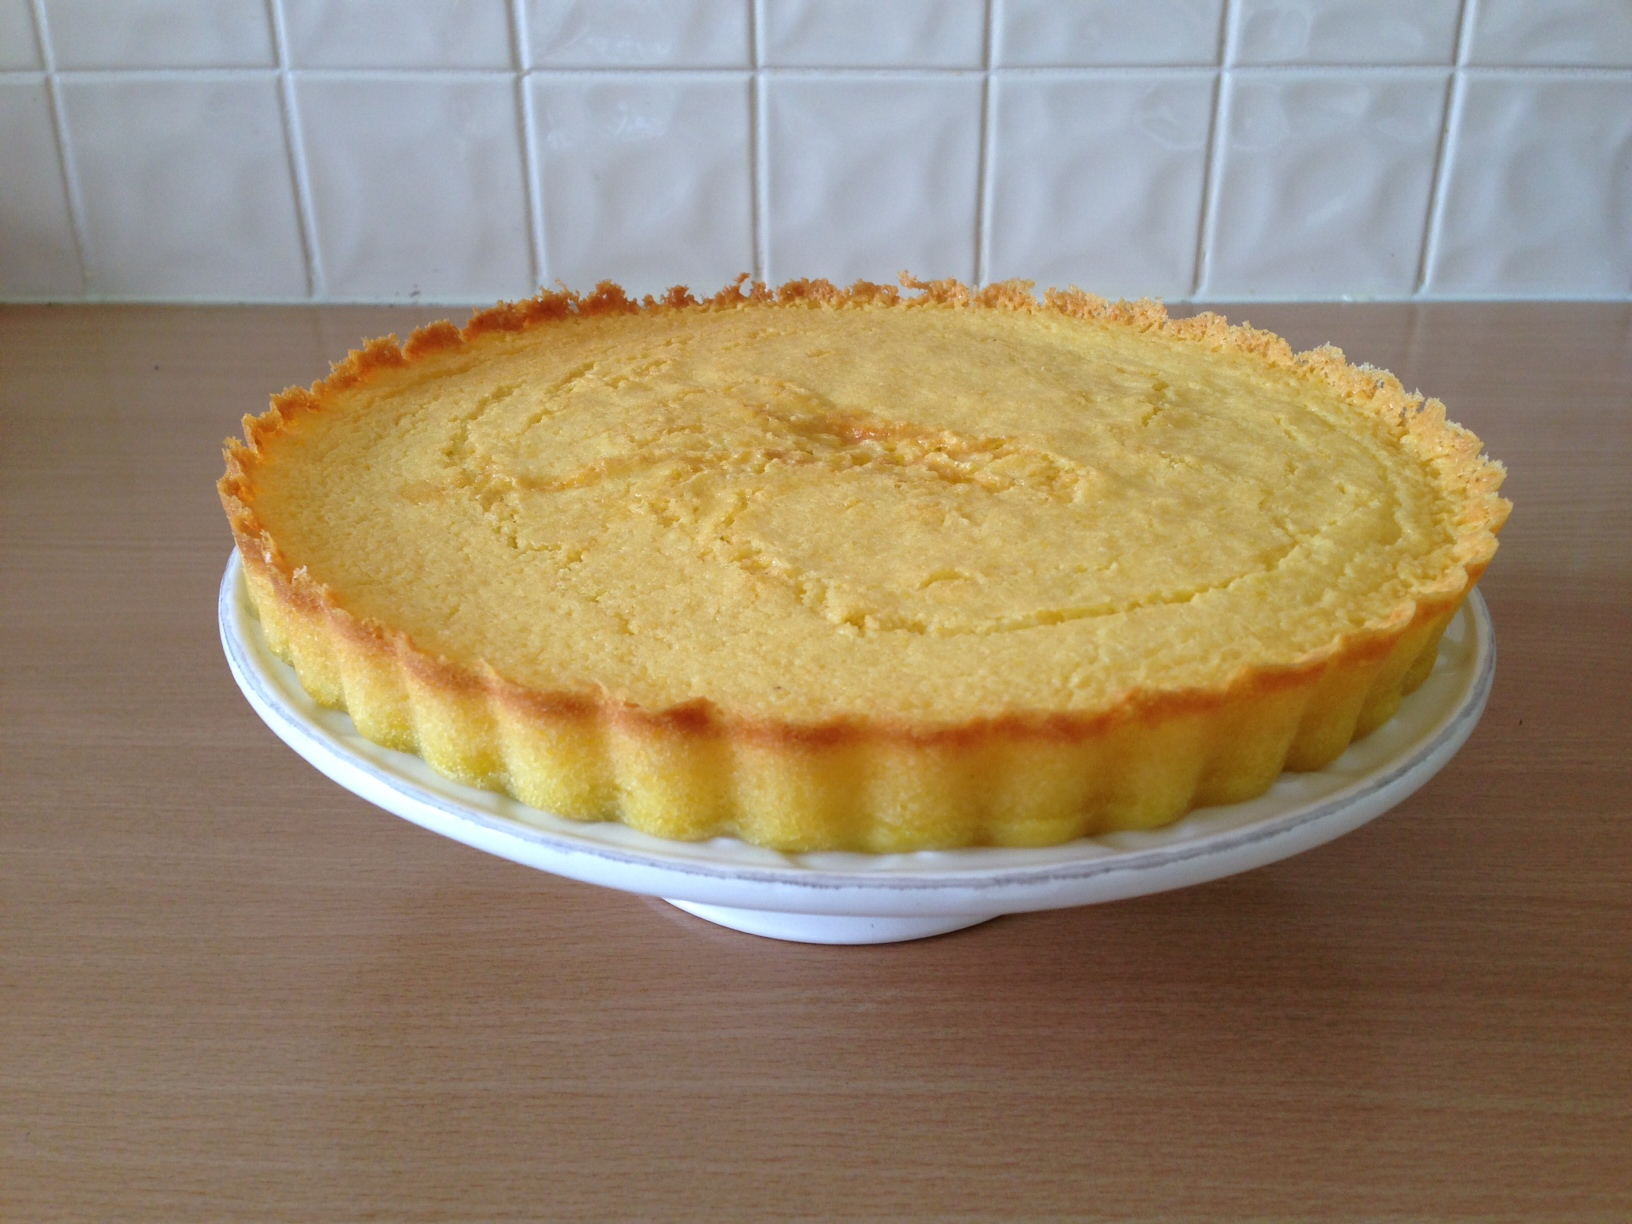
MARY BERRY’S JOLLY GOOD APPLE CAKE
Image
Image
The first time I made this cake, my husband was away and my delightful friend Catherine was staying for a few nights with her delightful children. As is not unusual for me, I was trying to do too much in the kitchen at once – baking a cake, cooking dinner and parenting my own kids all at the same time. I probably shouldn’t have been surprised (but I was!) when I loosened the cake from the spring-form tin and the whole thing went frisbee-like, straight into the nearby sink of dirty washing up water! But I persevered and made it again because this recipe is thoroughly deserving of its title: it’s the best tasting apple cake I’ve ever had the pleasure of eating, it’s quick to prepare using the food processor, it’s rich in flavour and quite good to look at without any real effort. If you’re not a fan of marzipan, don’t be put off by the small amount required – it melts all through the cake upon cooking and contributes to the sweetness and nuttiness of the cake without leaving isolated bits of it in your mouth. And do feel free to use tinned apples in this cake, though fresh ones taste a fair bit nicer and are not much work at all if you can use a slinky apple machine to do the hard work of peeling and slicing for you. Costing just under $6 to make, this cake serves 12 people and is delightful on its own for morning or afternoon or becomes a wonderful dessert with a dollop of cream or icecream. Thanks for sharing this one Nicola, and thanks for inventing it, Mary Berry (whoever you are!).
225g grams flour
1 level teaspoons baking powder
225g sugar
2 large eggs
half teaspoon almond extract
150g butter, melted
250g apples (approximately 3 medium sized), cored, peeled and sliced
50g marzipan
25g flaked almonds
2 tablespoons raw sugar for the top
Preheat oven to 170 degrees or 160 degrees for fan-forced. Grease and line a deep, loose bottomed tin.
In a food processor or mixer, combine flour, baking powder, sugar, eggs, almond extract and melted butter for 1 minute. Spread half the mixture in the bottom of the pan.
Slice apples and lay them on top of the mixture, dice and scatter marzipan over the top of the apples. Spread the remaining cake mixture over the top of the apples and marzipan, trapping them inside. Scatter the flaked almonds and raw sugar on top.
Bake for 1.25 to 1.5 hours, though start checking earlier. Cake is cooked when a skewer comes out clean of batter but moist from the apples. Cool in the tin and dust with icing sugar if doing so appeals.
NO COOK CHOCOLATE HEDGEHOG


There’s lots to love about this chocolate hedgehog, picked up by my husband from an former colleague. Unfortunately we’ve lost touch with Taleah, who first made it for Steve and a bunch of others for a work morning tea over ten years ago, but we still remember her fondly, partly because of this yummy slice! And it’s a terrific summer option because it’s chilled rather than baked and tastes great cold from the fridge or at room temperature. All the ingredients are easily kept in the pantry and quite literally this slice can be made in around ten minutes – a great option for last minute hospitality or as a quick addition to a meal being given away. Costing around $4 to make, this slice makes at least 21 slices.
- 1 x packet Nice Biscuits (or other plain biscuits)
- 125g butter, melted
- 125g sugar
- 1 egg
- 2 tablespoons cocoa
- Dash of vanilla
Icing
- 1.5 cups icing mixture
- 2 tablespoons cocoa
- a blob of butter
- dashes of hot water
- Line a 30x25cm lamington tin with baking paper
- Blitz biscuits to a rough crumb in food processor (don’t go too far – you want lumps of biscuits!). Remove the blade of the processor, and all other ingredients. Combine well and press mixture into the tin evenly, using the back of a dessert spoon. Refrigerate.
- While base is getting cold, mix icing mixture, butter and little hot water to make icing that isn’t especially runny or thick. Spread over biscuit base and sprinkle with sprinkles. Cut once cold and set.
ICE-CREAM SLICE
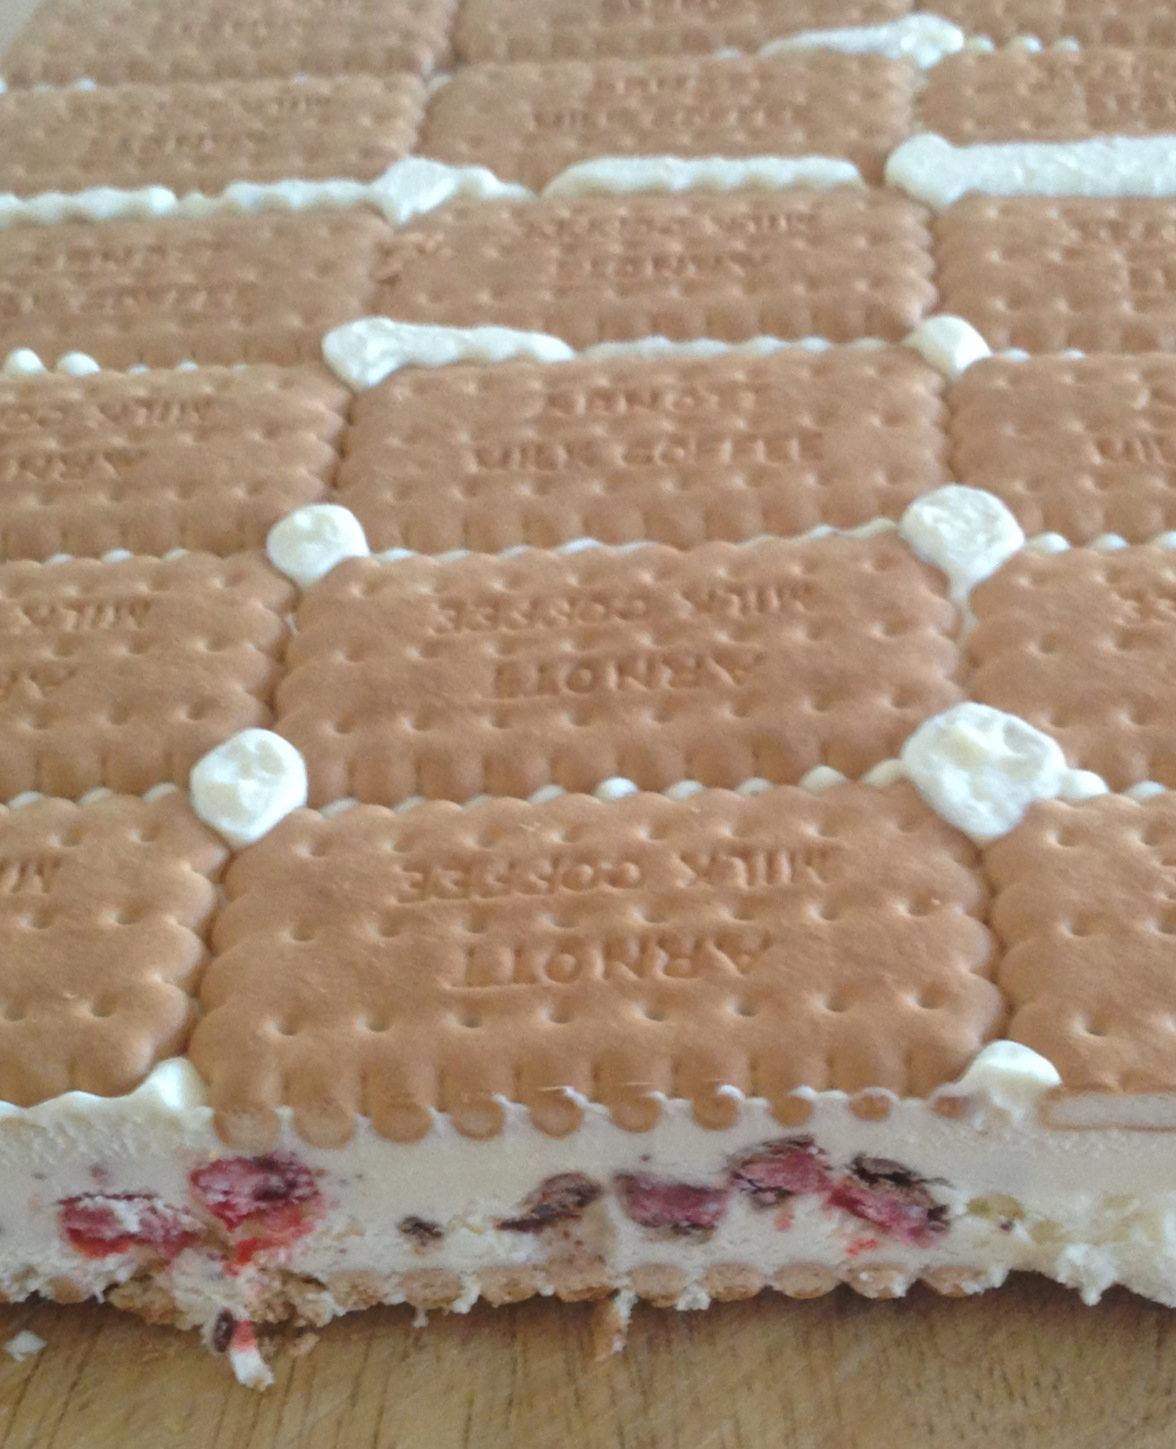


Many a Moore College family between the years 2008 and 2011 will remember Julie Morrow’s Ice-cream slice, often served up at the weekly-free-for-all college playground dinners. Always a hit, several people have mentioned how great the recipe is for hospitality and have replicated it many times long since their time at college has come to an end. And for good reason: it’s really fast to make, tastes terrific and serves at least 21 people for a total cost of $13, though much less if you stock up on biscuits and chocolate bars when on special. Thanks for a great recipe Julie, and thanks for reminding me to give it a go, Jess!
- 1 x 375g tin condensed milk
- 600ml cream
- 3 x 52g chocolate bars of your choice (I used cherry ripe), roughly chopped
- your choice of food colouring (I chose to keep mine white this time)
- 1 1/2 packets of plain biscuits such as Malt-O-Milk (I used Morning Coffee)
- Line a 20x30cm slice tin with foil and put down a layer of biscuits wrong side up. Make sure they fit in the tin nice and snugly.
- Whip cream until thick, add condensed milk and whip again. Gently stir through chopped chocolate bar and food colouring, if using. Spread cream mixture evenly over biscuit base and then top with another layer of biscuits, right side up this time.
- Cover with foil and freeze overnight. When ready to serve, tip slice out using a board to keep it stable when up-ending it. Remove the last layer of foil and cut into biscuit sized portions using a large sharp knife. Eat and enjoy immediately!
TIP: If you don’t eat it all when you first serve it, cut slices into individual portions before returning left-overs to the freezer. This will make it easier to access and serve next time round.
PEPPERMINT DELIGHT

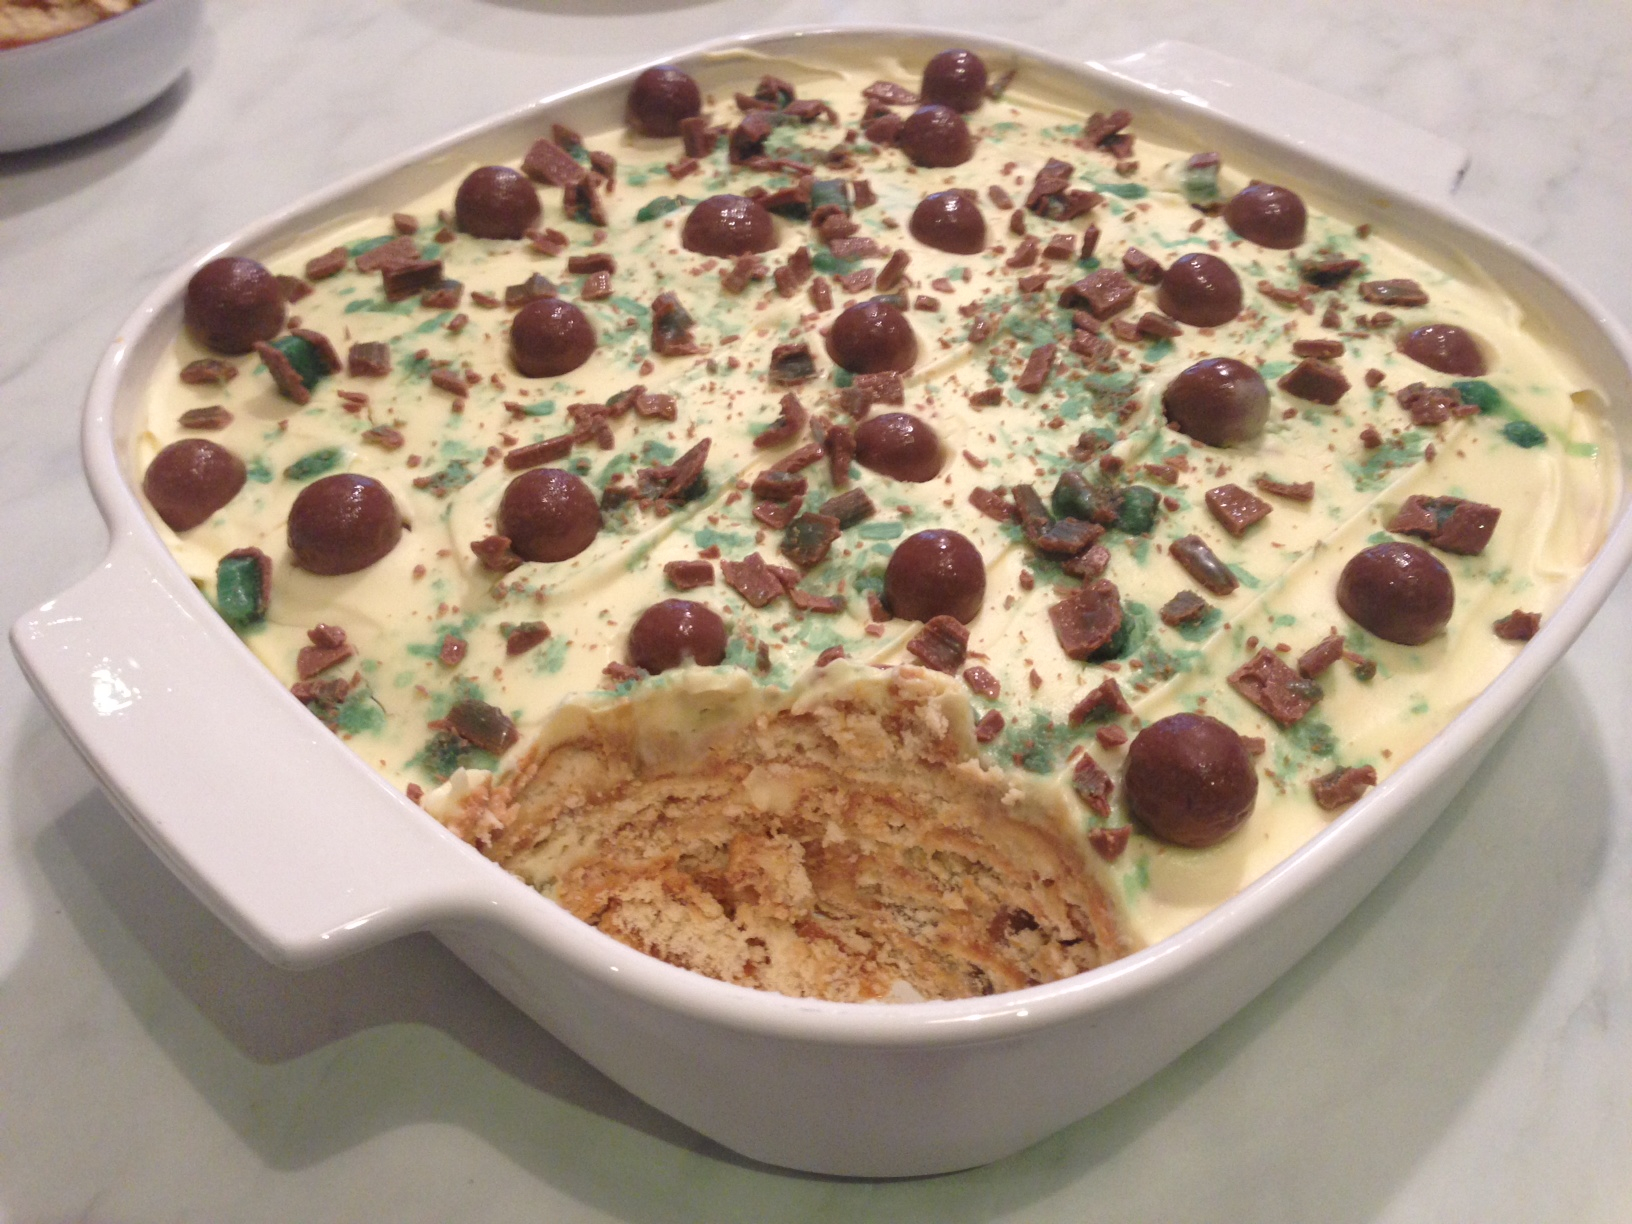
Years ago, in another life before having kids, my husband and I lived in Queensland and made friends with a couple called Sacha and Leigh-anne after we joined the Bible study group they hosted. Sacha and Leigh-anne were down to earth, funny, outdoorsy types who loved to go camping and listen to Garth Brooks in the car (Steve could only just tolerate the Garth Brooks bit, but I loved it). Each week we’d all bring our takeaway dinner to their house, share the highs and lows of the week, study the Bible and pray together. Their home was always open, they never bunged anything on for any of us (Sacha was often in the bath when we arrived) and they didn’t mind one little bit if you made yourself a cup of tea. In that season of life, we all grew lots spiritually and had lots of fun times together. These days we all live a long way from each other, but some friends from the town we now live in, Gavin & Chantell, have moved to their town – and to our delight have found good friends in each other. Last week, while on holidays we got to have the second annual Three Family Get-together, and just like old times shared with both families, it was delightful: a relaxed catch-up, fun and games as Sacha kept us entertained with his stories, all the while sharing simple but yummy food. Chantell brought this tasty dessert that went down a treat with everyone and I had to give it a go myself and share it with you. Hardly ‘cooking’ at all: it’s more like assembling a salad from a bunch of ingredients, this versatile dessert costs about $17 to make, but it does serve 15 people. For a smaller group, simply halve the quantities, which also halves the cost. As all the ingredients (except the cream) can be stored in the pantry for when you want them, I recommend buying them up when on special to make this even more affordable. Thanks for the recipe, Chantell.
- 4 Peppermint Crisp chocolate bars, chopped roughly
- 1 can of Nestle Caramel Top’n’fill
- 2 x packets of Nice biscuits (or other plain biscuits)
- 900ml cream, whipped
- Choose a medium sized casserole/pie/oven dish, and spread a thin layer of caramel on the bottom. Place a layer of evenly spaced biscuits over the top of the caramel, followed by a layer of cream. Sprinkle 1/4 of the peppermint crisp over the layer cream. Repeat this series of layers until all the ingredients are finished or the dish is full.
- End the layers with cream and the remaining peppermint crisp. I had some leftover malteasers in the pantry so popped them on top too – feel free to improvise.
- Place in the fridge for 24 hours to allow for softening and setting. Enjoy with ice-cream or without.
PAULINE’S CHILLED LEMON CHEESECAKE


Yesterday was my husband’s birthday and he requested this lovely cheesecake for birthday cake. It’s a recipe my mother-in-law Pauline gave me when Steve and I were first married and it has become something of an identity marker for our little family, a tradition that we’ve made our own for special celebrations. What we have always loved about this chilled cheesecake, is the light but creamy texture of the filling that comes from not using gelatine and its faint taste of lemon. And it’s so versatile flavour-wise: yesterday we enjoyed it topped with fresh mango pieces and raspberry sauce and in the past it’s been lovely with drizzled melted chocolate on top. These extra serving options are totally unnecessary though, because the cheesecake is just delightful all by itself. The one essential trick to making this cheesecake successfully is not to forget the lemon juice – it’s what makes the filling set. And I’ve learnt from experience that you can’t replace the fresh lemon juice with lemon squeezie as it won’t set. Super simple to make because it doesn’t require baking, and cost-effective because it easily serves 10-12 people, Pauline’s cheesecake costs around $10 to make.
- 250g cream cheese, softened to room temperature
- 1 x 395g tin sweetened condensed milk (home brand is fine)
- 300ml thickened cream
- 1 x 250g packet of Nice biscuits
- 190g butter, melted
- Juice of 1 fresh lemon
- Select a loose-bottomed pie tin or springform cake tin, 20-25 cm in diameter and spray lightly with canola spray.
- Place biscuits into the bowl of a food processor and blitz until a rough crumb. The biscuits need to be well and truly crushed, but don’t go too fine with them. Remove blade and add melted butter, mixing through. Using clean hands and spoon for pressing down firmly, place biscuit mixture into the tin to form the base, which should come up the sides 3/4 of the tins height. Place in freezer to set.
- Using electric beaters, beat the cream cheese to a paste, continue mixing and add the condensed milk. When thoroughly combined, continue mixing and add the cream and lemon juice. Beat a little longer to ensure the mixture is well-combined. Remove the now set base from the freezer and gently fill the base with creamy filling. Place the cheesecake in the fridge for 4-6 hours to set.
ETON MESS

The heatwave continues in our neck of the woods, the perfect time to try this no cook summer dessert, suggested to me ages ago by my friend Amy. And what a winner! Each component is able to be purchased or made ahead of serving time with almost no fuss: all that needs to be done beforehand is to make the simple berry sauce and whip the cream – both of which just go straight back into the fridge until you’re ready for dessert. Not only are these individual possets of cool berry yumminess easy to make, all of the ingredients can be kept close at hand for dessert at short notice: frozen berries in freezer, packet meringues in the pantry, and cream and yoghurt are constants in my fridge. The recipe that follows is my adaptation of Valli Little’s, originally published in Delicious magazine, but do whatever you like with the ingredients: more or less of each item according to what you like to taste most of. The residents at my place have requested more meringue next time! Similarly, the yoghurt can be completely left out, just increase the amount of cream to replace it, which also lowers the cost a little. Using fresh strawberries and the quantities below, this recipe serves 6 and costs less than $10 to make. Assemble just before serving in whatever takes your fancy: tumblers, ramekins or martini glasses – whatever, and enjoy some stress free time with your guests.
- 150g frozen raspberries, thawed
- 1/4 cup caster sugar
- 1 punnet of strawberries, hulled and thinly sliced (use when affordably in season, otherwise frozen mixed berries work well and are cheaper)
- 200ml cream, whipped
- 200ml greek yoghurt, (optional, and any kind is fine)
- 50g mini meringues, roughly crumbled (half a 100g box)
1. In a small bowl add sugar to defrosted raspberries and mix through. Using a stick blender, puree the mixture and pass through a sieve and discard seeds. Add sliced strawberries to raspberry liquid and mix through.
2. In another bowl, whip cream, again using a stick blender. Just before serving, add crumpled meringues, yoghurt and berry mixture to the cream, gently combining each ingredient, but don’t over mix!
3. Divide mixture evenly among the six glasses and eat immediately.
COCONUT IMPOSSIBLE PIE

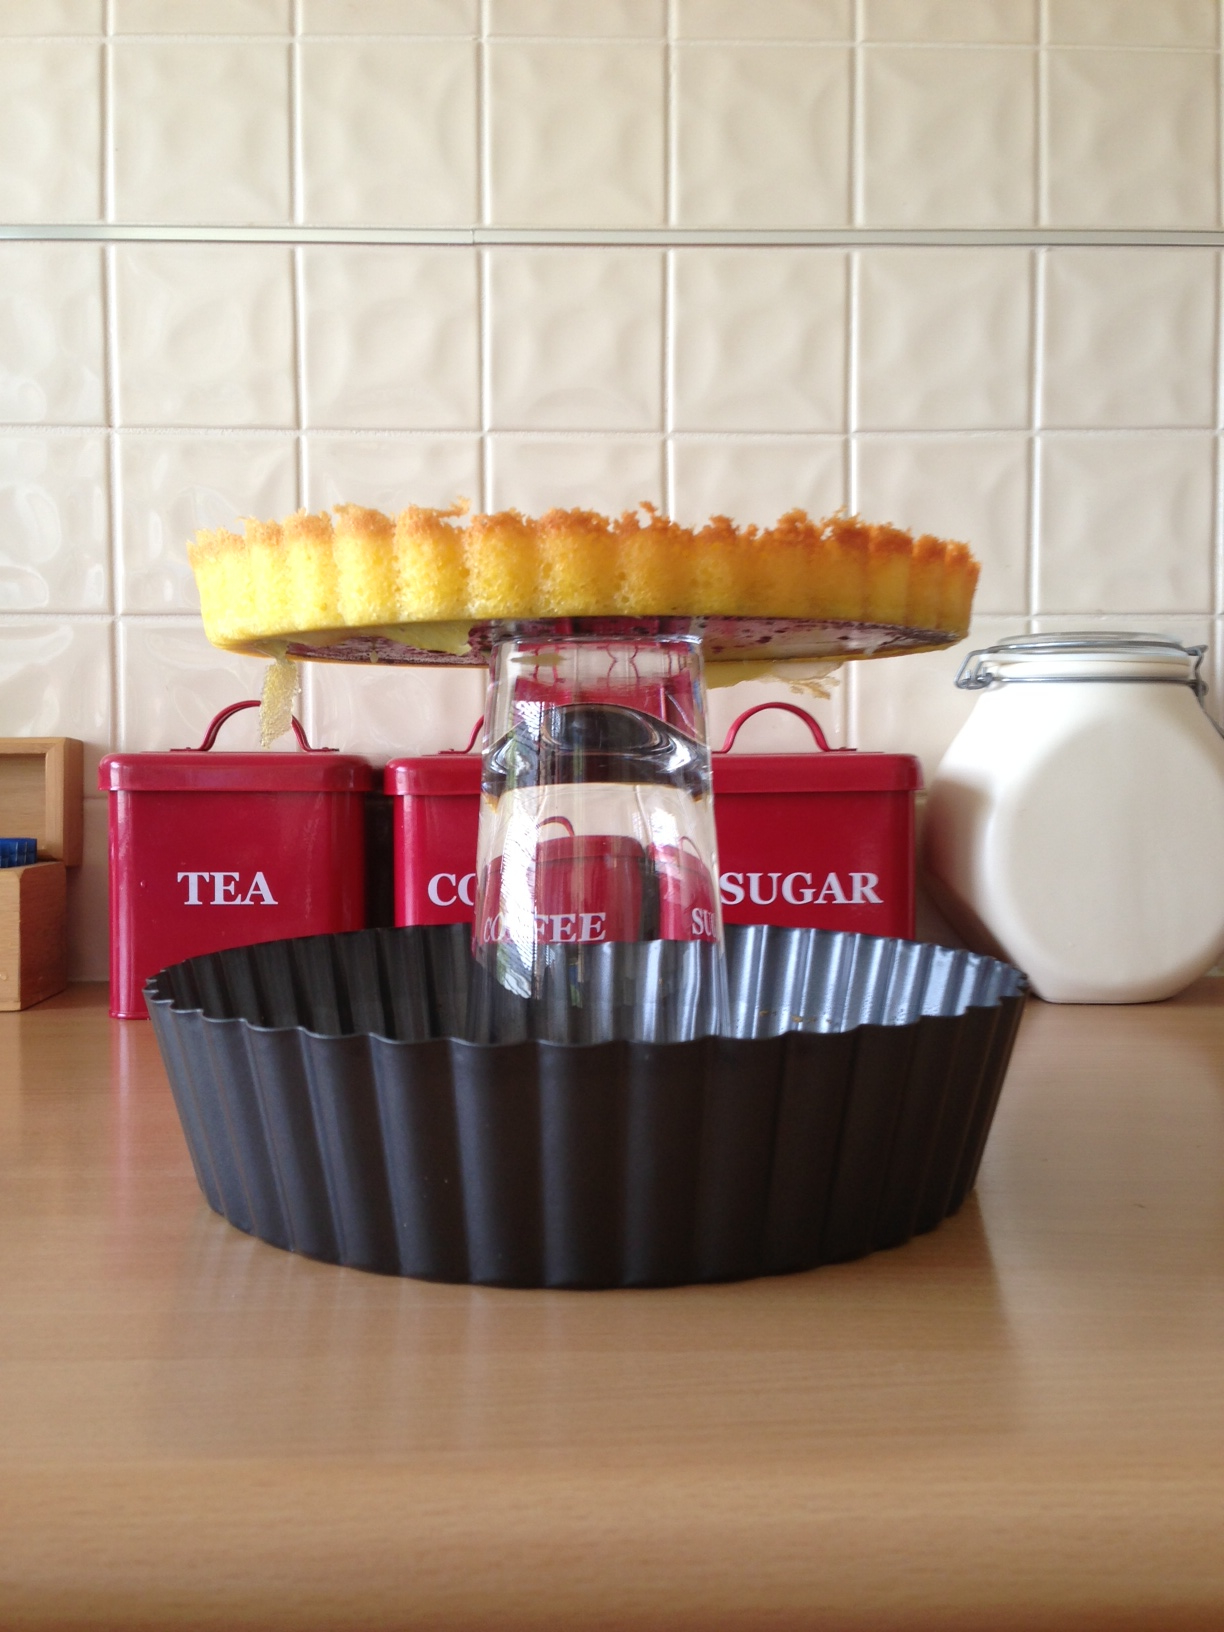
Last year, my delightful cousin-in-law Nicola put together a fundraising cookbook with recipes contributed by the parents who attend her church’s playgroup and I’ve just started working through the recipes inside – which has been great fun! The first one I’d like to share with you is this terrific Coconut Impossible Pie because it was so easy, was made on standard pantry items and costs very little to make. During cooking the combined ingredients settle into at least two layers: a dense-ish base and a custardy coconut filling – so yummy, especially for summer. If you choose to make this in a spring-form or loose bottomed tin as I did, please learn from my oven disaster and cook the pie in its tin, inside a large cake tin that can hold the pie during baking (see photo). Once it’s cooked, use a tall glass to remove the base and allow the pie to cool (see photo). If you prefer slightly less fuss, just bake the pie in standard pie dish or cake tin. This lovely dessert costs less than $4 to make and goes down beautifully when served with cream or ice-cream. Thanks for your excellent compilation, Nicola!
- 1/2 cup plain flour
- 2 cups milk
- 2 teaspoons vanilla
- 4 eggs
- 125g softened butter
- 1 cup castor sugar
- 1 cup coconut
- Preheat oven to 170 degrees, 160 degrees if fan forced.
- Place all ingredients in a bowl and mix well.
- Pour mixture into a greased pie dish and bake for 1 hour – but start checking earlier. Once the top seems ‘set’, pull it out as pie will continue to cook as it cools.
GINGER SPONGE
What I love about this recipe, originally from The Common Sense Cookery Book, introduced to me by my friend Beck:
It tastes amazing.
It has a lovely grown-up, old-world charm about it and feels a bit dainty when served with a cup of tea of coffee.
It’s ginger. Need I say more?
It’s made from ingredients already in the pantry (no shopping)
It has a short baking time
It’s ginger.
The two cakes are thin and cool quickly, ready to assemble.
It’s cheap as chips to make: no more than $3
It’s ginger.
Did I say, it’s ginger?
Thanks a bunch, Beck. Love, love, love it.
- 1 tablespoon butter
- 1/2 cup brown sugar
- 1 egg
- 1/2 cup milk
- 1 tablespoon golden syrup
- 1 cup plain flour
- 2 teaspoons ground ginger
- 2 teaspoons cinnamon
- 1 teaspoon bicarb soda
Mock Cream Filling & Topping
- 4 tablespoons butter
- 1 cup sifted icing sugar
- 1 teaspoon vanilla essence
- Preheat oven to 180 degrees celcius, 160 degrees if fan-forced. Grease and flour two 18cm diameter round shallow cake pans.
- Beat butter and sugar to a cream. In another bowl, beat egg milk and golden syrup together. Add to creamed butter and sugar.
- Fold in sifted flour, ginger, cinnamon and bicarb soda. Distribute evenly between the two pans and bake for around 15 minutes.
- Check if cooked through using a skewer which should come out clean from the middle of the cakes. Turn onto wire rack and cool.
- While cakes are cooling, make mock cream by eating butter and sugar to a cream, then gently adding icing sugar and vanilla essence.
- When cakes are cooled, use half mock cream to sandwich them together, and use the other half to ice the top of the cake.
LONG TRACK CHOCOLATE CUPCAKES


One of my favourite places to stop when driving the Hume Highway is the Long Track Pantry at Jugiong. The coffee tastes great, the food is delightfully made on the premises and there’s lovely tables to sit either inside amongst a vast array of kitchen giftware or outside in the sun with gorgeous rural views. A few weeks ago we stopped there on one of our many trips and Steve picked up one of Long Track’s free magnets containing this chocolate cupcake recipe. It quickly appealed to me because all the ingredients go in the food processor at the one time and then it’s straight into muffin cases and into the oven. At the same time I found I was lean on morning tea supplies in the freezer for the school term ahead, so I decided to give these a go. Moist and chocolatey and totally eatable even without icing, I’m sure I will be making these cupcakes again. The total cost for these is less than $5 and the recipe below makes a neat 24.
- 180g soft butter (room temperature will do)
- 3 cups self-raising flour
- 1 1/2 teaspoons vanilla
- 9 tablespoons cocoa
- 1 1/2 cups milk
- 3 cups caster sugar
- 6 eggs
- Preheat oven to 180 degrees / 160 degrees if fan-forced. Distribute 24 patty cases across 2 twelve hole muffin tins (regular sized, not patty cake or mini muffin sized – though you can make them smaller if you wish).
- Place all ingredients into a food processor and mix until smooth, but don’t over process. Spoon into prepared muffin cases and bake in oven for 15-20 minutes.
- When cool, ice with chocolate icing if desired, or sieve a little extra cocoa powder and icing sugar over the top (I didn’t do either and they still tasted lovely). Enjoy!
GINGERBREAD SLICE


I love gingerbread – actually, I love anything with ginger in it. And years ago, my friend Cynthia put me onto this amazing recipe called Grandpa Pencil’s Gingerbread Men. Since then, it’s been my go-to for great tasting gingerbread that turns out just how I like it: sweet, gingery, a bit of crunch but mostly chewy in texture. And of course, the kids always love decorating them. The only down-side has been the time it often takes to make and decorate a batch of these lovely things – definitely more a holiday or a weekend thing, than something achievable when life is busy. But I’ve come by two solutions to this problem. The first is these square cookie cutters I recently stumbled upon for $9.95 in a kitchen shop. No more re-rolling excess dough multiple times because the cookie shapes are so awkward. With these square cutters, there’s no need for edges at all, which maximises time by just cutting once. I should say too, as my friend Jane suggested to me: you really don’t need square cookie cutters to treat rolled out dough like this – just use a butter knife and cut the dough into squares in whatever size you prefer. And here’s a tip: the best way I’ve found to lift the uncooked shapes off a floured bench is to use a thin, metal egg lifter. The second gingerbread solution is to cook Grandpa Pencil’s dough as a slice instead of as cookies and decorate with freckles before they go in the oven, which is my adaptation below. Either way, this recipe will cost no more than $3 to make. Thanks Cynthia, for sharing this one all those years ago.
- 125g butter, softened to room temperature
- 125g sugar (I use brown)
- 280g plain flour
- 1/2 teaspoon bi-carb soda
- 1 1/2 teaspoons ground ginger
- 1/2 teaspoon cinnamon
- 1/2 teaspoon nutmeg
- 1 cup golden syrup, warmed in microwave
- 24 freckles
- Cream butter and sugar. Add the rest of the dry ingredients and mix to combine.
- With beaters mixing slowly, gently add warmed golden syrup until mixture turns to a ball of dough, not too wet and not too dry.
- If making into biscuits roll mixture onto a floured bench, otherwise, using wet hands, press mixture into a 30 x 20 cm lined lamington tin.
- Press 24 freckles into the wet mixture in a 4×5 configuration and bake at 180 degrees (170 if fan-forced) for 45 minutes. If it goes brown on top but still hasn’t cooked through, cover with foil and return to the oven. The end result should be a fudgy/brownie consistency, not so much a crumbly or dry slice. Allow to cool completely in tin before cutting between freckles into 24 squares.
STRAWBERRY OATMEAL BARS


When it’s school holiday time, we seem to eat so much more as a family than we usually do. It’s taken me by surprise how frequently my kids want to eat and with the extra time to spend with them at home, it’s been nice to do a little baking. But I’m no super spontaneous, indie, ‘let’s get creative’ type mum so adventures in this area still need to be simple enough to keep the fun levels high for all of us. This recipe sent in by Emily Yap totally fits the bill, who recommends it for lots of reasons: they’re tasty, cheap, easy to make and all the ingredients are standard pantry items – cause who likes having to make an extra trip to the shops just to do some baking? This recipe, adapted from a blog called The Pioneer Woman Cooks makes 15 squares of yummy-ness and will cost around $4 to bake.
- 200g cold butter, cut into pieces
- 1 1/2 cup all-purpose flour
- 1 1/2 cup oats (quick or regular)
- 1 cup brown sugar, packed firm
- 1 teaspoon baking powder
- 1/4 teaspoon salt
- 1 x 370g jar of jam of your preference, I used IXL Strawberry Conserve
- Preheat oven to 180 degrees, then grease and line a 20 x 30 cm lamington tin.
- Put all the dry ingredients in the bowl of a food processor, blitz for just a moment until everything is just combined.
- Add chopped butter to the mix and process until mixture resembles crumbs with large/obvious chunks, roughly the size of rice grains. Be careful not to over-process.
- Divide mixture in half and press one half of the mixture firmly and evenly into the bottom of the lamington tin.
- Heat the jam in the microwave at 50% for 40 seconds and give it a good stir. Pour gently over the crumb base and use a spoon to spread evenly.
- Gently tip the rest of the crumb mixture on the top of the jam and spread evenly. Using clean fingers press down as firmly as possible without destabilising the jam.
- Bake for 20-30 mins until brown on top. Cool in the tin and use a sharp knife to cut into squares.
GLUTEN FREE CHOCOLATE BROWNIE
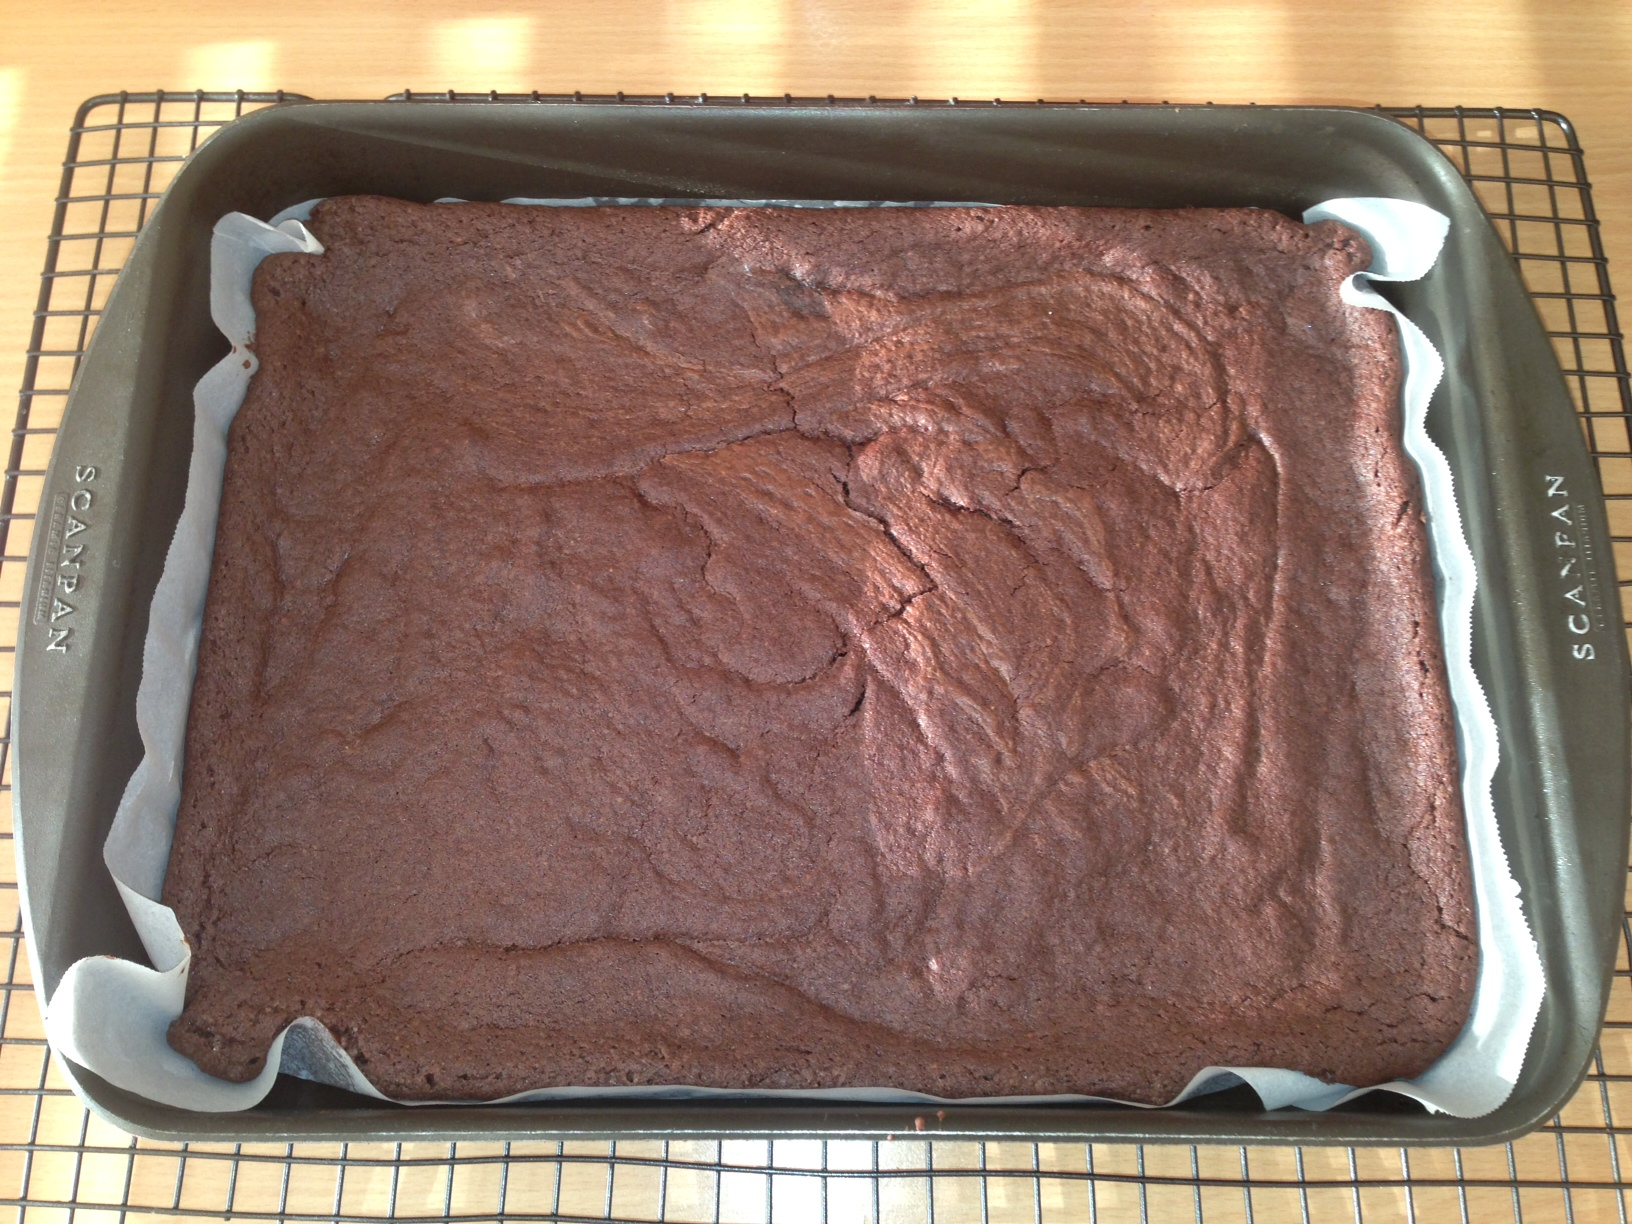
A while back the girls in the weekly Bible study group I’m part of were asked to help cater for desserts for an evangelistic event. We needed to provide a variety of easy desserts that involved little serving hassle, tasted great and cared for the needs of those with allergies. When my friend Jacinta said, “I’ve got a gluten free chocolate brownie recipe that works every time and tastes great”, we all praised God! And she was right. The group got together for a big baking session the night before and everything came together, in part due to this terrific recipe. Unlike many brownie recipes, there’s no expensive ingredients here and the whole thing cooked evenly without drying out the edges. I’m going to be using this one for many years to come! You’ll find gluten free flour in the health food section of most supermarkets and the whole recipe will cost around $5 to make.
- 240g butter or margarine
- 2 cups raw sugar (can substitute with caster or white)
- 1/2 cup cocoa
- 4 eggs
- 2 cups gluten free plain flour
- 1 teaspoon bi-carb soda
- 1 teaspoon vanilla essence
- pinch of salt
- Mix in 1/2-3/4 cup of any of the following, if desired: berries, jersey caramels, chocolate chips, walnuts or peanuts.
- Preheat oven to 180 degrees celcius, 160 degrees if fan-forced
- line a large baking dish or two 25×25 square pans with baking paper
- Melt margarine in glass jug or saucepan
- In a large bowl, combine sugar and cocoa, mix in melted butter, eggs, vanilla and salt.
- Sift bicarb soda and flour together and fold into the mix. Beat the mixture well by hand or with an electric mixer.
- Pour into tin/s and bake for 25-30 minutes, though start checking earlier. It should fee; ‘just set’ on top. Remember: it will continue to cook as it cools, so don’t overcook.
- Cool in the tin and serve by itself or with cream, icecream or raspberry sauce.
GLUTEN FREE RASPBERRY SLICE


You’ve got to love a gluten and egg free recipe that works just as well as if it weren’t, tastes just as good as its gluten-full counterparts and doesn’t cost the earth to make. That’s exactly my review of my friend Mim’s Gluten Free Raspberry Slice. This very simple recipe looks far more impressive than the minimal effort it actually requires – so don’t be put off by the creaming of the butter and sugar – everything else is so jolly simple, it’s really not a deal-breaker. Serve this up to all your guests as a dessert with cream or icecream or simply as a an eye-pleasing morning or afternoon tea. Finally, this yummy number can be done with berries of your choice (mine pictured above is mixed berry) and regular flour should you not require freedom from gluten. Either way, will only set you back around $4. Thankyou Mim, I can tell I’m going to be making this again and again.
- 200 g butter
- 1 teaspoon vanilla
- 1 cup caster sugar
- 1 cup almond meal
- 1 1/2 cups of gluten free flour
- 2 cups frozen raspberries
- 1/3 cup flaked almonds
- Line lamington pan with baking paper.
- Beat butter, vanilla and sugar until light and fluffy. Stir in almond meal and sifted flour.
- Press 2/3 pastry into base – reserve rest for crumbling on top.
- Bake uncovered in moderately hot oven (200) for 10 minutes until lightly browned.
- Sprinkle raspberries over the top.
- Sprinkle remaining pastry (crumbled) and flaked almonds.
- Bake 35 minutes, or until brown.
- Cool in pan. Lift whole slice out using baking paper. Cut into squares, dusting pieces with icing sugar.
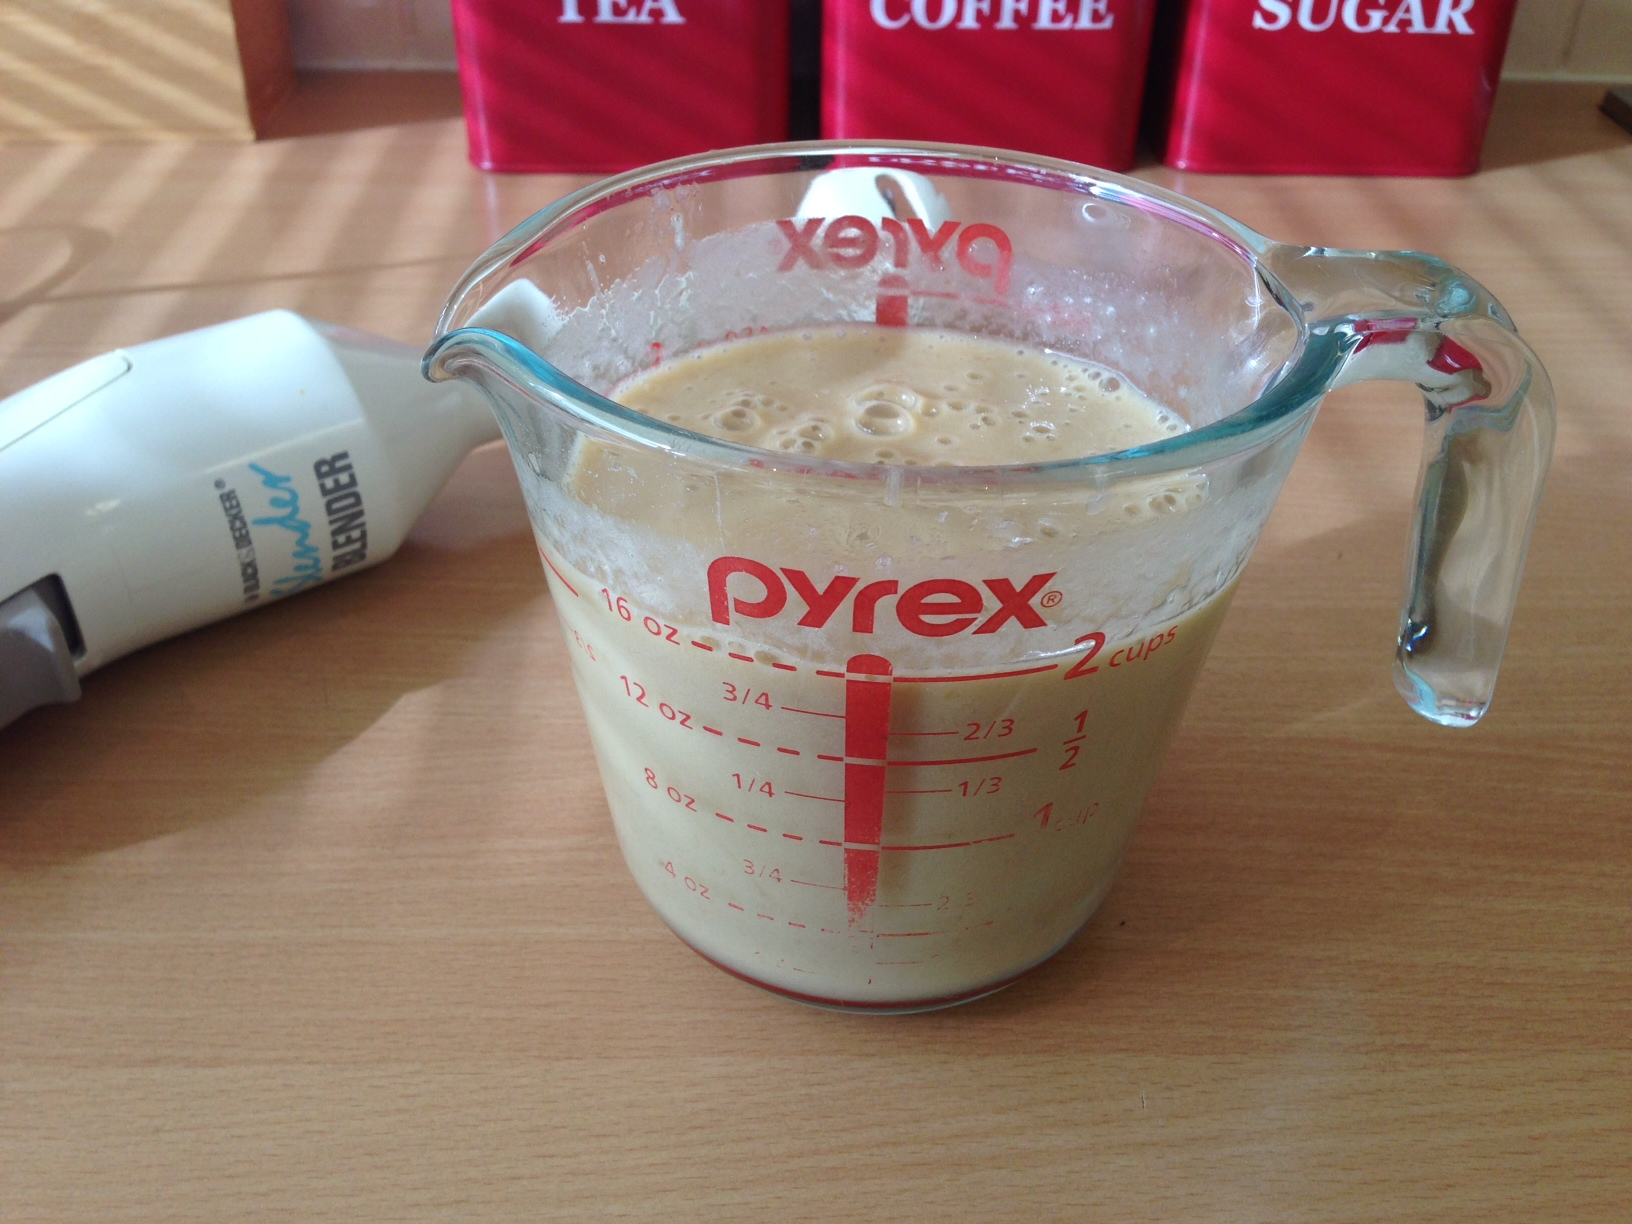
2 INGREDIENTS BANANA PIKELETS (with no added sugar or carbohydrate)
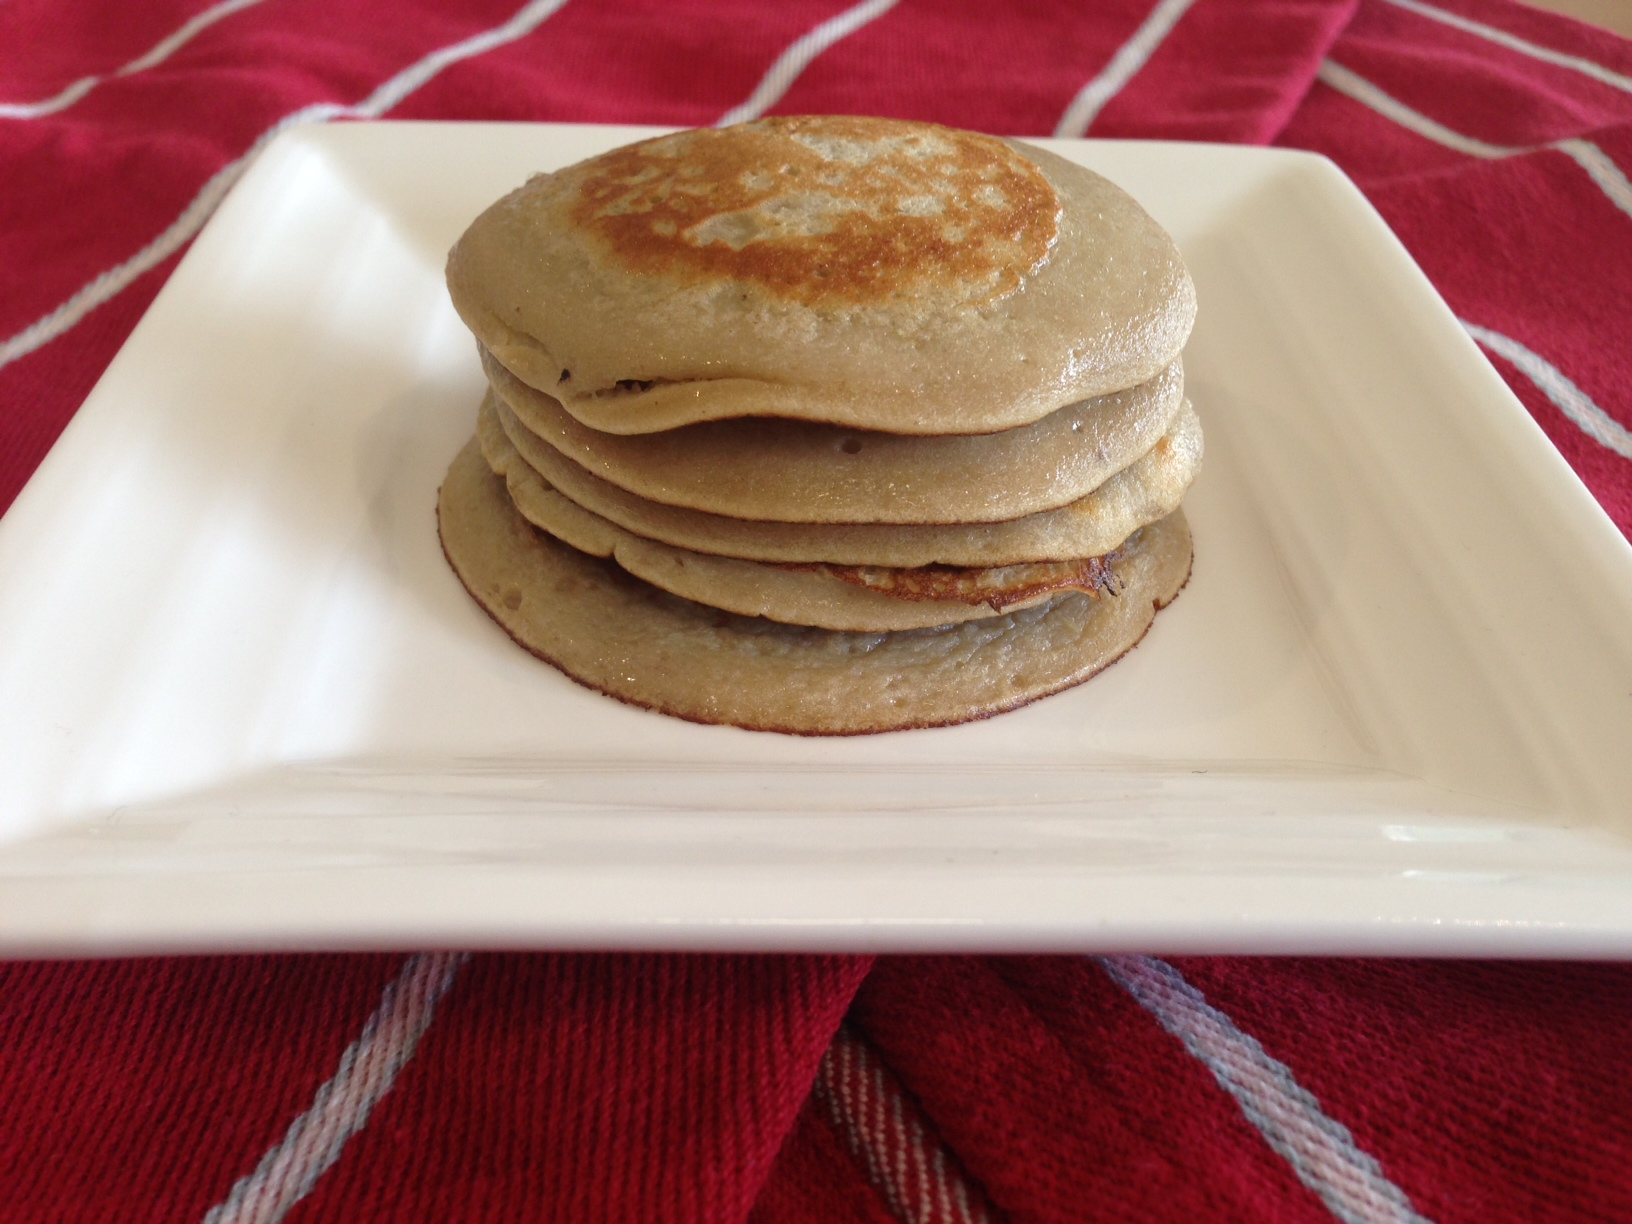

My friend Victoria posted a link to this delightful recipe during the week and I was genuinely intrigued by it – pikelets made using only eggs and bananas? I had to try them. This morning provided the perfect opportunity: waking up to an overcast, sleep in, pyjama type Saturday. The kids devoured these healthy, protein rich, gluten free and diary free pikelets that contain no added sugar or carbohydrate – definitely my kind of breakfast or snack. The consistency of these on eating is a little more spongy than a standard pikelet, but it certainly isn’t a deal-breaker. If you prefer something a little sweeter, simply add some icing sugar to serve. These little babies would also make an excellent dessert for sugar-phobes, simply drizzle with cream – though I must confess to eating mine like this for breakfast. Makes 24+ and costs no more than $2.
- 2 bananas, mashed a little with a fork
- 4 eggs
1. Put slightly mashed banana and eggs in a mixing jug. Using a stick blender, puree the mixture until completely smooth.
2. Pour small amounts (about the size of the lid of a jam jar) into a frypan set to medium/low. Use a small amount of canola spray before pouring. Cook each for a couple of minutes each side (though I do find the first side takes around 3 minutes and second takes less than one). Eat by themselves, with a dusting of icing sugar or with some runny cream.
RASPBERRY & COCONUT LOAF
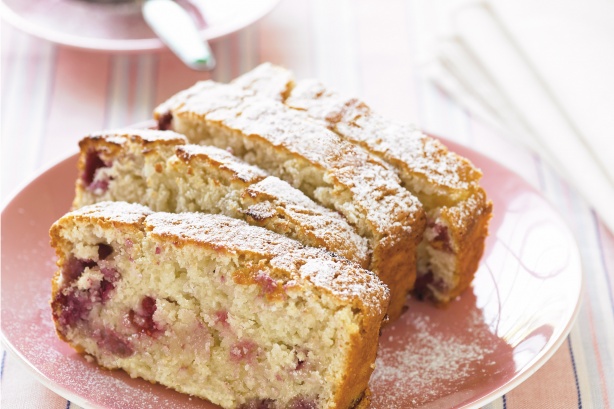

My dear friend Kim contributed this terrific little recipe from taste.com AGES ago – but I only recently noticed it in the foodthatserves@gmail.com inbox. This is a bonza recipe: the ingredients are ones you’re likely to find in your pantry and freezer and there’s no butter in it at all. If you’re avoiding sugar this recipe works well by simply exchanging sugar for dextrose exactly. If you don’t have raspberries in your freezer but do have tinned ones or berries of another kind, do feel free to exchange as needed. I made this using blueberries (see second photo) and it tasted lovely. This gorgeous little loaf will cost you no more than $4 to make. Enjoy!
- 1 3/4 cups desiccated coconut
- 1 1/2 cups coconut milk
- 1 cup caster sugar
- 1 egg, lightly beaten
- 1 teaspoon vanilla essence
- 1 2/3 cups self-raising flour
- 2 tablespoons flour extra
- 1 cup frozen raspberries
- icing sugar, to serve
- Combine coconut and coconut milk in a large bowl. Cover and stand for 30 minutes (or not – I have little patience for steps like these!).
- Preheat oven to 170°C. Line base and sides of a 7cm-deep, 10.5cm x 20.5cm (base) loaf pan with baking paper, allowing a 2cm overhang at both long ends.
- Toss frozen berries in extra flour (this will prevent them from sinking to the bottom of the loaf as it cooks). Using a metal spoon, stir sugar, egg and vanilla into coconut mixture. Sift flour over coconut mixture. Gently stir until combined. Fold in raspberries.
- Spoon mixture into prepared pan. Bake for 1 hour 10 minutes to 1 hour 15 minutes or until a skewer inserted into the centre comes out clean. Cool loaf in pan for 10 minutes. Lift onto a wire rack to cool completely. Dust with icing sugar and slice. Serve toasted, if desired.
MUFFINS THAT TASTE LIKE DOUGHNUTS
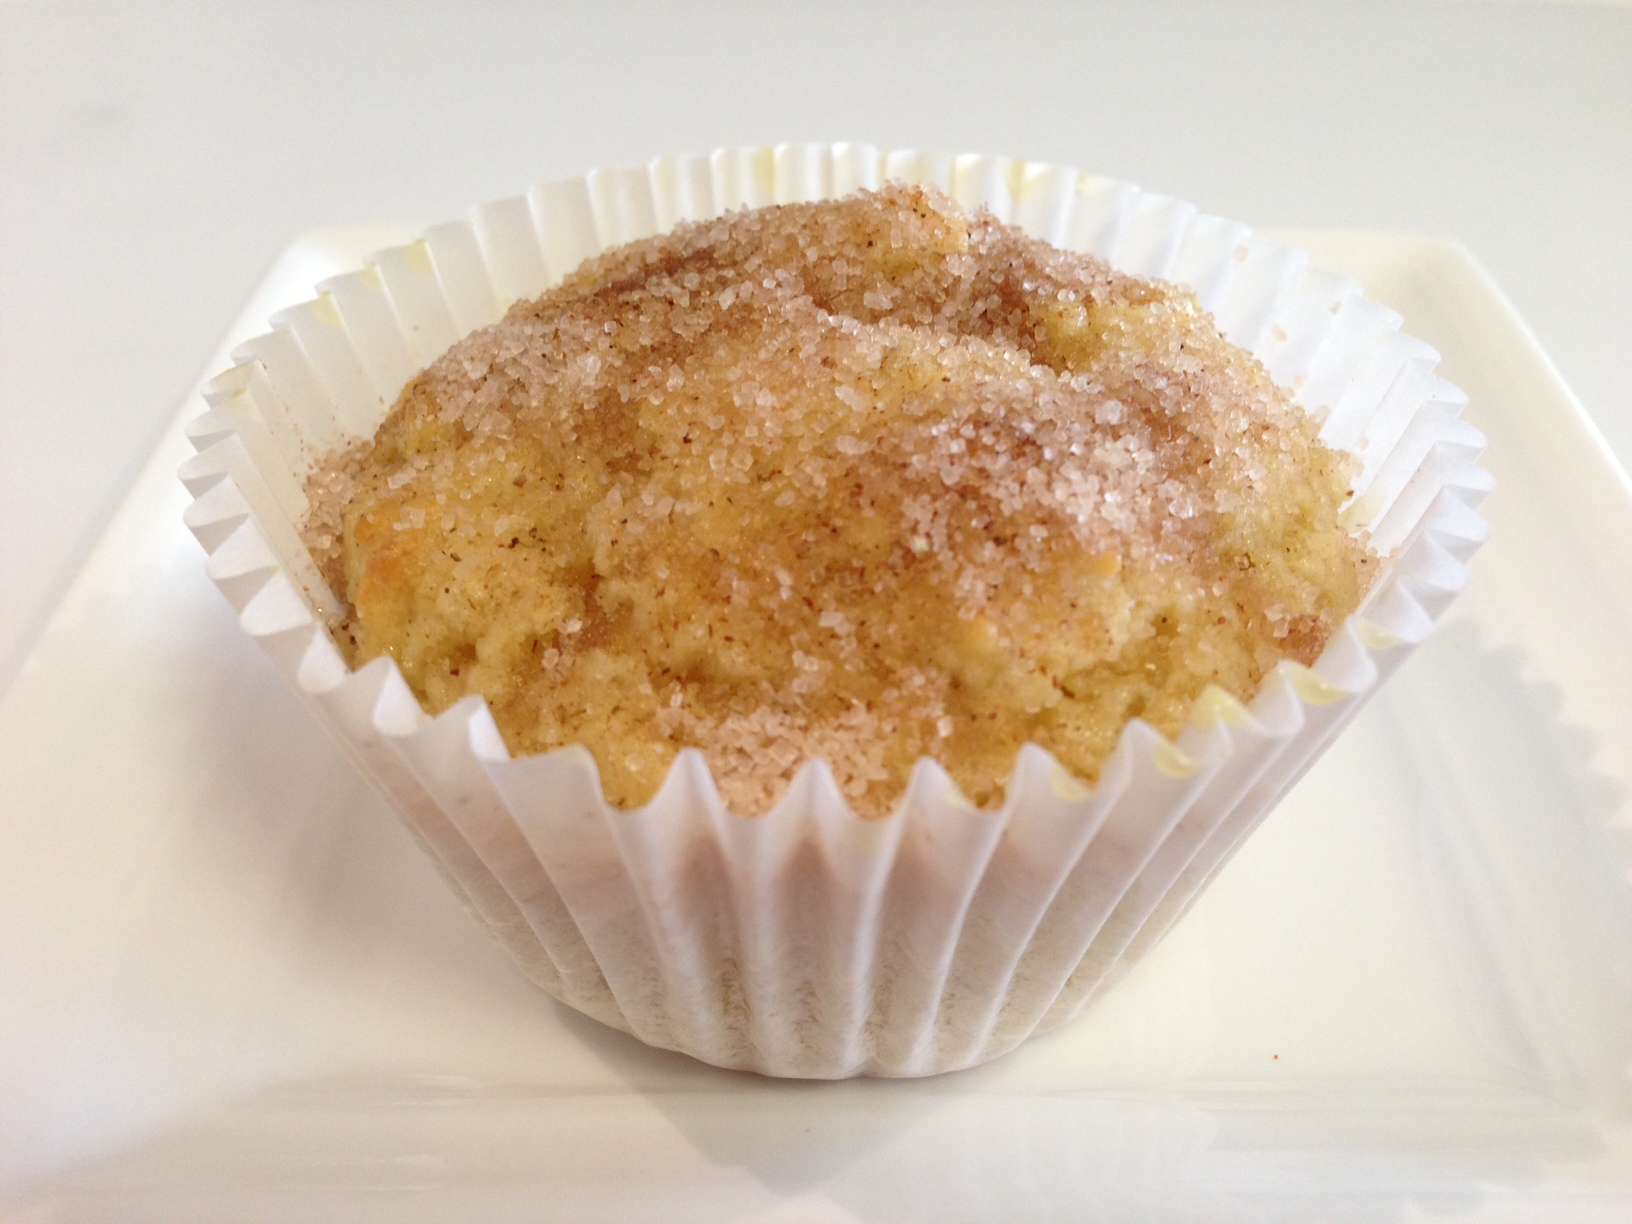
I saw this recipe floating around on Facebook a couple of weeks ago and it really grabbed me – who wouldn’t want to try a recipe promising muffins that taste like cinnamon doughnuts? These muffins delivered on their promise in taste, were simple to make from basic pantry ingredients that are readily on-hand and cost no more than $1.50 to make. Make these quick and easy muffins for last minute friends dropping by or for a quick solution for empty lunch boxes at the end of a busy week. Like all muffins, these don’t have an especially long shelf life, but they are freezer friendly and if you’re eating them after a day or two, a quick zap for 10-20 seconds in the microwave brings back a fair bit of freshness and restores them to something more like a warm cinnamon doughnut. For those avoiding sugar, simply replace the caster sugar measure for measure with dextrose (available from the beer brewing section at K-Mart or Big W). If you’re not too heavy-handed with the mixture it will make 12 muffins. Enjoy!
- 1 3/4 cup plain flour
- 1 1/2 teaspoons baking powder
- 3/4 cup caster sugar
- 1/2 teaspoon salt
- 1/2 teaspoon nutmeg
- 1/4 teaspoon cinnamon
- 1/3 cup vegetable or canola oil (I use rice bran)
- 1 egg
- 3/4 cup milk
Sugar Topping
- 1/2 cup melted butter
- 1/4 cup caster sugar
- 1/4 tsp cinnamon
1. Preheat oven to 180 degrees celcius and distribute 12 paper cases in a 12 hole muffin tray.
2. Combine dry ingredients in a large bowl. Mix liquids in separate bowl or pyrex jug. Add liquids to dry ingredients and combine together well, without over beating. Spoon mixture into prepared muffin tins using two soup spoons (but don’t overload them). Bake for 15 mins though start checking at 10. When muffins spring back a little, they’re ready.
3. While muffins are baking prepare sugar topping: combine sugar and cinnamon in a small bowl and melt butter in yet another bowl. As soon as muffins come out of the oven, dip each one into melted butter and roll into sugar & cinnamon mixture, or brush with butter and top with sugar mixture if muffins are too hot to handle.
NIGELLA LASWON’S CHOCOLATE CROISSANTS
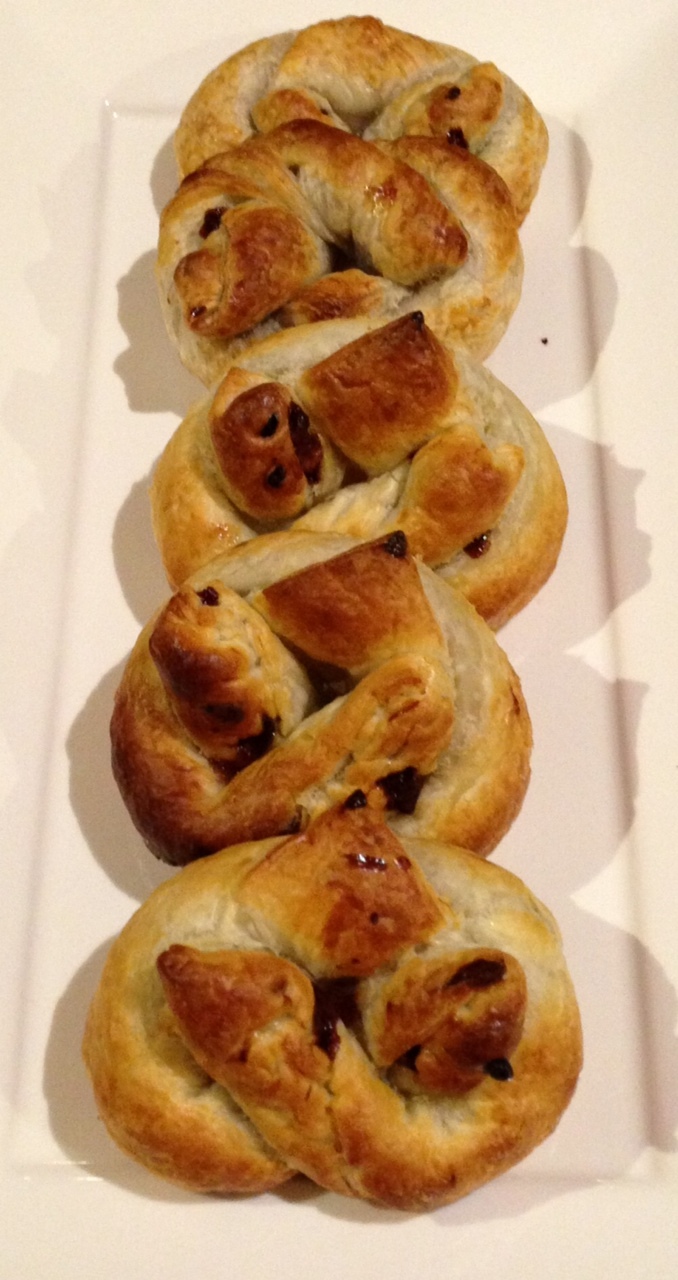
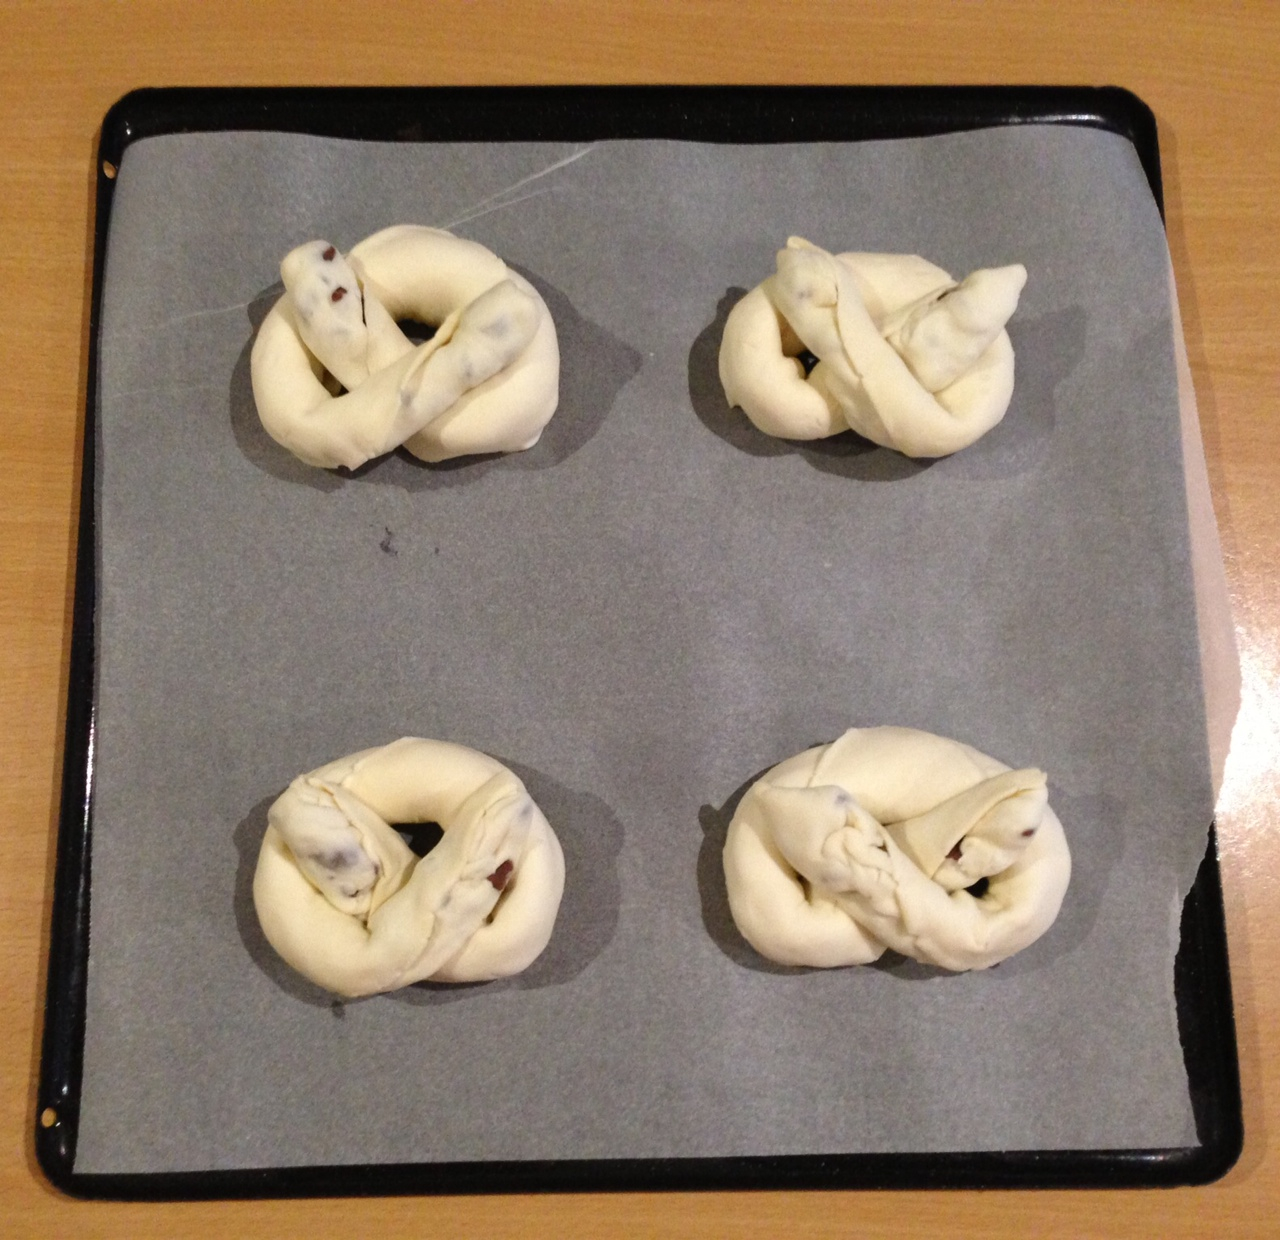

We recently enjoyed the pleasure that is old friends coming for an impromptu dinner. We’d had a lovely day taking things slowly: sleep ins; going for a drive in the country; and coming home for afternoon rests followed by feeling recharged enough to feel like cooking for the evening ahead. Still, I didn’t want to lose the sense of relaxation the day had brought so wanted to stick to a simple offering for dinner and dessert. A quick flick through Nigella Lawson’s Nigella Express produced this recipe for Chocolate Croissants and the simplicity of just three ingredients grabbed me immediately. And they turned out to be all the things I love: fast, tasty, cheap to make and easy to prepare. I made these in the late afternoon, but didn’t bake them until we’d finished our main course, which turned out to be delightful timing – allowing dinner to ‘sit’ and then consuming them at their warmest and freshest. Serve stacked up on a platter for a free-for-all feast, or in bowls with cream or icecream. Alternatively these could be made in a more miniature form for church morning teas or a finger food dessert for a larger crowd. The quantities listed below serves 8 and costs around a total of $5.
- 4 sheets of ready rolled puff pastry, thawed and cut once each diagonally to create two large triangles per square
- 1 x 230g bag of Cadbury Choc Bits (I used milk, but use dark chocolate if you prefer)
- 1 egg, whisked in a cup
- Preheat oven to 220 degrees
- Evenly distribute choc-chips along the long end of each triangle of pastry and press them in firmly
- Starting with the long end of the triangle, roll pastry until you have all the choc-chips trapped inside. Then fold each end in to keep chocolate trapped. Then continue rolling into a log shape until all the pastry is rolled up.
- Shape the log of pastry and chocolate into a pretzel shape or whatever shape you like
- Place each on an oven tray with enough space between them to grow a little
- Using a pastry brush, cover each croissant in egg-wash
- Bake for around 15 minutes until brown on outside and mostly cooked through. Enjoy!
CINNAMON SCROLLS

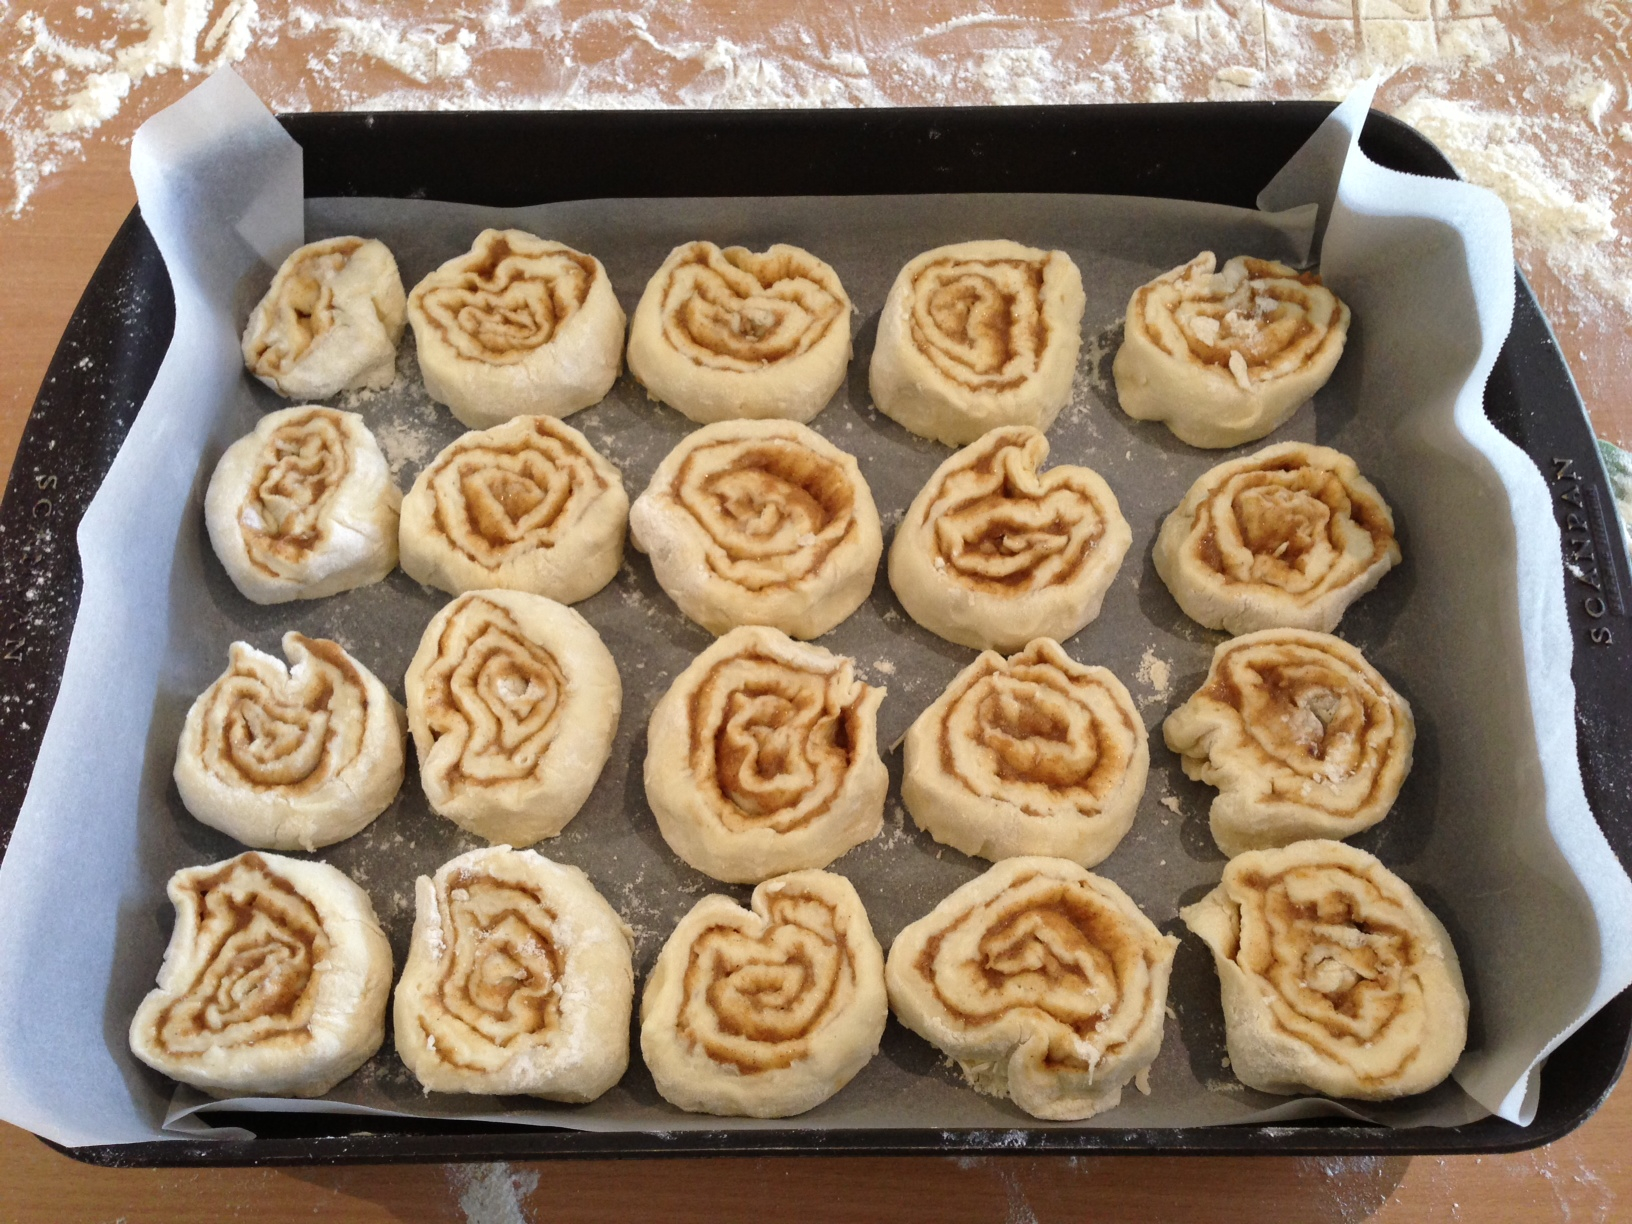
I stumbled upon this sensational recipe on Cath’s blog the other day and was immediately taken with it. So very easy, so very cheap, so very yummy. And seeing as I’m on a bit of a scroll making wave right now, I was keen to give them a go. And although I’m not really meant to be eating sugar at the moment, these have caused me to make some exceptions. These delicious cinnamon scrolls are not much harder to make than scones and pretty much the same cost as the cream goes in the mixture, and not on top. This recipe makes more than a roasting dish worth of scrolls (I had to use another smaller tin, just for the four that wouldn’t fit in!) so would be a great option for Bible study morning tea, afternoon tea playdates, church morning tea or any time at all really. The smell as they were baking was only topped only by the actual enjoyment of eating them. Approximate cost is $3.50 and makes 24 scrolls. Thanks for your blog Cath, and thanks for sharing this recipe with us.
Scroll Mixture:
- 4 cups Self Raising Flour
- 300ml cream
- 300ml milk
Inside Mixture:
- 1/2 cup butter, softened
- 1 cup brown sugar
- 1 tablespoon cinnamon
- Good dash vanilla essence or extract
Icing Mixture:
- 1 cup icing mixture
- enough warm water to make a runny icing
- extra cinnamon if you like (I did!)
- In a bowl, mix self-raising flour with milk and cream.
- The mixture will be quite sticky still, but turn it out onto a well-floured board or bench, and turn it over a few times to flour it well.
- Roll it out into an oblong shape so it is quite thin – the thinner the better, but not so thin that it will tear when you move it.
- In a small bowl, mix together soft butter with brown sugar and cinnamon. Add a hearty dash of vanilla sugar, or vanilla essence. Spread this mixture over the rolled out pastry. Don’t wash the bowl – you will need it later for the icing.
- Using a spoon or pastry brush, spread this inside mixture all over scroll mixture. Roll it up from the long end until you have a log.
- Cut the roll into pieces about 1 inch thick, and lay them in a greased or lined oven tray, close together but not packed in. Sprinkle them with vanilla sugar if you have some.
- Bake them in the oven at 180deg. for 15-20 minutes, or until they are starting to brown nicely.
- In the bowl where you mixed the sugar and butter, mix 1 cup of icing sugar with enough water to make it go runny. The butter and spice left around the edge of the bowl is sufficient to give it a slight flavour, though you might like to add extra cinnamon. Using a dessert spoon, drizzle this over the scrolls while they are still warm.
- Enjoy! Best eaten the same day, though a quick zap in the microwave brings them back to freshness should they need it a day or two later (but they won’t last that long, anyway!).
2 INGREDIENTS COOKIES


So it seems I’m slowly being converted out of my anti-biscuit baking funk by some contributors and their awesome recipes. My old uni friend Katherine has sent in this fantastic contribution – cookies with just two ingredients + whatever mix-ins you might like. There’s so much to love about this recipe: no butter, no eggs, no refined sugar, minimal mixing, less than 5 minutes prep before they go in the oven, they’re much healthier than their mainstream counterparts, they taste terrific and the oatey substance of them is so homely. But since this is a blog about easy and affordable hospitality, I should mention too that they’re a great option to make for last minute guests who drop in (no rolling mixture, just dollop the mixture on the trays using 2 dessert spoons), a yummy addition to a meal provided for folks in need or freezing in advance for the never-ending stock needed for healthy school lunches. Originally from a terrific blog called The Burlap Bag – all credit is given to its author, Lauren who invented these. Using the quantities listed below, with choc-chips used as my mix-in of choice, these little babies will cost you no more than $6 to make 40+ cookies and less if you get bananas cheaper than $3/kg. Thanks for sharing, Katherine and thanks for inventing, Lauren!
- 8 bananas, mashed (or blitzed in food processor)
- 4 cups quick cooking oats (homebrand is fine)
- My mix in: 1 x 230g bag cadbury choc-chips
Mix ingredients together. Old bananas are amazing for this, but you can use fresh ones too. I buy a bunch of bananas, let them get old on my counter, giving the family the opportunity to eat them and then stick what remains in the freezer – whole with the skin on.
Then add in what sounds yummy to you (or nothing!) Lauren suggests these:
– a handful of chocolate chips
– crushed walnut pieces
– cinnamon
– raisins
Lauren’s tip: Since all bananas are different sizes, the needed measurements can vary. If it seems too runny and the cookies would flatten out too much, add in more oatmeal. And make sure to not add in TOO many mix-ins as the cookies won’t hold together very well.
Here’s my tip: If you’re going to add choc chips as your mix-in, use a good quality one this time. With so few ingredients, these won’t hide the taste of poor quality chocolate.
Dollop onto trays using dessert spoons and flatten before baking with a fork. Bake in a moderate oven for around 15 mins. Enjoy!
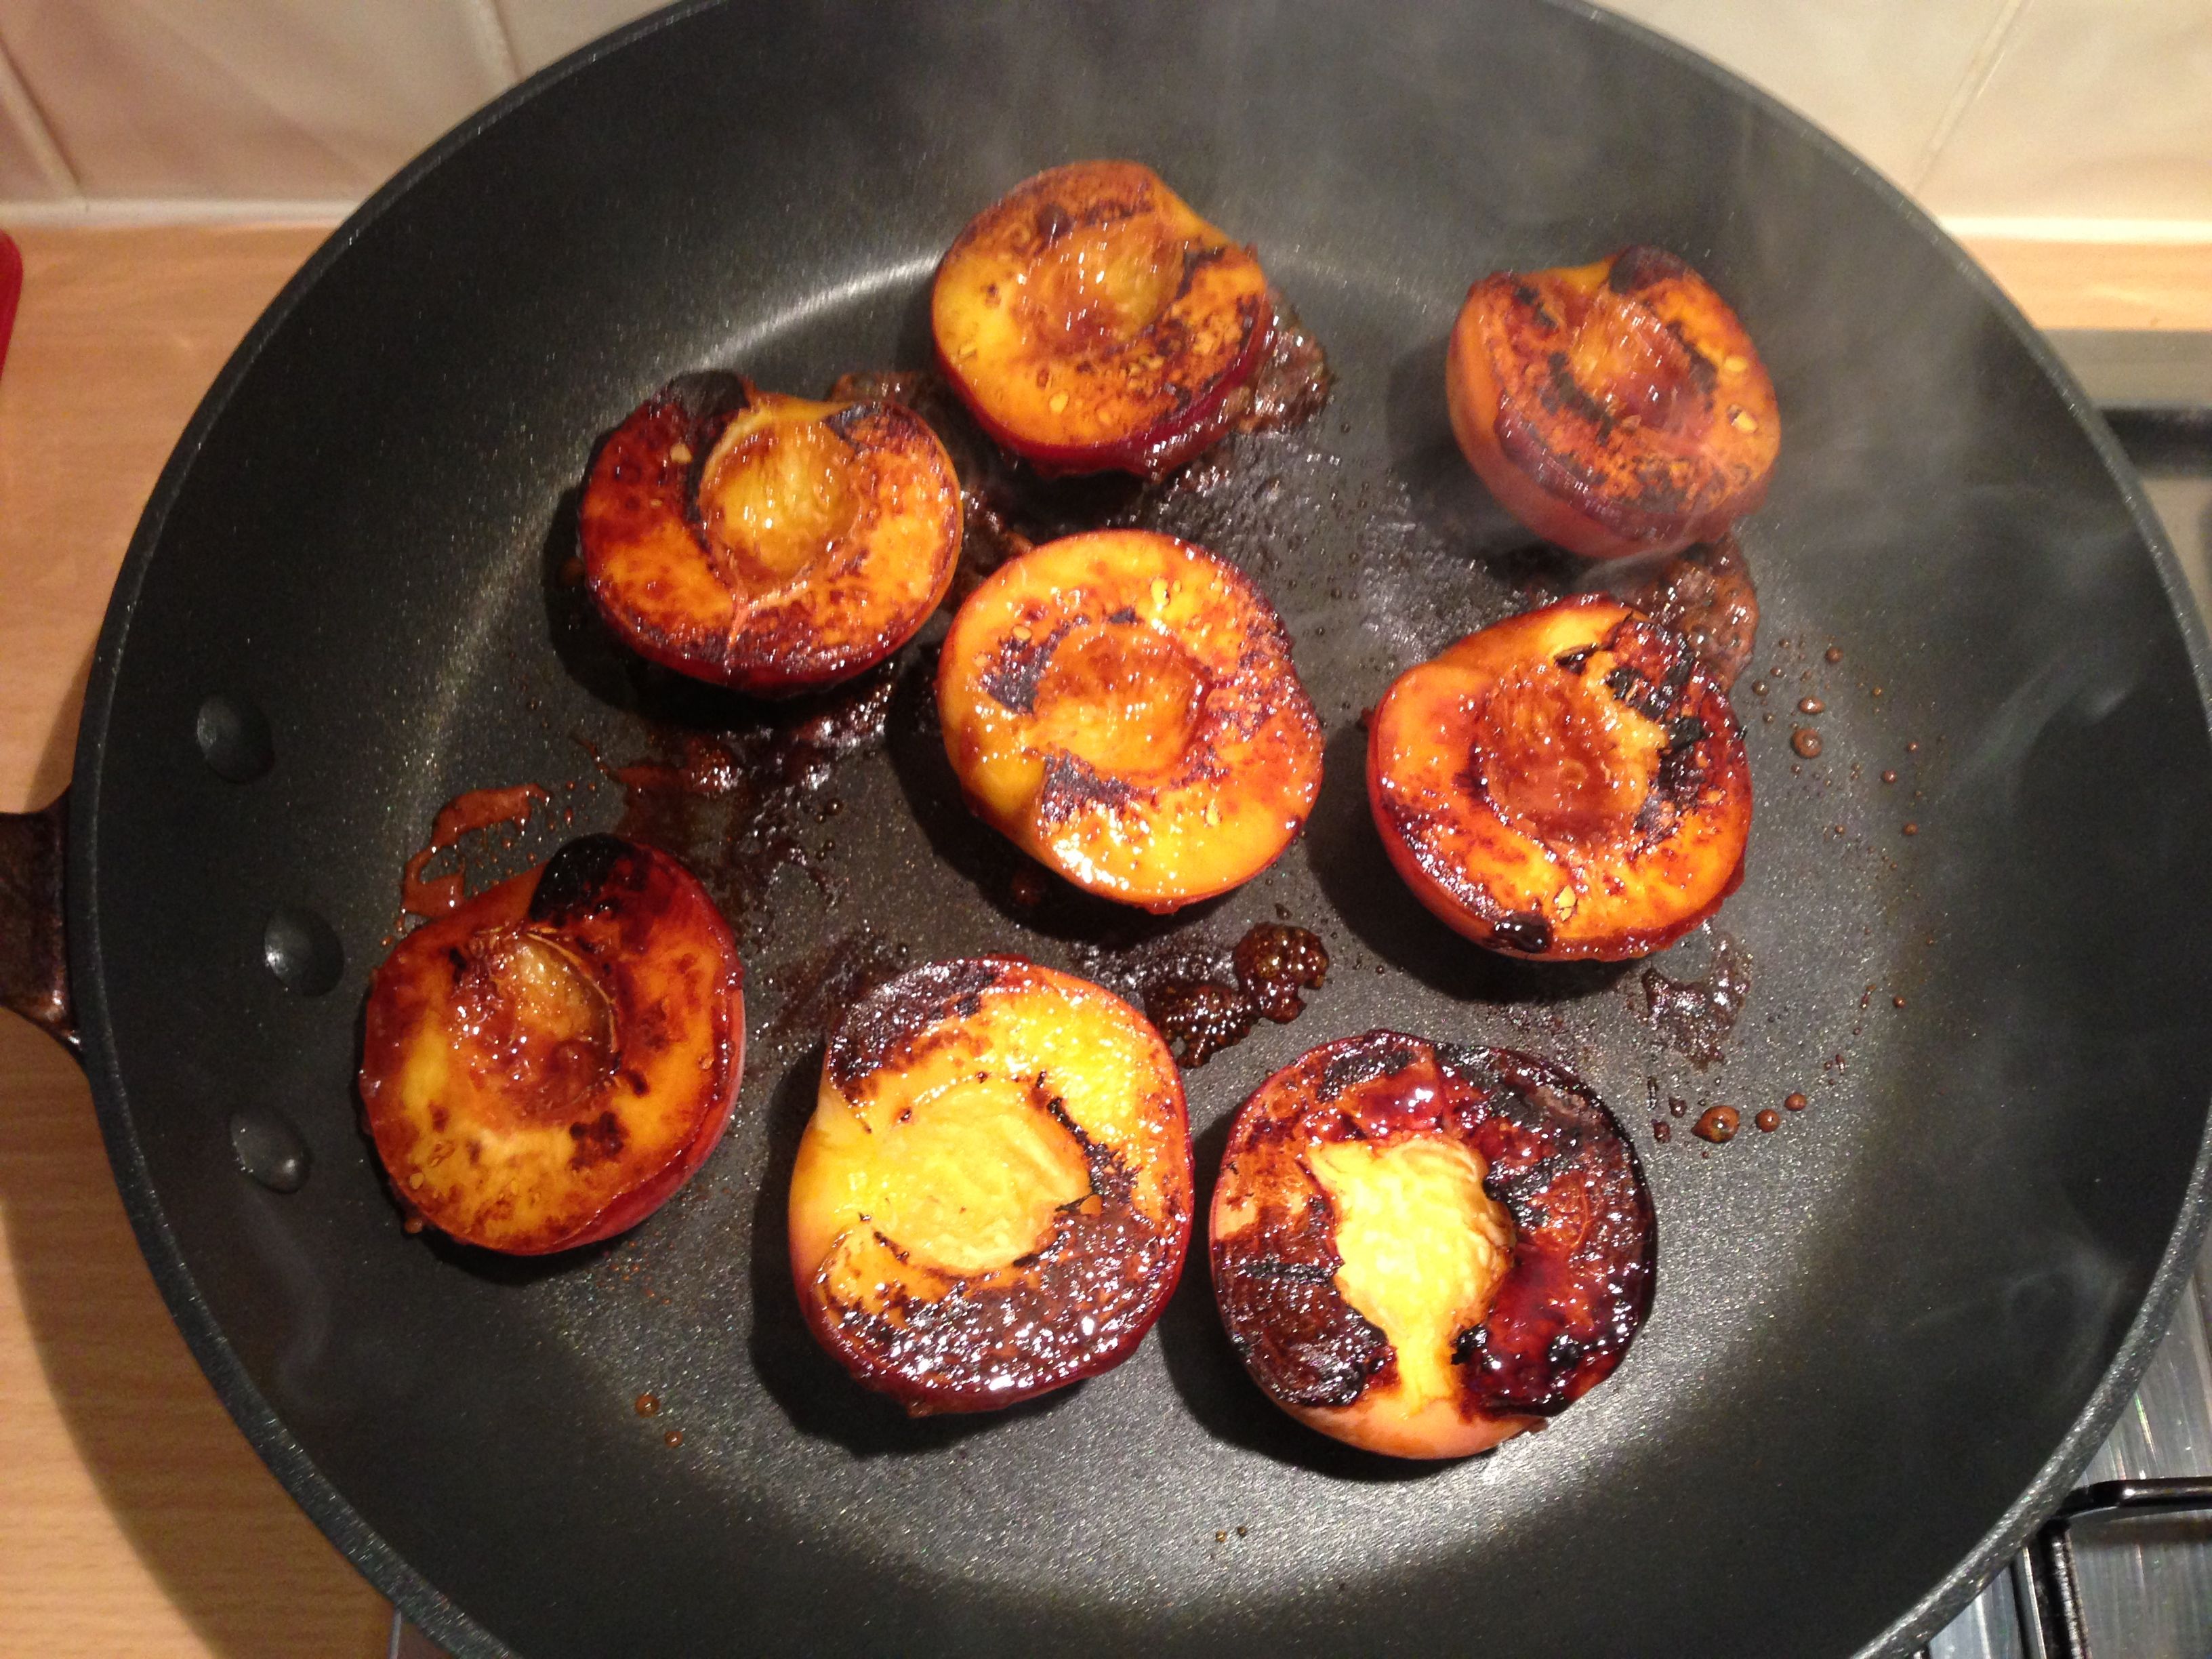
CARAMELISED PEACHES
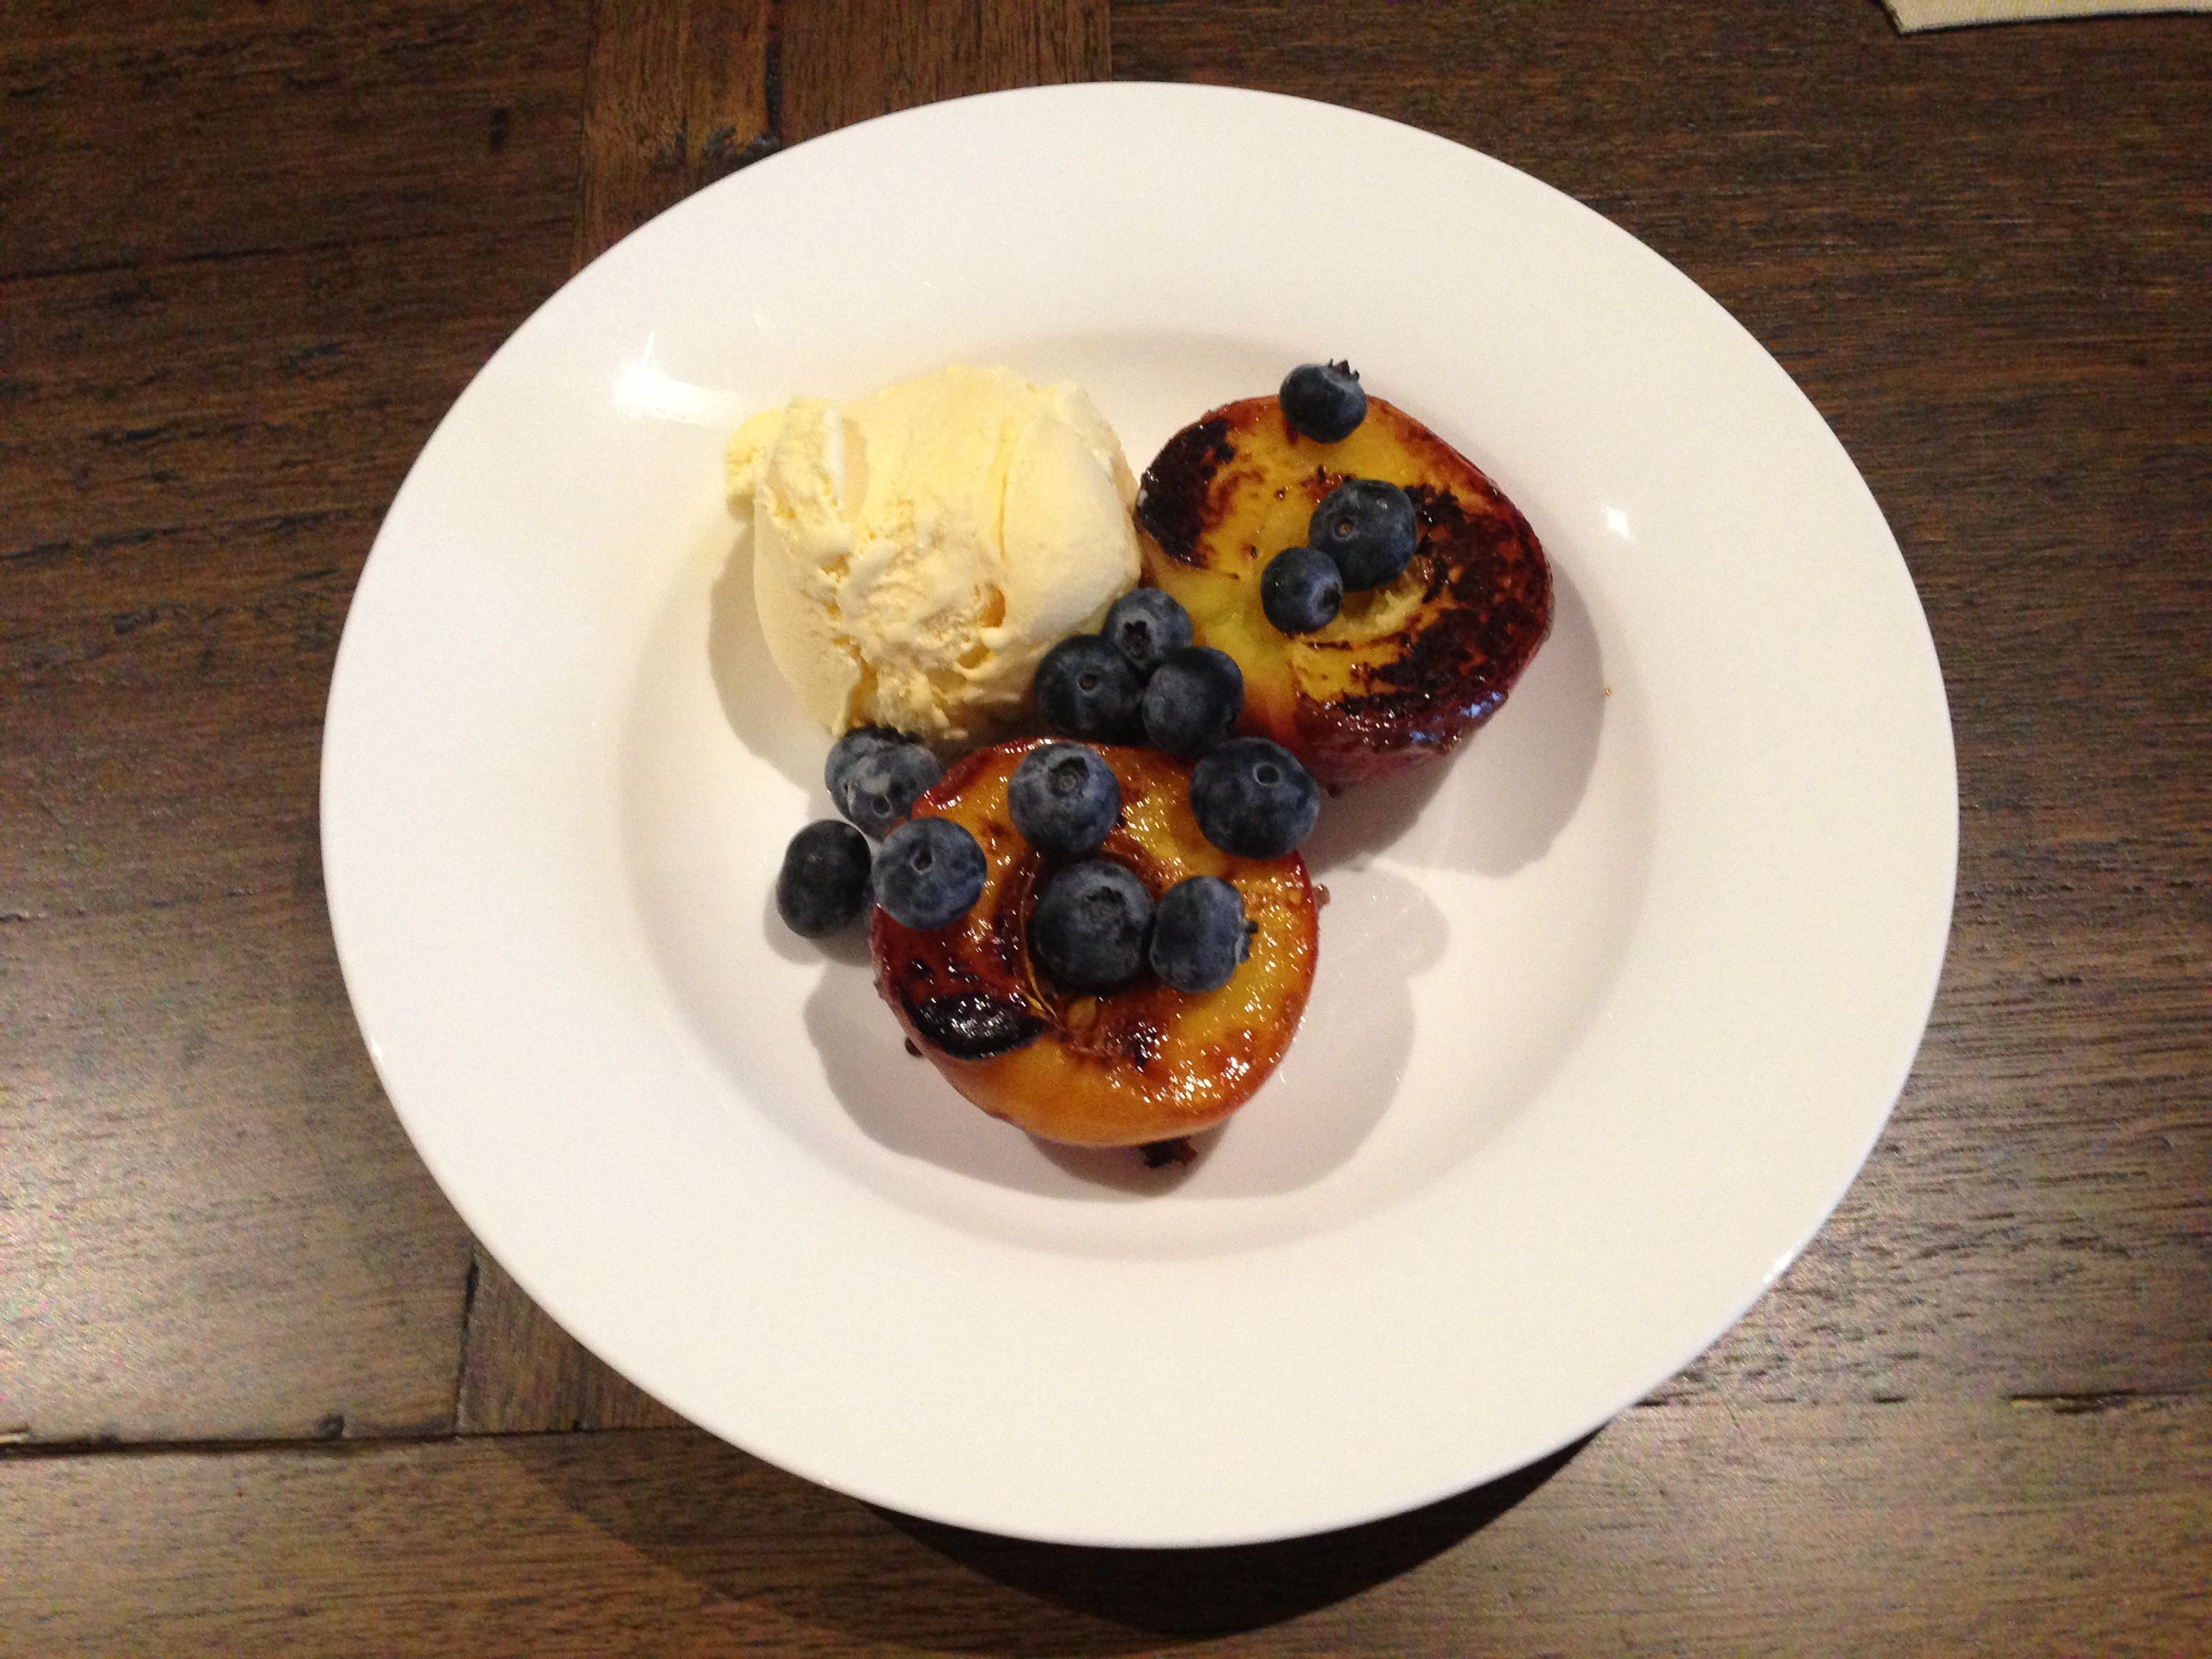

These caramelised peaches are one of my favourite summer desserts. They’re so yummy as well as fast and easy to make – so much so that I simply make it in front of guests while they’re waiting for main course to settle a little. The end result is a healthier type of dessert and it works even without the brown sugar if you’re trying to avoid adding it. The cost of this dessert depends on the current price of peaches and your preference for ice-cream, but easily falls in the affordable category. Serve with a scoop of vanilla ice-cream or thick Greek style yoghurt and a handful of fresh blueberries if they’re as well priced as they are right now – $2.75 a punnet at Woolworth’s.
- 1 peach per person, halved with stone removed
- 1/2 cup brown sugar
- blueberries, ice-cream and yoghurt to serve
- Preheat a frypan or grill to full whack
- Press the wet half of each peach into the brown sugar and place sugar side down in the pan. Cook until sugar caramelises and peach starts to soften slightly
- Turn peaches and cook the outside half briefly until starting to soften also
- Place two peach halves, caramel side up in each person’s bowl. Add ice-cream, or yoghurt and berries. Enjoy!
BALSAMIC STRAWBERRIES

Sometime last year, my friend Soph updated her facebook status with something about having made an easy dessert of sliced strawberries, a splash of balsamic vinegar and spoonfuls of sugar, mixed up and served on icecream. The simplicity of it and the promise of yumminess grabbed my attention and so I had a go at doing it too. Soph was right – the process was instant and simple and the result was sweet strawberries amid a yummy self-made sauce created by the interaction of ingredients. At this time of year strawberries are much cheaper than usual and fruity desserts are perfect for the heat of summer. Use this mixture to make instant strawberry sundaes by spooning masses of it on top of a bowl of ice-cream, or do what our cousin Angela does, and turn it into a quick and easy parfait. I’m keen to use this to make a fast Eton Mess using store bought meringues, ice-cream and whipped cream, though am yet to do so. The cost of this dessert will depend on the price of strawberries and your preference for ice-cream and the quantity below serves 4. Enjoy!
- 1 punnet fresh strawberries, thinly sliced
- 2 tablespoons balsamic vinegar
- 2 tablespoons caster sugar
- ice-cream enough for 4 people
1. In a medium sized mixing bowl place sliced strawberries, balsamic vinegar and caster sugar. Combine all ingredients and allow to rest at room temperature for half an hour.
2. Use as you like, but my favourite is this: spoon mixture across four bowls of ice-cream for grown-up style strawberry sundaes.
CHOCOLATE SLICE

Bible study is at my place tonight and because I have an aversion to rosters, our group doesn’t have one for providing supper. So this afternoon, I found myself in need of a quick and easy solution! Its our last study for the year and like it is for everyone, this time of the year is busy, busy busy! So today was a great day to try out Bek Marshall’s easy Chocolate Slice. It’s a simple melt and mix number which uses standard pantry items and it only takes a couple of minutes to combine the ingredients and whack it in a slice tin. I love the outcome of this one: chewy chocolate slice, able to be iced while still warm (another time saver) and a total cost of less than $3. An absolute winner! Thanks for contributing, Bek!
- 1 cup self raising flour
- 1 tablespoon cocoa
- 1 cup rolled oats
- 1 cup sugar
- 1 tsp vanilla
- 125 g butter or margarine, melted
- 1 egg
- 3 weetbix, crushed
- Mix flour, cocoa, oats, sugar and crushed weetbix. Add vanilla, egg, melted butter and mix. If mixture is too dry add a little milk to the mixture before pressing into a 16x26cm slice tin.
- Cook @ 180deg for 20-25min
- Ice with chocolate icing while still warm. Sprinkle with topping of choice such as nuts, coconut or sprinkles.
PEACH AND RASPBERRY (CAKEY TYPE) TART
 While it is true that winter is my favourite season of the year, I can’t help but feel a little enlivened by the warmer weather and the knowledge that summer is on its way. The shops are starting to supply summery fruits once more: mangoes, melons, apricots and other stonefruits, my favourite being the yellow peach. To celebrate the promise of all things summer, I decided it’s the perfect time to try out this simple and delightful recipe from my friend Jess. I love the way Jess does hospitality – simple and tasty food accompanied by no amount of fuss and flourish, she simply focusses on the folks she’s serving. This lovely dessert is the first of a number of affordable and tasty recipes contributed by Jess – costing no more than $5 and even less when peach season is in full swing.
- 125g butter, softened
- 1 cup / 220g caster sugar
- 1 teaspoons vanilla
- 2 eggs
- 1 ½ cups / 220g self raising flour, sifted
- 2 peaches, cut into thin wedges
- 150g raspberries
- 2 tablespoons icing sugar
1. Preheat oven to 160 degrees and line 22cm springform tin (not a tart tin – the first time I made this I used a loose-bottomed tart tin and it overflowed because the walls of the tin didn’t come up high enough).
2. Beat butter, sugar, vanilla until light and creamy. Add the eggs and beat well.
3. Fold in flour and put in tin.
4. Top with peaches and raspberries and sprinkle with icing sugar (you can do this randomly or with an ordered pattern. I tried to go with random, but seriously struggled not to order my randomness! The picture above shows a bit of both)
5. Bake 1 hour or until cooked through and serve with vanilla ice-cream, thick cream or good quality yoghurt.
BIG BATCH CHOCOLATE CHIP COOKIES


In general, I don’t really like baking biscuits. I do love the taste of a chewy homemade chocolate chip cookie, but just the thought of repetitively rolling teaspoonfuls of mixture into little balls and cycling tray after tray through the oven, is enough to make me flip-out before I even begin. But when my friend Cathy sent this recipe the other day, I was forced to reconsider my anti-biscuit position. The recipe that follows does away with rolling balls of mixture (yay!) though you can still do that if you prefer, and is made in super-sized quantities that fit the bill for multi-purpose cooking (individually wrapped for school lunches, supper for Bible study, morning tea when cooking for a camp or just for filling the household cookie jar). Along with all these things, I fell in love with this recipe because each of the logs of uncooked cookie mixture can be wrapped in plastic wrap and frozen for emergencies. Simply thaw the log out on 50% in the microwave, cut into rounds and bake for 10 minutes in a moderately slow oven. When I trialled this bumper cookie recipe, I chose to bake half the mixture into 48 biscuits, and freeze the other half in two logs for whenever I need them next. Using Nestle chocolate melts, this recipe, that costs no more than $12 to make (even less if you use homebrand chocolate) works out at just 12 cents per cookie and has definitely softened me up when it comes to biscuit baking!
- 500grams softened butter or margarine (I use butter)
- 2 cups/460g castor sugar
- 1 x 395 tin condensed milk (I use homebrand)
- 2.5 cups/380g plain flour
- 2.5 cups/380g self raising flour
- 190g each of dark, milk and white chocolate melts (half a Nestle Melts packet of each)
- Preheat oven to 170 degrees.
- Using an electric mixer or beaters, cream butter, sugar and condensed milk. Mixture perfectly fits 5L mixing bowl. If yours is smaller than this, use a plastic all-purpose bowl, readily available in laundry section of the supermarket.
- Stir in flours until combined and then stir in choc chips.
- On a floured bench top, divide mixture into four equal portions and roll into evenly shaped logs.
- Each log makes 24 biscuits, so starting in the middle, with a knife, cut the log in half leaving two portions to make 12 biscuits from each. Cut each section again to make 4 portions which will make 6 biscuits from each. Again, cut each of the four portions in half again, which will make 3 biscuits from each. Finally, cut each of these smallest portions into three equally sized rounds. Repeat the process for each log. This ensures evenly sized biscuits and production of exactly 96 biscuits.
- Roll each portion into balls, or do as I do and just place the cut up rounds straight on lined oven trays.
- For a crunchier biscuit bake until golden for around 12 minutes, and if you prefer a chewier cookie, cook for no longer than 10 minutes and remove from oven while still a little pale. Cool on tray or wire rack.
SUPER SIMPLE BISCOTTI


I do love homemade biscotti so was very excited when this simple and yummy recipe landed in by inbox from my friend Soph, who found it on a friend’s blog. Needing to provide dessert for dinner with friends this week, I decided to give these a go because they were able to be made ahead of time, and Soph’s super do-able serving suggestion of dipping in chocolate fondue grabbed me immediately. Don’t be turned off by the two stage cooking process – this recipe is still dead easy and really nowhere as labour intensive as it might seem. I have never succeeded in making biscotti wafer-thin, but having tried, failed and still enjoyed eating chunkier homemade versions of it, I’ve decided I’m okay with it. This winning recipe costs less than $3 to make. Thanks Soph, for this terrific contribution.
- 1/4 cup oil
- 1/2 cup sugar
- 2 tsp vanilla essence
- 2 eggs
- 1 3/4 cup all purpose flour
- 1 tsp baking powder
- pinch of salt
- 1/2 cup cranberries
- 3/4 cup roasted almonds (Woolworth’s homebrand are terrific and cheap!)
1. In a mixing bowl, mix together the sugar and oil until combined.
2. Add eggs and vanilla essence and mix thoroughly until combined.
3. Add flour, baking powder and salt to the egg mixture, and stir to form a dough. When all the flour is almost incorporated, add in the cranberries and almonds. Continue stirring until all the flour is incorporated and a dough has formed.
4. Take half the mixture and using wet hands, form it into a log. Place the log onto a tray lined with baking paper and pat into a smoother log shape. Repeat with the remaining dough
5. Bake at 300F/150C for 35-40 minutes until the logs are slightly golden.
6. Remove from the oven and cool. Reduce oven heat to 275F/135C.
7. Once the logs are cool enough to handle, slice into slices. Place sliced biscotti back onto tray and bake for 8-10 minutes until crisped.
NIGELLA LASWON’S COCONUT CAKE

Ages ago, my friend Amy suggested this cake would be perfect here at foodthatserves and yesterday, I finally got around to making this chuck-almost-everything-in-the-food-processor cake. If you follow the recipe below, you’ll end up with a yummy looking cake much like the one above and you’ll love the taste too. For those who are trying to reduce their overall fructose intake, I was so thrilled with the result of this using dextrose instead of sugar. You can buy dextrose from the home brew section of Big W(oop) as it’s affectionately known in our household or from specialty home brew shops and health food stores. Dextrose is actually cheaper than caster sugar to buy and all I did in this case was exchange it directly for the 175g sugar required. The fructose free cake that resulted was yummy and just like a normal cake. Instead of the icing Nigella suggests, I served it with whipped cream and defrosted blueberries from the freezer – so good. Total cost to make is around $3.
- 175g/6oz butter, softened
- 175g/6oz golden caster sugar
- 175g/6oz self-raising flour
- 1 1/2 tsp baking powder
- 3 eggs, beaten
- 50g/2oz desiccated coconut
- 2 tbsp coconut cream, or single cream
FOR THE BUTTERCREAM FILLING AND TOPPING:
- 280g/10oz icing sugar
- 100g/4oz butter, softened
- 3 tbsp coconut cream, or single cream
- 5 tbsp raspberry jam
- Preheat your oven to 180C (fan oven 160C), Gas 4. Butter two 20cm sandwich tins with greaseproof paper.
- Mix the butter, sugar, flour, baking powder and eggs in a food processor for 2-3 minutes until smooth. Gently stir in the coconut and cream.
- Divide the mixture between the tins and smooth the tops. Bake for about 25 minutes until golden and firm.
- Loosen the edges and leave in the tins for 5 minutes, then turn out on to a wire rack to cool. Peel off lining paper.
- To make the buttercream: beat together the icing sugar, butter and coconut cream until smooth. Spread one sponge with the jam. Top with just under half the buttercream and sandwich with the other sponge. Swirl the remaining buttercream on top of the cake.
BIG BATCH BANANA CHOC-CHIP MUFFINS


More often than not these days, I find myself in need of inexpensive and simple recipes that can be made in massive quantities. I’ve realised this is because I don’t have enough time to bake or cook for just one purpose: whatever is on the go has to meet the need of a freezer requiring a terms worth of school little lunches, morning tea for church or suppers for Bible study. I also find it’s much more cost-efficient. So when my friend Kim gave me this bumper recipe for 60 banana choc-chip muffins I was over the moon. Now that bananas have come down in price (it seems it’s not too hard to get them for $2 per kg), now is a great time to make these moist and fudgey treats. If you don’t need 60, this recipe is easily halved. An important tip about these muffins: feel free to use homebrand choc-chips. They’re much smaller than their more expensive counterparts and actually work better in this recipe. Depending on the price of bananas, all up this huge batch of deliciousness costs approximately $20. Thanks for sharing, Kim!
- 15 very ripe bananas (approx. 4kg)
- 3 1/2 cups sugar (700g)
- 5 eggs, slightly beaten
- 375g butter, melted
- 5 teaspoons baking soda
- 2 1/2 teaspoons salt
- 7 1/2 cups self raising flour (1.2kg)
- 4 x 250g packets choc-chips (1kg)
- Preheat oven to 180 degrees celsius and distribute muffin cases across as many muffins trays as you have and will fit in your oven.
- Put all the bananas in the bowl of a food processor and blitz until creamy.
- Put all dry ingredients in a huge bowl or plastic 6L all-purpose basin (see picture).
- In a large mixing bowl combine mashed bananas, sugar, eggs and melted butter. Tip this wet mixture into the dry ingredients and mix until combined, but don’t over do it.
- Using two dessert spoons, dollop one heaped spoon worth of mixture in each muffin case. Bake for 15-20 minutes until brown and cooked through. Enjoy!
FAST PORTUGUESE TARTS

Recently my friend Anna reminded me of this recipe I’d used lots a few years ago. The recipe is my take on Portuguese Tarts, morphed into its current form from a Stephanie Alexander Lemon Tart recipe. These little custardy wonders are dead easy, really yummy and make a very affordable morning/afternoon tea or dessert when served with a dollop of cream or a scoop of ice-cream. They’re quick to make and store for 5 or so days in an airtight container. This recipe makes 36 tarts and costs around $5.
- 4 sheets of ready rolled puff pastry
- 6 eggs
- 250g caster sugar
- 300ml cream
- 2 tablespoons real vanilla extract
1. Cut pastry rounds big enough to fit muffin sized tins, with a little extra to go up the sides. Should get 9 out of 1 sheet of pastry.
2. In a bowl combine all the other ingredients with a whisk. Pour liquid into a jug.
3. Fill pastry cases to almost full and bake at preheated oven at 180 deg for 20 mins or until browning on top. Tarts will have risen and look huge, but will fall again when cooling (which is what you want).
4. Cool on wire racks and serve either warm or cold on a platter with them all piled up and dusted with icing sugar. Makes 36.
STEPHANIE ALEXANDER’S LEMON DELICIOUS

I have the fondest memories of my Nan’s Lemon Delicious pudding. As kids we spent lots of holidays at my grandparents’ home at Tumut Plains in country NSW. It was my most favourite of all her desserts and once she knew how much I loved it, she would always make it when she knew I was coming. It was always paired with a main that she called ‘Old Faithful’ which was essentially a Tuna Mornay baked on a bed of brown rice and topped with rounds of sliced fresh tomato and grated cheese. In my mind they go together now. These days I love Lemon Delicious for the added benefit of being so cost efficient: the whole pudding costs around $3 to make and feeds 8. Enjoy finding the lemon sauce that pools in the bottom of the dish and serve with cream or icecream.
- 2 lemons
- 60 g butter
- 1 1/2 cups castor sugar
- 3 eggs, separated
- 3 tablespoons self-raising flour
- 1 1/2 cups milk
- Preheat oven to 180°C and butter a 1 litre oven proof basin or serving dish.
- Zest 1 of the lemons and juice both. In a food processor, cream butter with zest and sugar, then add egg yolks.
- Add flour and milk alternately to make a smooth batter. Scrape mixture from sides of processor bowl and blend in lemon juice. Transfer to a clean basin.
- Whisk egg whites until creamy and firm and fold gently into batter. Pour batter into prepared basin.
- Stand basin in a baking dish and pour in hot water to come halfway up sides of basin. Bake for 1 hour. Allow to cool a little before serving.
WOMEN’S WEEKLY FAMILY CHOCOLATE CAKE


Years ago, my friend Amy made this cake for one of her children’s birthdays while I was at her house for a cuppa. She baked and I watched from the breakfast bar while sipping tea – one of my favourite things to do with friends, whether I’m the one cooking or watching! I took the recipe home that day and have been making it ever since. This moist and chocolatey cake is so fudgey and the cake itself is absolutely as good as the frosting! It makes a whopping great big slab, baked in a roasting dish. Terrific for large crowds or dividing up for a multitude of school lunches, this one freezes fabulously.
- 2 cups (500ml) water
- 3 cups (660g) caster sugar
- 250g butter, chopped
- 1/3 cup (35g) cocoa powder, sifted
- 1 teaspoon bicarbonate of soda, sifted
- 3 cups (450g) self-raising flour
- 4 eggs, beaten lightly
- 90g butter
- 1/3 cup (80ml) water
- ½ cup (110g) caster sugar
- 1½ cups (240g) icing sugar mixture
- 1/3 cup (35g) cocoa powder
- Preheat oven to moderate. Grease deep 26.5cm x 33cm (14 cup/3.5 litres) baking dish: line base with baking paper.
- Combine the water, sugar, butter and combined sifted cocoa powder and soda in medium saucepan; stir over heat, without boiling, until sugar dissolves. Bring to a boil then reduce heat; simmer, uncovered, 5 minutes. Transfer mixture to large bowl; cool to room temperature.
- Add flour and egg to bowl; beat with electric mixer until mixture is smooth and changed to a paler colour. Pour mixture into prepared dish.
- Bake cake in moderate oven about 50 minutes. Stand cake in baking dish 10 minutes, before turning onto wire rack; turn cake top-side up to cool. Spread cold cake with fudge frosting.
Fudge frosting:
- Combine butter, water and caster sugar in small saucepan; stir over heat, without boiling, until sugar dissolves. Sift icing sugar and cocoa powder into small bowl then gradually stir in hot butter mixture. Cover; refrigerate about 20 minutes or until frosting thickens. Beat with wooden spoon until spreadable.
TIP: Choose a perfectly level-bottomed baking dish; one made from cast aluminium is the best choice, but almost any type will work. If the cake appears to be cooking too quickly in the corners of the pan, reduce oven temperature to moderately slow; this will increase cooking time by up to 15 minutes.
SUGAR FREE CHOCOLATE SOUR CREAM CAKE


I can’t tell you how excited I am to be blogging about this cake! I’ve been fiddling about and am so happy with the flavour of this chocolate cake made on stevia instead of sugar. The cake that results is moist and chocolatey but isn’t at all rich. The whipped cream tops it off nicely, and although it looks dry when it comes out of the oven, it’s really not at all on the inside (the second picture shows it’s moist loveliness best). When covered in cream, this phenomenon isn’t noticed at all. This cake costs less than $5 to make and can be topped with berries of your choice for an even fancier (mostly) sugar free dessert (obviously berries have some sugar, but not much).
- 300 grams plain flour
- 100grams stevia (Natvia is my preferred brand for taste)
- ¾ teaspoon baking powder
- ¼ teaspoon bicarb soda
- ½ teaspoon salt
- 200grams butter, cut into cubes and softened
- 50grams cocoa (Woollies homebrand has improved LOTS and is now quite useable)
- 200ml or ½ cup sour cream
- 3 large eggs
- 1 ½ teaspoons vanilla extract
- 120ml or 1/2 cup milk
- 300ml cream, whipped
1. Preheat the oven to 180°C (170 degrees fan forced). Grease and line your choice of 25cm springform tin, 25cm square tin or 25cm ring tin.
2. In the bowl of an electric mixer, combine the flour, stevia, baking powder, baking soda and salt.
3. Then, using the electric mixer on a low setting, add the cubed, softened butter. This will produce a rough crumb-like consistency.
4. In a wide-mouthed measuring cup, whisk together the cocoa, sour cream, eggs and vanilla, then slowly add this cocoa mixture to the ingredients in the bowl, beating until thoroughly combined. With motor running slowly, add milk which will make the batter take on a dropping consistency.
5. Pour the batter into tin and bake for 40 minutes. The cake will have risen and cracked a little on top. Don’t stress about this – although it looks dry, it’s actually quite moist on the inside. Leave in the tin for 10 minutes on a cooling rack, then turn out to cool.
6. When cake has cooled completely, top with whipped cream and store in the fridge.
BLUEBERRY MUFFINS 2 WAYS
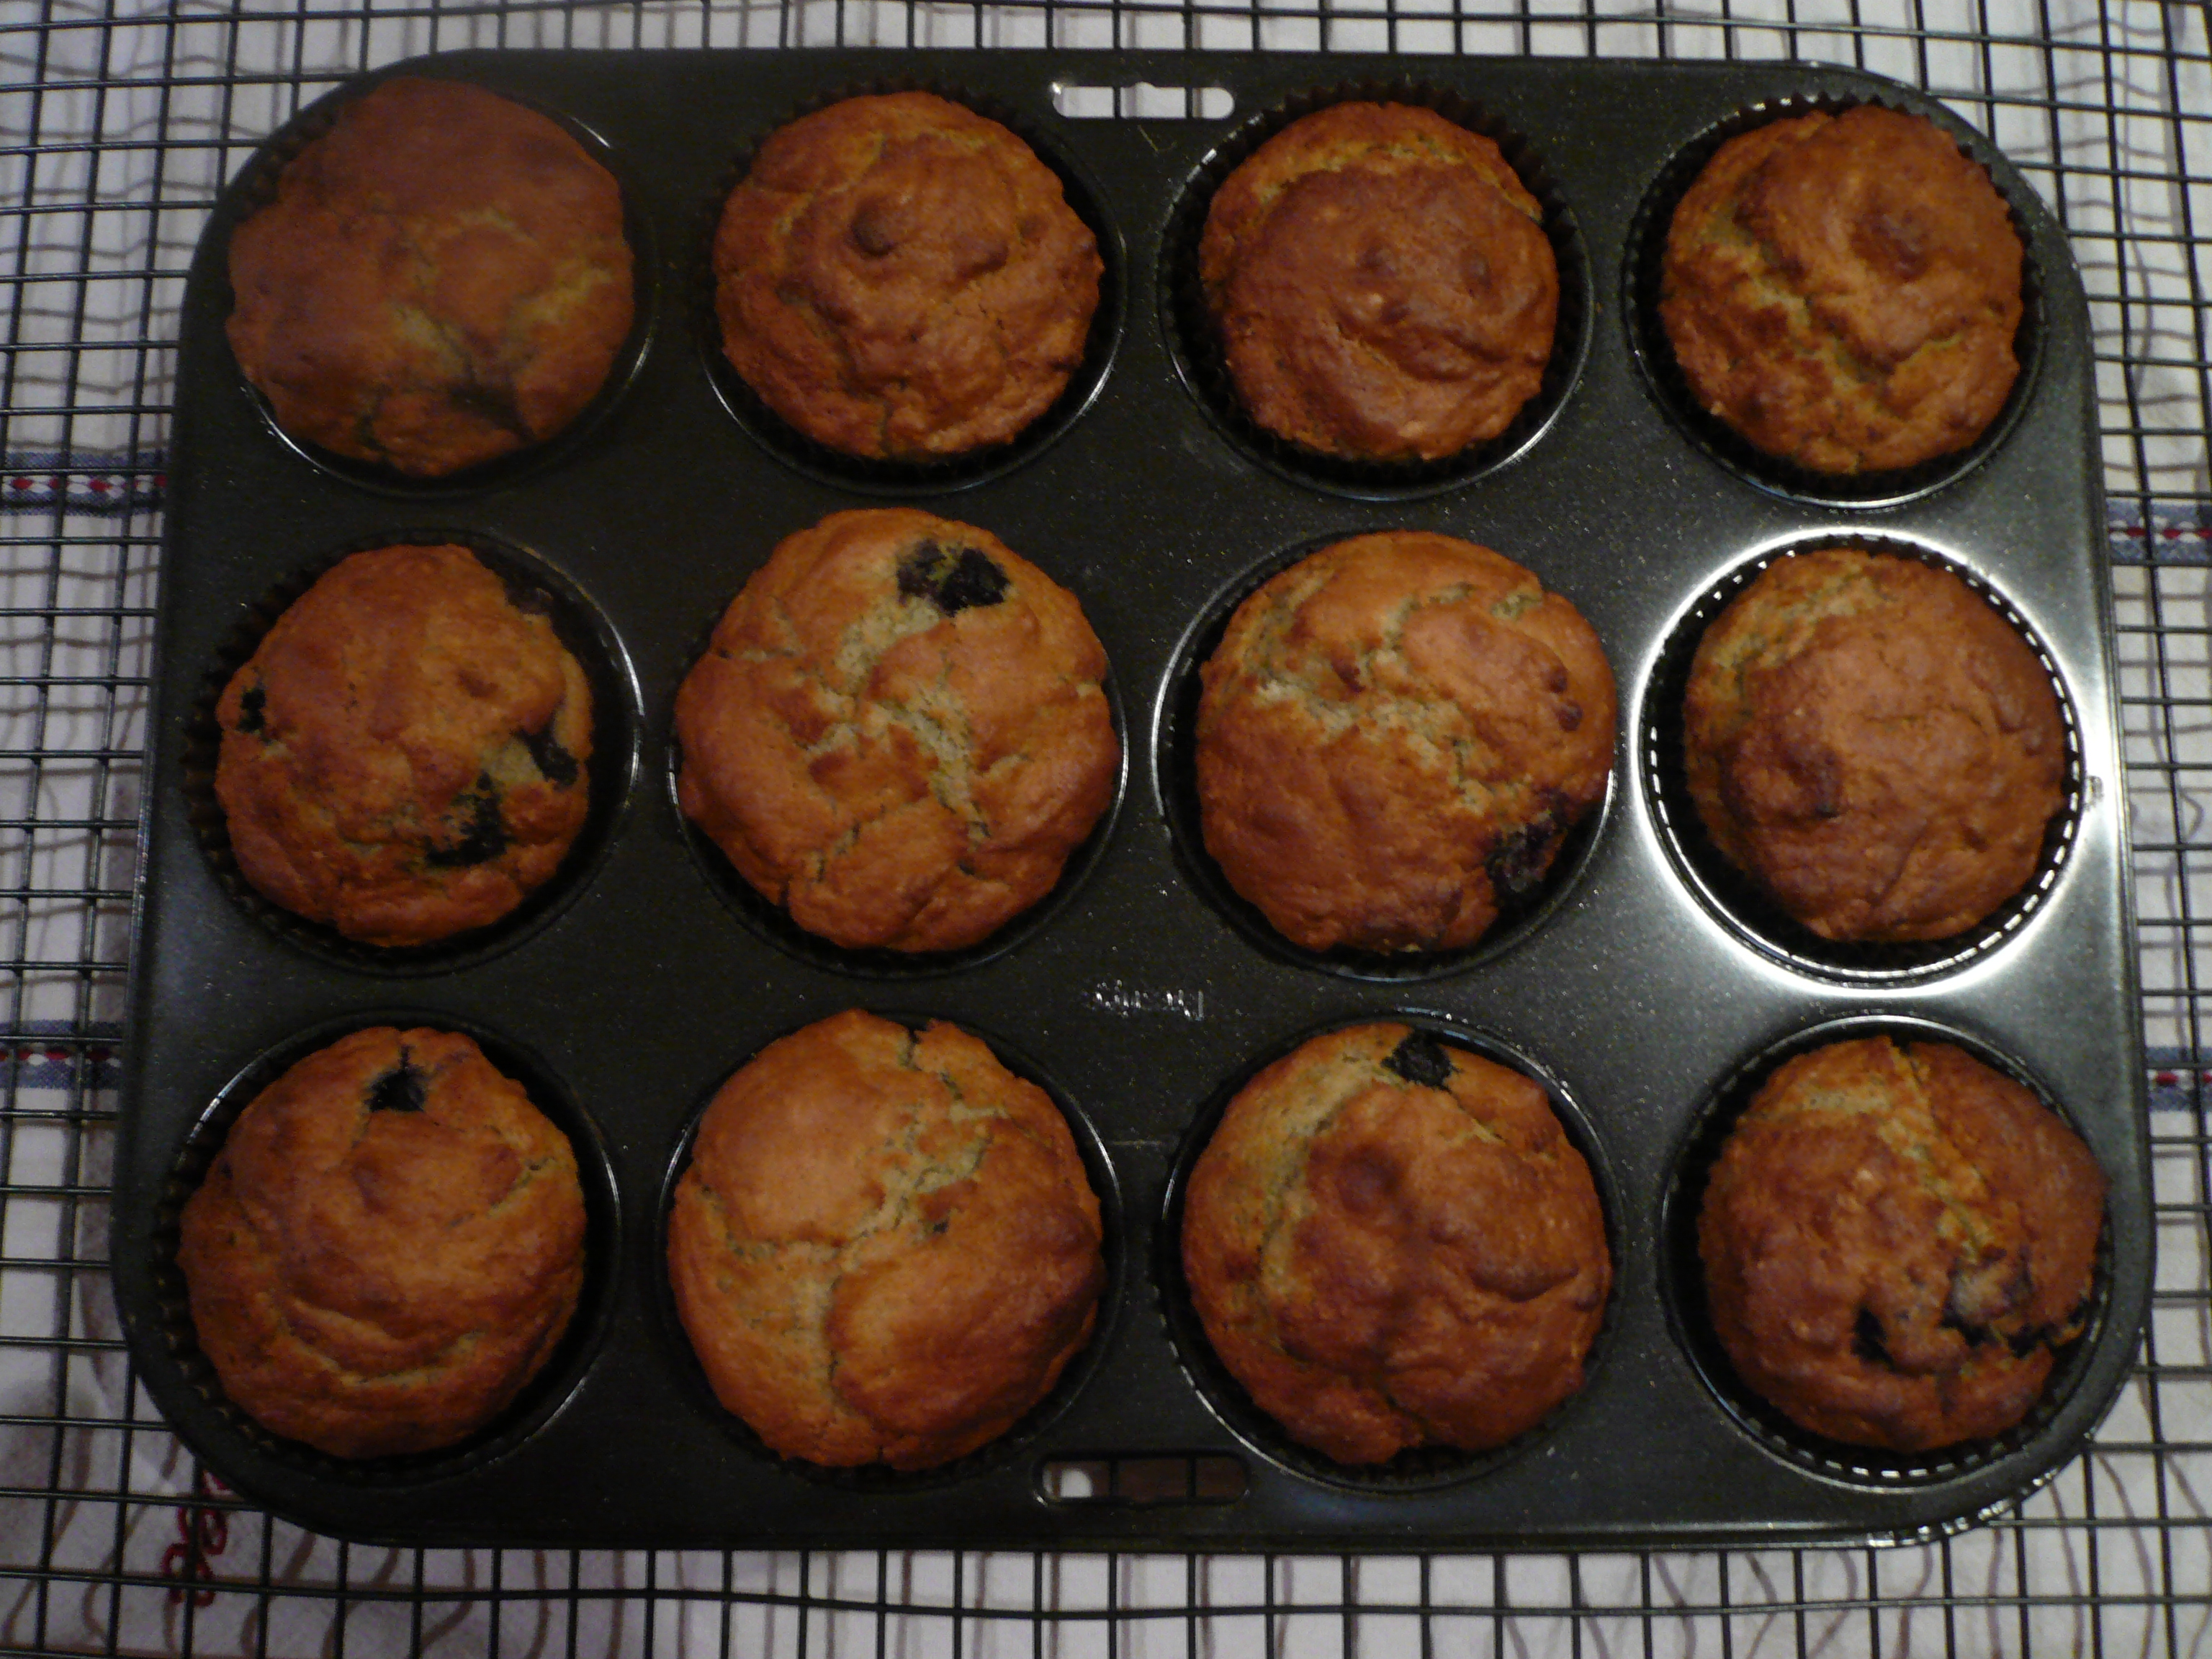
Above: Original Blueberry Muffins
Below: Sugar Free Blueberry Muffins

I have been using this Blueberry Muffin recipe by Nigella Lawson for years as my basic muffin recipe, morphing the flavours to suit what is desired – raspberry and white chocolate, chocolate chip and berry flavoured. Recently I’ve needed to modify it to be made on Stevia rather than sugar and it still works quite well. Below you’ll find the original recipe and the version of it I use when making them sugar free. Please don’t go to the shop to buy buttermilk, I’ve only ever used the yoghurt and milk replacement and it work fine. These are fast to make and will cost you no more than $3-4 depending on your choice of filling.
- 75g unsalted butter,
- 200g plain flour
- ½ tsp bicarb of soda
- 2 tsp baking powder
- 75g caster sugar
- Pinch of salt
- 200ml buttermilk (or 100g yoghurt and 100ml milk)
- 1 large egg
- 200g blueberries (I often use less to reduce cost)
- 12 hole muffin tray lined with 12 paper cases
- Preheat oven to 200C/gas mark 6.
- Melt the butter and set aside to cool a little.
- Combine all the dry ingredients in a bowl and in a measuring jug beat together the buttermilk (or yoghurt and milk), egg and melted butter.
- Using a wooden spoon and a light hand, pour the wet ingredients into the dry and mix gently to combine. Don’t worry about lumps, the important thing is the mixture isn’t over-worked.
- Fold in the blueberries, again keeping mixing to a minimum.
- Spoon into the muffin cases and bake for 20 minutes, by which time the muffins should be risen, golden and firm on top.
BANANA BREAD (WITH NO ADDED SUGAR)

Having had some requests for some sugar free recipes, I thought I’d share this one. I make this modified banana bread (originally another Nigella recipe) in muffin sizes for my kids lunches all the time and the best part is I know that the only sugar in it comes from the bananas themselves. This recipe calls for stevia instead of sugar and you can buy it in a variety of granulated brands in the sugar aisle next to the artificial sweeteners. The exciting thing about stevia is that it’s totally natural so there’s no bad after taste and it’s also much sweeter than sugar so you really only need 1/4 of the amount you might normally use when baking with sugar.
- 250g plain flour
- 2 teaspoons baking powder
- 1/2 teaspoon bicarbonate of soda
- 1/2 teaspoon salt
- 125g unsalted butter, melted
- 50-75g stevia (add enough to suit your desire for ‘sweetness’)
- 2 large eggs
- 4 small, very ripe bananas (about 300g weighed without skin), mashed
- 1 teaspoon vanilla extract
- 23 x 13 x 7cm loaf tin, buttered and floured or with a paper insert
- Preheat the oven to 170ºC/gas mark 3 and get started on the rest. Put the flour, baking powder, bicarb and salt in a medium-sized bowl and, using your hands or a wooden spoon, combine well.
- In a large bowl, mix the melted butter and stevia and beat until blended. Beat in the eggs one at a time, then the mashed bananas. Then, with your wooden spoon, stir in the vanilla extract. Add the flour mixture, a third at a time, stirring well after each bit. Scrape into the loaf tin and bake in the middle of the oven for 1-11/4 hours. When it’s ready, an inserted toothpick or fine skewer should come out cleanish. Leave in the tin on a rack to cool, and eat thickly or thinly sliced, as you prefer.
JODI’S MUM’S LEMON TEA CAKE

The lemon tree out the side of my house has been bursting with lemons for the last few weeks and I’ve been racking my brain to find ways to use them up. I’m really not the most sentimental of people but I quite like it that the variety of lemon my tree brings forth is a ‘Meyer’ lemon – my maiden name. According to my grandmother, one of our long lost relatives first propagated it and it’s now one of the most readily available varieties. So I was excited when my friend Jodi emailed me her mother’s recipe for Lemon Tea Cake. When I made this ridiculously easy cake, I so enjoyed the neatness of it all – using all the lemon’s rind and juice with no wastage. This cake will set you back no more than 20 minutes and $3. Thanks for sharing, Jodi.
- 1 1/2 cups self raising flour
- 1 cup sugar plus 1/4 cup extra
- 1/2 teaspoon salt
- 120g butter
- 2 eggs
- 1/2 cup milk
- zest of 1 lemon
- juice of 1 lemon
- Preheat oven to 180 degrees (170 fan forced). Grease and line a 20cm round, ring or loaf tin.
- In a medium sized bowl, sift flour, add sugar and salt. Rub in butter. (This is done easily if you grate butter cold, straight from the fridge.)
- Combine beaten eggs and milk and stir into mixture. Fold in lemon rind.
- Pour into the tin and bake for about 50mins, but start checking earlier with a skewer.
- Mix juice of lemon and 1/4 cup sugar and remove cake from the oven. Immediately spoon lemon juice/sugar mixture over cake and allow to soak into the cake.
- Leave in tin to cool. Serve by itself or with cream and ice cream for dessert.
CHOCOLATE FUDGE SLICE WITH CARAMELLO CHOCOLATE


A number of years ago my friend Kara gave me this divine recipe and since then it’s been one of my favourites for when I need to quickly make a morning or afternoon tea or a fast dessert. The consistency of the slice is nice and chewy with the oozing Caramello chocolate randomly permeating the mixture. It’s a fast melt and mix recipe which will take you no more than 10 minutes to mix and pop into the oven. One of the things I love most about this recipe is it’s versatility – my friend Nicole makes it with white chocolate chunks and it’s easy to substitute the Caramello for whatever chocolate you prefer. If you buy your chocolate on special and use home brand condensed milk, this yummy option will cost less than $6 to make. Finally, consider using it as a desert serving up a square for each person with a scoop of ice cream. Serves 24+
- 1 cup self raising flour
- 1/2 cup brown sugar
- 1/2 cup coconut
- 2 heaped tabs cocoa
- 125g butter, melted
- 400g can condensed milk
- 1 family size block Cadbury Caramello chocolate (replace with whatever you fancy)
- Grease and line a rectangular 16x26cm slice tin with baking paper. Preheat oven to 180 degrees (fan-forced 170 deg).
- In a large mixing bowl combine all the ingredients (except chocolate), press into slice tin. Break chocolate into individual squares and press them randomly and firmly into the mixture in the tin.
- Bake for 20-25 mins, but start checking early. The slice should be rise back after a light touch but still be a little wobbly and soft when it comes out of the oven. It will continue to cook as it cools.
NIGELLA LAWSON’S CHOCOLATE POTS

This is one of the easiest, yummiest and affordable dessert recipes I’ve ever come across. I love food that’s served in ramekins because it always looks great and costs are kept down by controlling portion size. Originally from Nigella Lawson’s Nigella Bites, this gluten free dessert is a winner in my book because it takes no more than 10 minutes to make and then it’s straight into the fridge for later – and it’s literally all done. Every time I make these rich little treasures they get devoured. The mixture makes 8 small ramekins (about 1/3 cup capacity each), but In the photo above, I over-filled mine and so it only made 6 portions. I picked up my little ramekins from Kitchen Antics for $1.95 each. Tonight they’re on offer because it’s the State of Origin and my sister and brother in law are coming to watch it with us. Total cost $3.
- 175 grams dark chocolate, minimum 70% cocoa
- 150 ml thickened cream
- 100 ml milk
- 1/2 teaspoon vanilla extract
- 1 egg
- Crush the chocolate to smithereens in a food processor. Heat the cream and milk until just about boiling, add the vanilla and pour down the funnel over the chocolate. Let stand for 30 seconds. Process for another 30 seconds, then crack the egg down the funnel and process again for 45 seconds.
- Pour into 8 little ramekins until 3/4 full. Refrigerate for 6 hours or overnight. Serve naked or topped with berries.
BILL GRANGER’S BLUEBERRY TEA CAKE

We’ve had another birthday in our neck of the woods lately – that of a wonderful servant hearted sister in Christ – so I wanted to make her a birthday cake, and thought this one looked as if it would be something she’d like. I was really thrilled with the taste, the sheer size of it (makes enough to fill a 23 x 33cm baking tin) and the beautiful look of the finished product. I’m a bit of sucker for cream cheese icing and this recipe coped beautifully with my using the homebrand punnet of it for just $2. If you’re more pressed for time, or would like to further reduce the cost of this already affordable cake, Smiley Bill suggests an optional icing made simply from icing sugar, lemon zest and lemon juice. Total cost $8, serves 18.
- 210ml sour cream
- 1/2 teaspoon bicarbonate of soda
- 180g butter, at room temperature
- 330g caster sugar
- 2 tsp finely grated lemon zest
- 1tsp vanilla extract
- 3 medium eggs
- 250g blueberries (frozen is fine)
- 375g plain flour
- 1 1/2 tsp baking powder
1. Preheat the oven to 180C/Gas 4. Grease a baking tin and line with baking paper
2. Mix the soured cream and bicarbonate of soda and leave to sit for 5 minutes
3. Beat the butter and sugar together in a bowl until light and creamy. Add the lemon zest and vanilla and beat
4. One at a time, beat in the eggs, then mix in the soured cream mixture until evenly combined
4. Put the blueberries into another bowl and toss with a little of the flour. Sift the rest of the flour and baking powder over the cake mixture and fold in, until just combined. Gently fold through the blueberries
5. Spoon the mixture into the prepaed tin and bake for 45-50 mintues, until a skewer inserted into the entre comes out clean. Leave to cool slightly in the tine for 10 minutes, then turn out and cool on a wire rack.
Cream Cheese Icing
- 250g cream cheese
- 100g butter at room temp.
- 1tsp grated lemon zest
- 1tsp vanilla extract
- 250g icing sugar, sifted
- To make the frosting, beat the cream cheese, butter, lemon zest, and vanilla in a bowl until light and fluffy, then mix in the sugar until smooth. Top the cooled cake with the frosting.
EASY CHOCOLATE FUDGE

Ever since I’ve known Kylie Gellert, she’s been making this delicious and very easy fudge. I’ve enjoyed many of Kylie’s variations on many an occasion and I’m so thrilled she emailed this recipe for me to share with you. Recently I’ve discovered the delights of Aldi chocolate – especially White Crisp (white chocolate with hazelnuts and rice crisp throughout) so I had a go at making Kylie’s oh so easy fudge with these feature ingredients and it worked really well. All I did was add 60g roughly chopped hazelnuts and 3/4 cup rice bubbles. This recipe is a great one to make into little gifts for Christmas or for affordable birthday gifts for friends, although this fudge is just as good for Bible study suppers or church morning tea. Thanks for sharing, Kylie!
- 450g Dark or Milk Chocolate bits (easier) or block (cheaper) cooking chocolate
- 1 tin Condensed Milk
1. Put the chocolate into a glass bowl, and pour the condensed milk over the chocolate. Don’t stir.
2. Microwave on high for 2mins, and stir until smooth. If not able to be stirred to smooth, put back into the microwave for 1 min, stir (repeat if necessary).
3. Pour into a plastic wrap-lined loaf tin or container of similar size.
4. Set in the fridge for at least 20 min, preferably for 2+ hours.
5. Cut into squares approximately 1cm x 1cm (or whatever size you like).
Notes
• If wanting to use white chocolate instead of milk or dark, you will require 550g to make it set.
• Don’t use a wooden spoon to stir the chocolate as the moisture in the timber will upset the consistency. A metal spoon or silicon spatula will work best.
Variations
• Add sultanas and crushed nuts to dark or milk for fruit & nut fudge.
• Add coconut to dark or milk for golden rough fudge.
• Add raspberry essence (a little bit!) to white choc for raspberry & white choc fudge. (Hint: raspberry lollies really don’t work well to add in.)
• Add caramel essence to white choc for a yummy caramel fudge that isn’t too rich.
• Add crushed peppermint chocolate bar to dark choc for a refreshing choc mint fudge.
• Make a dark or milk base and let set before adding a white chocolate top for a top deck fudge (rather rich).
Also really good over ice-cream when it is still in a pouring consistency, but is incredibly rich. It kind of sets as it hits the ice cream.
Pricing
• Nestlé white chocolate buds $11.40/kg (Home brand works just as well if you can find it – I couldn’t on Woolies or Coles online, but have used it in the past)
• Home brand dark chocolate bits (easier) $6.70/kg
• Home brand dark chocolate block (cheaper) $6/kg – it does need to be broken into squares.
• Home brand condensed milk $2/tin
WHITE CHOCOLATE MUD CAKE – ANY SIZE YOU NEED!

Originally given to me by my mother in law, I can’t tell you how much I love this handy recipe! The white chocolate mud cake that results is moist, not too rich and stores well for ages even if you don’t freeze it – though it does freeze very well. Here you’ll find the quantities for almost every kind of cake tin you might need to use, which is just terrific. Finally, the other great thing about this recipe is that it is just a melt and mix cake – no creaming butter and sugar. Even though white chocolate adds to the cost of the cake, the cost of this recipe is still quite reasonable, especially compared to store-bought cakes (and this one is much, much nicer). Today I’m using this versatile recipe for my daughter’s birthday cake – she’s turning 3 tomorrow!
| 12 cmround | 15 cmround | 17 cm round15 cmsquare17 cmoblong | 20 cmround | 22 cm round19 cmsquare | 15 cm round23 cmsquare | 28 cm round30 cmheart28×34 | 30 cm round28 cmsquare |
30 cm square |
||
| Butter | 85g | 125g | 165g | 250g | 335g | 375g | 500g | 625g | 750g | |
| WhiteChoc | 45g | 75g | 100g | 150g | 200g | 225g | 300g | 375g | 450g | |
| CasterSugar | 2/3 cup | 1 cup | 1 1/3 cups | 2 cups | 2 2/3 cups | 3 cups | 4 cups | 5 cups | 6 cups | |
| Milk | 1/3 cup | 1/2 cup | 1 cup | 1 1/2 cups | 2 cups | 2 1/4 cups | 3 cups | 3 3/4 cups | 4 1/2 cups | |
| PlainFlour | 1/2 cup | 3/4 cup | 1 cup | 1 1/2 cups | 2 cups | 2 1/4 cups | 3 cups | 3 3/4 cups | 4 1/2 cups | |
| SR Flour | 2 tbs | 1/3 cup | 1/3 cup | 1/2 cup | 2/3 cups | 3/4 cups | 1 cup | 1 1/4 cups | 1 1/2 cups | |
| Vanilla | 1/4 tsp | 1/2 tsp | 1/2 tsp | 1 tsp | 1 tsp | 1 1/2 tsp | 2 tsp | 2 1/2 tsp | 3 tsp | |
| Eggs | 1 | 1 | 1 | 2 | 3 | 3 | 4 | 5 | 6 | |
| BakingTime | 1 hour | 1 1/2 hours | 1 3/4 hours | 1 3/4 hours | 2 hours | 2 1/2 hours | 3 hours | 3 1/2 hours | 4 hours |
- Preheat oven to 170 degrees (160 degrees fan forced)
- Grease and line base and sides of cake tin with baking paper, bringing paper up 5cm above the side of the tin.
- Combine chopped butter, chopped chocolate, sugar and milk in saucepan. Stir over low heat until chocolate is melted and sugar dissolved. Transfer the mixture to a large bowl and cool for 15 mins.
- Stir in sifted flours, vanilla and lightly beaten eggs. Pour mixture into prepared tin.
- Bake for time given on chart. Cover cake with foil half-way through cooking time if over-browning.
- Cake will develop a thick sugary crust during baking. Test with a skewer close to end of cooking time. Cool the cake in the tin.
White Chocolate Ganache Icing
- 1/2 cup cream
- 300g white chocolate
- Bring cream to the boil in a small saucepan, pour cream over white chocolate in a small bowl, stirring until chocolate melts.
- Cover, refrigerate, stirring occasionally about 30 mins or until mixture is spreadable.
NIGELLA LAWSON’S CHOCOLATE PAVLOVA

My friend Amy put me onto this recipe about 8 years ago and since then it’s become one of my favourite dessert options for catering. It literally only takes a couple of minutes measuring and mixing and then it’s into a low oven for an hour and a quarter – allowing me to get other things done. I generally make it in the morning and leave it to cool in the switched off oven for the rest of the day. From there it’s ridiculously easy to whip cream and top it with whatever you like. Nigella suggests fresh raspberries on top but I’ve often used frozen ones and actually we all like it best with bananas, strawberries and a handful of maltesers dumped on top. Also, when cooking other desserts that call for egg yolks only, I keep the whites and freeze them in zip lock bags. They thaw out beautifully and this often means I don’t have to use new eggs – another money saver. This low fuss dessert will set you back about $8 and serves 10.
- 6 egg whites
- 300g caster sugar
- 3 tablespoons cocoa powder, sieved
- 1 teaspoon balsamic or red wine vinegar
- 50g dark chocolate, finely chopped
- 300-500ml double cream
- 500g raspberries
- 2-3 tablespoons coarsely grated dark chocolate
- Preheat the oven to 180°C/gas mark 4 and line a baking tray with baking parchment.
- Beat the egg whites until satiny peaks form, and then beat in the sugar a spoonful at a time until the meringue is stiff and shiny. Sprinkle over the cocoa and vinegar, and the chopped chocolate. Then gently fold everything until the cocoa is thoroughly mixed in. Mound on to a baking sheet in a fat circle approximately 23cm in diameter, smoothing the sides and top. Place in the oven, then immediately turn the temperature down to 150°C/gas mark 2 and cook for about one to one and a quarter hours. When it’s ready it should look crisp around the edges and on the sides and be dry on top, but when you prod the centre you should feel the promise of squidginess beneath your fingers. Turn off the oven and open the door slightly, and let the chocolate meringue disc cool completely.3.
- When you’re ready to serve, invert on to a big, flat-bottomed plate. Whisk the cream till thick but still soft and pile it on top of the meringue, then scatter over the raspberries. Coarsely grate the chocolate so that you get curls rather than rubble, as you don’t want the raspberries’ luscious colour and form to be obscured, and sprinkle haphazardly over the top, letting some fall, as it will, on the plate’s rim.
ANZAC SLICE

I’ve recently decided that as much as I love baking biscuits, I just can’t pull them off without stress in my current stage of life. Steve loves Anzac biscuits, but the thought of rolling little balls, arranging them on trays and then rotating them around the oven is enough to stress me out before I start. This terrific recipe from my childhood solves the problem for less than $2. Makes 32 slices.
- 140 grams butter, melted
- 2 tablespoons golden syrup
- 2 tablespoons milk
- 1 cup self raising flour
- 1 cup coconut
- 1 cup rolled oats
- 1 cup brown sugar
1. Preheat oven to 180 degrees
2. Combine all the dry ingredients in a large mixing bowl
3. Melt butter in a heatproof jug in the microwave, stir in golden syrup and milk.
4. Make a well in the middle of the dry ingredients and add the butter mixture. Mix well.
5. Press into a lined 16 x 26 cm slice tin and cook for 15 minutes until golden brown.
GRANDMA FRAGAR’S SCONES

A few years ago my Mum gave me her mother’s scone recipe, and now it’s the only one I ever use. These scones are just so simple and easy to get right. There’s no rubbing butter and flour together and no surprising secret ingredient. The only thing I would say is your oven has to be nice and hot, so if yours tends to be on the cool side, maybe consider putting it up 5-10 degrees for this recipe. Scones are a wonderful option for large group catering because they make people feel special but aren’t too labour intensive. These ones won’t cost you more than a couple of dollars or much energy in the kitchen. This recipe makes 20.
- 4 cups self raising flour
- 2 dessertspoons icing sugar
- pinch of salt
- 2 heaped dessertspoons butter
- 2 cups of milk
1. Preheat oven to 200 degrees
2. Place flour, sifted icing sugar and salt in a large mixing bowl. Mix well.
3. Melt butter in a heatproof jug in the microwave, top up the butter with milk to the 2 cups mark on the jug.
4. Make a well in the flour mixture, add the milk/butter mixture and gently combine using a butter knife. Combine using cutting actions through the middle and scraping the outside mixture to the centre. Don’t over mix, you want everything only just combined.
5. Tip the mixture onto a floured bench top and put more flour on the top of the mound of mixture. Pat the whole thing down until it’s about 4cm thick and evenly spread out.
6. Cut rounds using a floured scone cutter or an appropriate sized glass. Place each one on a biscuit tray lined with baking powder so that they are close together but not touching. Brush the top of each scone with a little milk.
7. Bake for around 10 mins until they’ve risen and are golden brown.
8. Serve with jam and cream.
NIGELLA LAWSON’S CHOCOLATE BROWNIES

This is the best recipe for Brownies I’ve ever found. Unlike so many brownie recipes, the whole thing cooks evenly with no drying out of the edges. It makes a whole large roasting dish worth of Brownie which makes 25 dessert sized pieces or 40+ slices sized serves. Originally from How to be a Domestic Goddess, I think this is one of Nigella’s best. Total cost is about $9, but it makes LOTS. To decrease the cost, I pretty much always leave out the walnuts.
- 375 g soft unsalted butter
- 375 g dark chocolate
- 6 large eggs
- 1 tablespoon vanilla extract
- 500 g caster sugar
- 225 g plain flour
- 1 teaspoon salt
- 300 g chopped walnuts
- Preheat the oven to 180°C.
- Line your approximately 33 x 23 x 5 1/2cm roasting dish with foil or baking paper.
- Melt the butter and chocolate together in a large heavy based saucepan.
- In a bowl beat the eggs with the sugar and vanilla.
- Measure the flour into another bowl and add the salt.
- When the chocolate mixture has melted, let it cool a bit before beating in the eggs and sugar mixture, and then the nuts and flour.
- Beat to combine and then scrape out of the saucepan into the lined brownie pan.
- Bake for about 25 minutes.
- When its’s ready, the top should be dried to a paler brown speckle, but the middle still dark and dense and gooey.
- Keep checking the brownies as they cook; remember that they will continue to cook as they cool.
Every time I make this very easy slice, someone asks for the recipe. It’s great for morning or afternoon teas, but can also be served with a dollop of cream or ice-cream for dessert. I tend to keep a few small tins of passionfruit pulp in the pantry so that I can make this quickly and easily without a trip to the shops. I also use lemon squeeze from the fridge if I don’t have fresh lemons. All this means that it’s one of those recipes that I have everything I need to make it in the pantry already. Originally from Good Taste magazine. Serves 12. Costs less than $6 to make.
PASSIONFRUIT SLICE

- Melted butter, to grease
- 150g (1 cup) self-raising flour
- 85g (1 cup) desiccated coconut
- 100g (1/2 cup) caster sugar
- 100g butter, melted
- 1 x 395g can sweetened condensed milk
- 125ml (1/2 cup) fresh lemon juice
- 2 tbs passionfruit pulp
- Preheat oven to 180°C. Brush a 16 x 26cm (base measurement) slab pan with melted butter to lightly grease. Line the base and 2 long sides with non-stick baking paper, allowing the sides to overhang.
- Use a wooden spoon to combine the flour, coconut, sugar and butter in a large bowl. Use your hands to bring the dough together in the bowl. Transfer to the prepared pan. Use a metal spoon to press firmly over the base. Bake for 12 minutes or until light golden. Set aside to cool.
- Reduce oven temperature to 150°C.Use a balloon whisk to whisk together the condensed milk, lemon juice and passionfruit pulp in a large bowl until smooth and well combined. Pour into the pan and spread evenly over the base. Bake in oven for 15 minutes until just firm to the touch. Set aside to cool completely. Cut into slices to serve.
QUICK FRUIT SLICE

My precious friend Debra made this slice to help out with catering during the busy start to university year and it was an absolute hit. Steve was totally into it and so I asked her for the recipe. It’s so simple and fast to make. Makes 24 small slices and costs less than $2.50 to make. Thanks for sharing, Deb!
- 1 cup self-raising flour
- 1 cup coconut
- 1 cup mixed fruit
- 3/4 cup sugar
- 1 egg, lightly beaten
- 120g butter, melted
1. Preheat oven to 180 degrees (170 degrees fan-forced)
2. Mix dry ingredients in medium sized mixing bowl, add butter and beaten egg. Mix well.
3. Press into 16 x 26cm slice tin. Bake for 20 mins or until light brown.

Hey Jane… how about that famous Lister lemon cheesecake receipe…??? xoxoxo Leigh-anne
Will do it soon, Leigh! I keep forgetting about it 🙂
THANKYOU so much Jane for this wonderful website. I am constantly going through it for family desserts, kids treats and morning tea (massive amounts) for church. I have recommended your website to SOO many friends. What a blessing. THANKYOU. Steph Robinson