Tag Archives: Freezer Friendly

Oven-baked Bolognese

Standard

This bolognese sauce is my new addiction. My friend Corinne made dinner for the kids and I last week saying “We’re just having bolognese, I’ll bring some over.” But there’s nothing “just” or ho-hum about this bolognese, which is hinted at by its somewhat random ingredients list, and twice cooked methodology. But man, is it worth it. Corinne’s bolognese is hands down the best I’ve ever tasted. I think perhaps she was well aware of our family’s penchant for Weetbix and porridge dinners, especially when dad’s away. But we so appreciated her kindness in sharing with us some of what she and her family were having for dinner that night, which just so happened to be amazingness masquerading as ordinary. To me, this best ever bolognese is called Bacony Kindness Bolognese, and I thank God for my friend and for hers. First published by Delicious Magazine, (photo credit too) this lovely gluten free and freezer friendly recipe costs under $20 to make and easily serves 10.

  • 30g unsalted butter
  • 2 tablespoons olive oil
  • 200g bacon, any kind, finely chopped
  • 1 large onion, finely chopped
  • 2 celery stalks, finely chopped
  • 1 small carrot, finely chopped
  • 2 garlic cloves, finely chopped
  • 500g each beef and pork mince
  • 2 cups (500ml) milk
  • 1/4 teaspoon freshly grated nutmeg
  • 2 tablespoons tomato paste
  • 1 1/2 cups (375ml) dry red wine (I just use a cheap clean skin)
  • 800g canned chopped tomatoes
  • 2 cups (500ml) beef stock (I use powdered, but use a gluten free variety if needed)
  • 2 bay leaves
  • 2 tablespoons chopped basil leaves
  1. Preheat the oven to 160 degrees celcius.
  2. Melt the butter and olive oil in a large flameproof casserole over medium heat. Add the chopped bacon and cook, stirring, for 3-4 minutes until it starts to crisp. Add the onion, celery, carrot and garlic and cook, stirring, for 5 minutes or until softened. Add the beef and pork mince and cook for 8-10 minutes, breaking the meat up with a wooden spoon, until browned.
  3. Add the milk and nutmeg and simmer over medium heat for 4-5 minutes until the milk evaporates. Add the tomato paste and stir for 2-3 minutes until combined, then add the wine and allow to simmer for 10 minutes. Add canned tomatoes, stock and herbs. Season with salt and pepper. Cover, then cook in the oven for 2 hours or until thickened and reduced. Skim any fat from the surface, then serve with pasta.
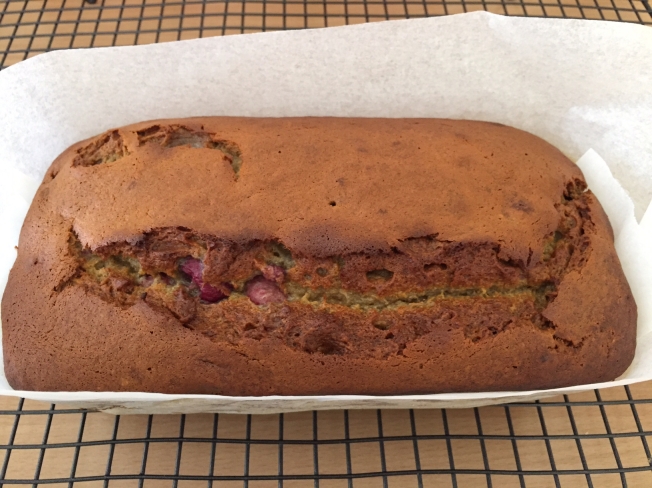
Nigella Lawson’s Banana Bread (or my Rapidly Rotting Fruit Loaf)

Standard

Banana Bread

This easy-peasy banana bread has become my frequent go-to for using up fruit that’s quickly losing freshness in my fruit bowl. Originally from Nigella Lawson’s excellent book, How To Be A Domestic Goddess, this banana bread is cheap to make, freezer friendly and super versatile. If bananas have become over-ripe I often throw them straight in the freezer whole, skins and all, and then thaw them out to use another time – upon defrosting the insides just slop right out of their skins, and don’t even need mashing. And this recipe copes really well with almost anything you want to throw at it: old, bruised strawberries, rhubarb, a drained can of pineapple chunks/crushed pineapple, a handful of nuts, crystalized ginger… whatever floats your boat. Just keep the bananas!) The loaf pictured above features rotten bananas, too-far-gone pears and a handful of frozen raspberries from the freezer, and cost about $5 to make.

  • 175 grams plain flour
  • 2 teaspoons baking powder
  • ½ teaspoon bicarbonate of soda
  • ½ teaspoon salt
  • 125 grams unsalted butter (melted)
  • 150 grams caster sugar
  • 2 large eggs
  • 4 small very ripe bananas (mashed)
  • 1 teaspoon vanilla extract

Preheat the oven to 170ºC and line a loaf tin with baking paper. Put the flour, baking powder, bicarb and salt in a medium-sized bowl and, using your hands or a wooden spoon, combine well.

In a large bowl, mix the melted butter and sugar and beat until blended. Beat in the eggs one at a time, then the mashed bananas, along with any other fruit you’ve decided to use – just blitz it in your food processor first. Then, with your wooden spoon stir in vanilla extract and any other ‘bits’ you want – nuts, raspberries etc… Add all this to the flour mixture, then scrape into a loaf tin (23 x 13 x 7cm) and bake in the middle of the oven for 1-1¼ hours (start checking at 1 hour). When it’s ready, an inserted toothpick or fine skewer should come out cleanish. Leave in the tin on a rack to cool, and eat thickly or thinly sliced, as you prefer. Also can be toasted and spread with butter for a yummy brunchy breakfast. 

Hugh Fearnley-Whittingstall’s Carrot, Spinach, Cumin (and Fetta) Muffins

Standard

cumin muffins

fetta

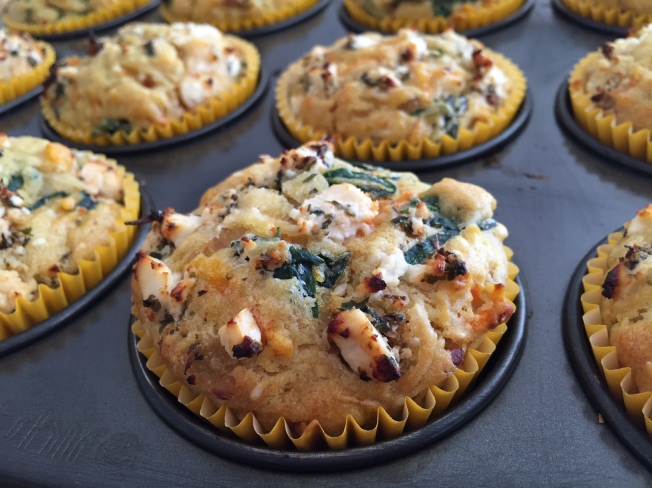
Having more of a savoury than a sweet tooth, I’ve long enjoyed a good savoury muffin. Aside from the wide variety of possibilities when it comes to flavour, they are a terrific option any time of year – another alternative to sandwiches for kids heading back to school, or a yummy accompaniment to a BBQ dinner or a bowl of soup (with a bit of real butter on the side too). They can also be a just meal of their own. Savoury muffins are healthy, tasty, filling, very forgiving when you have to fudge the quantities, inexpensive, and best of all, freezer friendly. I love how easy it is to grab one of these from the freezer, and place once more in a warm oven for 5 minutes – bringing them pretty much back to newly baked awesomeness. Julie Morrow has contributed a couple of wonderful recipes that you’re sure to enjoy, each first published by Hugh Fearnley-Whittingstall in The Guardian Australia. She suggests, and I wholeheartedly agree, adding 100g of fetta to the top of each muffin, and my hot tip for this (discovered by my thrifty husband Steve) is the Coles brand of Marinated Danish Fetta – pictured above. It’s EXACTLY the same as the South Cape variety (even the jar is the same), but costs $5.40 per jar, as opposed to almost $12). First up from Julie are these fluffy, moist, flavoursome and vegetarian friendly babies. This recipe makes 12 and costs less than $5.

  • 80g unsalted butter, melted and cooled, plus 10g for frying
  • 1 onion, finely diced
  • 2 tsp ground cumin
  • 150g spinach, tough stalks removed and very finely shredded (I used baby spinach salad greens)
  • 250g plain flour
  • 2 tsp baking powder
  • ½ tsp bicarbonate of soda
  • 1½ tsp salt
  • 2 eggs
  • 275g whole milk yoghurt (but sour cream, diet yoghurt or regular cream will do)
  • 150g carrots, grated
  • 100g fetta cheese
  • 40g pumpkin seeds, toasted (optional, I used sesame instead)
  1. Heat the oven to 200C/400F/gas mark 6 and line a muffin tin with 12 paper cases.
  2. Warm the 10g of butter in a large frying pan and sauté the onion with a pinch of salt until soft and translucent, about 10 minutes.
  3. Add the cumin, stir for a minute, then add the spinach and stir until wilted and soft. Cool.
  4. In a large bowl, whisk together the flour, baking powder, bicarbonate of soda and salt.
  5. In a jug, whisk the melted butter, eggs and yoghurt. Pour the wet ingredients over the flour and stir with a spatula until just combined.
  6. Fold in the cooled onions and spinach, the carrots and seeds.
  7. Spoon into the cases crumble the fetta evenly atop each portion.
  8. Bake for about 18 minutes, until a toothpick comes out clean.

Bolognese Pasta Lunch Muffins (or a low-bar, guilt free alternative to sandwiches for bored kids and parents)

Standard

Bolognese Lunch Muffins

Unless you’ve been living under rock, you’d know that the last week (at least in Australia) has been all about back to school. And for some precious little ones its meant heading to school for the first time. I’m not generally a sentimental kind of person but there’s something about it all that makes my heart stop and pause as the page of life turns. All this, as well as the good holiday break, somehow gives me at least a small spurt of energy for school lunches at the beginning of the year. Now generally, all those posts in the blogosphere about how to make school lunches organic, healthy, fun, dinosaur shaped and immaculately presented for our little idols, I mean, children – send me into a tailspin. And I’m glad to have mostly avoided them this back to school season. But level-headed suggestions from level-headed friends are always welcome and this recipe brings together two that recently came my way: one friend mentioned she feeds her kids pasta for lunch because it’s more filling than sandwiches and much easier to prepare in batches. Another suggested this recipe she found in Fresh Magazine at Woolworth’s. These pasta ‘muffins’ were painless to make, froze and thawed out well (so you can get a good fortnights worth done at once) and cost around the same price to make than the same number needed of ham and cheese sangas, approximately $5 for 24. I’m sure when the kids are tired of these we’ll head back to sandwich land, but these yummy numbers (adapted a little – I left out all the veggies) are a welcome option around here.

  • 500g macaroni, cooked al dente and drained
  • 1 large 700g jar home brand passata
  • 1 cup grated carrot (optional)
  • 1 cup grated zucchini (optional)
  • 2 eggs lightly whisked
  • Salt to taste
  • 2 cups grated cheese
  1. Preheat oven to 180 degrees celcius. Line 2 x 12 hole muffin tins with paper cases.
  2. Combine all the ingredients except the cheese in a bowl, and divide mixture evenly among muffin holes. Season to taste with salt.
  3. Top each muffin of pasta with grated cheese, using it all up.
  4. Bake in oven for 15 mins or until cheese has melted. Allow to cool before freezing them ready for school each day.

Orange, Poppy Seed and Sour Cream Muffins

Standard

orangepoppseedmuffinsplated

orangepoppyseedmuffins

Recently while grocery shopping, I was sucked in by the cover of Donna Hay magazine, which was adorned with the most gorgeous looking muffins. And despite needing to keep one good eye on reality (the deal-breaker for me was the feature in the middle of the mag which promised to help me pull off a wintery family picnic by the sea at which even the kids would eat freshly caught crab and indulge in home-made lemon jelly desserts – each with a fresh sprig of thyme), I have enjoyed reading the issue. Just for fun, yesterday I thought I’d have a go at making some of Donna’s made-over front cover muffins, but unsurprisingly, there were no chia seeds or ricotta cheese in my stores, so I gave Donna’s muffins a middle of the road make-over of my own, swapping chia, ricotta and lemons for oranges, poppy seeds and sour cream. These freezer friendly muffins were simple and affordable to make and the result was lovely fat and tasty, moist, fluffy and delicate muffins, which took about 10 mins to get in the oven and cost around $4.

  • 2 ½ cups self raising flour
  • 1 cup caster sugar
  • 2 tablespoons orange zest
  • ¼ cup poppy seeds
  • 1 cup sour cream
  • 2 teaspoons vanilla extract
  • 1 cup greek yoghurt
  • ½ cup vegetable oil (I use rice bran)

Orange Drizzle Icing

  • 1 cup icing sugar
  • 2 tablespoons orange juice
  1. Preheat oven to 180 degrees and distribute muffin cases among a 12 hole muffin tray (I like to use baking paper for this – just cut into squares, turn a small glass upside down and mould each paper square with 2 hands around the glass to get the needed shape).
  2. Mix the first four (dry) ingredients in a large bowl and set aside. Mix the wet ingredients in a smaller bowl and then combine with the dry, mixing until combined, but only just.
  3. Divide batter among lined muffin holes and bake for 20-25 minutes.
  4. While muffins are baking, mix sugar and juice together to make the drizzling icing. When muffins are brown and spring back slightly when touched, remove from oven and drizzle icing all over, glazing each. If you prefer the icing thicker and more like a topping, wait for muffins to cool before drizzling. 

Winter Pea Soup

Standard

 Image

Image

My friend Julie sent in this tasty soup recipe and having tried it out last weekend, I’m super keen to share it with you. Here are four reasons to love this bright green broth: there’s very little preparation at all – just a few quick steps with readily kept ingredients thrown in, followed by simmering; the recipe requires only one pot, which means very little washing up; it’s cheap, cheap, cheap to make (only approximately $3); and perfect for warming comfort during these lovely cooler months. Serves 6-8 people. Thanks for sharing this, Julie. 

  • 2 large onions
  • 2 cloves garlic
  • 3 large potatoes
  • 1 kg frozen peas
  • 1.5 litres vegetable stock (I used powdered and chicken stock as substitute)
  • 150ml cream
  1. In a large, 3L+ pot, gently fry onion and garlic in a little oil. 
  2. Add peeled potatoes, chopped into chunks, peas and stock. Bring to boil and cook until potatoes are soft. 
  3. Blitz with hand blender until smooth then add cream. Season well with salt and pepper and serve with bread.

Donna Hay’s Instant Chicken Satay

Standard

Image

As I was thinking about what to write about this wonderfully fast and tasty dish, I realised again just how many times I’ve sat at the bench in my friend Amy’s kitchen as she’s recommended recipes to me. Though she’s moved houses since we first met, the scenario hasn’t changed much over the ten years we’ve known each other: Amy makes cups of tea for us both, she cooks whatever she needs to cook (and she’s a good deal better at it than me), we chat, sip tea, and she tells me about all the great recipes she’s tried out lately. Probably a good number of the recipes on this blog have come from her and over the years I’ve learnt lots about simple, yummy eating from Amy. In the beginning, I’d write her recommendations down on scrap paper (many of which I still have) but these days I just take a photo of her recipes on my phone and then come home and try them out. Now that my son is learning piano from Amy’s wonderful husband, once a week while he’s having his lesson, I get to once again sit at her bench and learn new things, which is exactly what happened a fortnight ago when she suggested this truly yummy, simple and affordable Donna Hay number. And although I’ve already added a slow-cooker satay recipe here, sometimes you just need a tasty stir-fry recipe of the instant variety. This one is freezer friendly and good to give away, though of course, check for peanut allergies before doing so or inviting folk over. A double portion of the recipe below fills a large wok almost to the brim, though following those listed below serves 8 with rice, and costs around $12. 

  • 2 tablespoon vegetable oil
  • 1 large onion, thinly sliced (my addition, not Donna’s) 
  • 4 chicken breast fillets / 6 chicken thigh fillets
  • 2 long red chillies, thinly sliced (I use the gourmet garden one in a tube) 
  • 1/2 cup coconut cream 
  • 2 tablespoons crunchy peanut butter 
  • 2 tablespoons of soy sauce 
  • 1/2 cup chicken stock (I use powdered, reconstituted in water)
  • 2 teaspoons fish sauce
  • 4 tablespoons brown sugar
  • 200g fresh snow peas
  • 2 carrots, peeled and julienned (my addition, not Donna’s) 
  • 1 1/2 cups fresh coriander leaves (optional, no big deal if you don’t have them)
  1. In a small bowl combine coconut cream, peanut butter, soy sauce, stock, fish sauce and sugar. Mix well and set aside.
  2. Heat a large wok or frying pan over high heat. Add the oil, onion, chicken and chilli and cook for 2-3 minutes until golden. 
  3. Add the snow peas and carrots and cook for 1 minute. Add the combined peanut butter and liquids and cook for a further minute or until slightly thickened. Stir through the coriander and serve on steamed rice. 


Belinda Jeffery’s Coconut and Caramel Slice

Standard

Image

Belinda Jeffery’s Mix & Bake is one of my all-time favourite cookbooks and it is the delightful original source from which I’ve adapted this Coconut and Caramel Slice. Pretty much every recipe in this book is a taste winner and it makes a wonderful gift for those who love to bake. This easy slice is excellent for hospitality because it makes a large quantity in one baking effort (so you can cater for more than one event in one baking session) and the coconutty caramel flavour atop the crumbly vanilla base it so very hard to go past. The quantities below make a very large slice and costs $8 to make (up to 40 pieces), though if you don’t need such a large amount, simply halve all the quantities and you will have a slice that neatly fits into a standard 28x18cm sized lamington tin for around $4. Easily freezable and with a refrigerated shelf-life of over a week, this is a great option to keep ahead of a busy week of hospitality opportunities or for even just a moments quiet rest with a cuppa and a good book.

Base

  • 2 1/4 cups/335g plain flour
  • 1/2 cup/80g icing sugar
  • 250g cold butter
  • 1 teaspoon vanilla extract

Topping

  • 3 eggs
  • 2 tablespoons coconut cream
  • 1 tablespoon milk
  • 2 teaspoons vanilla extract
  • 45g butter, melted and cooled
  • 1 cup/220g firmly packed brown sugar
  • 1 tablespoon plain flour
  • 1 1/2 cups/105g shredded coconut
  • 50g flaked almonds for topping
  • icing sugar for dusting (optional)
  1. Preheat oven to 180 degrees, (170 if fan forced) and line a large 32x24cm slice tin with baking paper.
  2. Combine all the ingredients for the base in a food processor and press evenly into the bottom of the tin. Set food processor aside and don’t wash it up yet. Bake the base for 20-25 mins until slightly golden. Set aside to cool. Reduce oven to 150 degrees, (140 if fan forced).
  3. While the slice is cooling slightly, put sugars and flour in the already used food processor and process together. Pull out the blade and gently stir in the shredded coconut. Set aside.
  4. In a large bowl, combine eggs, coconut cream, vanilla extract and melted butter using a whisk. Gently fold dry ingredients from the food processor into this wet mixture. Gently tip the whole topping mixture over the base and spread evenly. Sprinkle over the flaked almonds and bake for around 45 minutes, though start checking earlier. Slice is cooked when the topping feels set and the whole thing is evenly golden.
  5. Cool to room temperature and cut into squares or fingers as desired. This slice cuts especially well when cut with a large, sharp straight-edged knife and after spending some time in the fridge. Enjoy!

Gingerbread Slice

Standard

Image

Image

I love gingerbread – actually, I love anything with ginger in it. And years ago, my friend Cynthia put me onto this amazing recipe called Grandpa Pencil’s Gingerbread Men. Since then, it’s been my go-to for great tasting gingerbread that turns out just how I like it: sweet, gingery, a bit of crunch but mostly chewy in texture. And of course, the kids always love decorating them. The only down-side has been the time it often takes to make and decorate a batch of these lovely things – definitely more a holiday or a weekend thing, than something achievable when life is busy. But I’ve come by two solutions to this problem. The first is these square cookie cutters I recently stumbled upon for $9.95 in a kitchen shop. No more re-rolling excess dough multiple times because the cookie shapes are so awkward. With these square cutters, there’s no need for edges at all, which maximises time by just cutting once. I should say too, as my friend Jane suggested to me: you really don’t need square cookie cutters to treat rolled out dough like this – just use a butter knife and cut the dough into squares in whatever size you prefer. And here’s a tip: the best way I’ve found to lift the uncooked shapes off a floured bench is to use a thin, metal egg lifter. The second gingerbread solution is to cook Grandpa Pencil’s dough as a slice instead of as cookies and decorate with freckles before they go in the oven, which is my adaptation below. Either way, this recipe will cost no more than $3 to make. Thanks Cynthia, for sharing this one all those years ago.

  • 125g butter, softened to room temperature
  • 125g sugar (I use brown)
  • 280g plain flour
  • 1/2 teaspoon bi-carb soda
  • 1 1/2 teaspoons ground ginger
  • 1/2 teaspoon cinnamon
  • 1/2 teaspoon nutmeg
  • 1 cup golden syrup, warmed in microwave
  • 24 freckles
  1. Cream butter and sugar. Add the rest of the dry ingredients and mix to combine.
  2. With beaters mixing slowly, gently add warmed golden syrup until mixture turns to a ball of dough, not too wet and not too dry.
  3. If making into biscuits roll mixture onto a floured bench, otherwise, using wet hands, press mixture into a 30 x 20 cm lined lamington tin.
  4. Press 24 freckles into the wet mixture in a 4×5 configuration and bake at 180 degrees (170 if fan-forced) for 45 minutes. If it goes brown on top but still hasn’t cooked through, cover with foil and return to the oven. The end result should be a fudgy/brownie consistency, not so much a crumbly or dry slice.  Allow to cool completely in tin before cutting between freckles into 24 squares.

Jamie Oliver’s Chicken Korma

Standard

Image

Image

I’m not exactly sure why, but until a few days ago, I have struggled in recent months to want to cook anything new. With no headspace for it, I’ve been in a season of sticking to: old faithful recipes, porridge and weetbix and making one thing last a few nights. But my drought seems to have broken. Perhaps it’s because the weather has turned warmer, or because the kids are on school holidays, but today I tried this blog-worthy recipe, adapted from Jamie Oliver’s Ministry of Food via my friend Kara. It’s all the things this blog is about: not foody-ness – but taste, ease and affordability so that having people over isn’t too stressful. And what a terrific recipe this turned out to be! It can be made ahead of time, or in that last hour between getting home from work and people turning up – because once everything’s in the pot, it’s a simple case of simmering this gluten free meal while doing other things. Depending on the type and price of the chicken you use, this dish will cost between $10-$13 to make and serves 6-8 with rice. Add to this dollops of greek style yoghurt and fresh coriander leaves. I’m loving eating it, even as I type! Thanks for pointing me towards this bonza recipe, Kara.

  • 800g chicken thighs or breasts, cut into 2-3cm pieces
  • 2 medium onions, halved and sliced thinly
  • 1 fresh green chilli, optional (only if you like spicy curries. I left it out)
  • A 3cm piece of fresh ginger, peeled and chopped finely
  • 1 small bunch of fresh coriander, washed, leaves removed and stalks chopped finely
  • 1 x 400g tin of chickpeas, drained
  •  rice bran or vegetable oil
  • Knob of butter
  • 1/2 x 290g jar of Patak’s korma curry paste
  • 1 x 400ml tin of coconut milk
  • A small handful of flaked almonds, plus extra for serving
  • 2 heaped tablesoons desiccated coconut
  • salt and pepper
  • Greek style yoghurt, for dolloping

1. Put the oil in the pan to heat and add onions, ginger and coriander stalks. Stir constantly for ten minutes to ensure it’s become fragrant and hasn’t burnt on the bottom. If using chicken thighs, throw them in for browning now, otherwise if using breasts, hold off til end of step 2.

2. Add the korma paste, coconut milk, half the flaked almonds, chickpeas, desiccated coconut and sliced chicken breasts. Half fill the empty coconut milk tin with water, pour it into the pan, and stir. Let the whole thing simmer away for about half an hour. This is so easy – now just walk away and do other things, like putting the rice on in the rice cooker.

3. Season carefully once the chicken is cooked and become tender. Serve with boiled rice, adding a few spoonfuls of Greek yoghurt dolloped on top. Sprinkle over the rest of the flaked almonds and coriander leaves.