Monthly Archives: February 2014

Indian Style Risoni

Standard

Image

Image

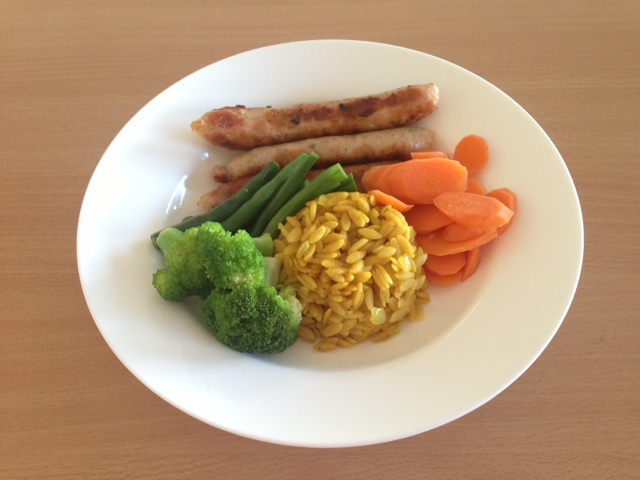
Sometimes you just need a little side dish that makes a standard meat and three veg meal a tad more special. Years ago a friend gave me a packet of Israeli cous-cous and it was the recipe on the back of the packet that inspired this risoni (or orzo) dish. If you’re unfamiliar with risoni, the (Australian) way to understand this carbohydrate is ‘pasta in the shape of rice’ and it can be found in the pasta section of most supermarkets. This not-at-all-spicy dish is really quite fast to make: you can get it going quickly and then reduce it to the absorption stage, which provides all the time you need to whack on whatever meat and vegetables you might be having, in this case, chicken sausages and steamed vegetables. And there’s no reason why this must be a side dish and not the main dish – just add some panfried pieces of chicken breast, a handful of freshly chopped parsley and some vegetables of your choice and you’ve got a dead-easy, one frypan main course – done. Using the ingredients and quantities below, this dish costs about $1.50 and serves 4 adult x 1 cup portions of risoni. 

  •  blob of butter
  • 1 small onion, finely chopped
  • 1 cup risoni
  • 1 cup chicken stock (I use powdered stock and water)
  • 2 teaspoons tumeric
  • 2 teaspoons cumin powder
  • salt and pepper to taste
  • handful of fresh parsley, chopped (though you can see from my picture I omitted it for the sake of my kids who aren’t so keen).
  1. Melt butter in a small frypan with a lid and add onion. Cook at a low temperature until onion is clear and soft. Add risoni and stir thoroughly to coat in the butter and onion mixture.
  2. Add chicken stock and stir carefully, adding in tumeric and cumin powder. Reduce the heat to the lowest possible setting, place lid on the pan, and allow everything to cook and absorb for at least 20 minutes. 
  3. Just before serving, season with salt and pepper and toss parsley in too. Enjoy!
Advertisement

Mary Berry’s Jolly Good Apple Cake

Standard

Image

Image

The first time I made this cake, my husband was away and my delightful friend Catherine was staying for a few nights with her delightful children. As is not unusual for me, I was trying to do too much in the kitchen at once – baking a cake, cooking dinner and parenting my own kids all at the same time. I probably shouldn’t have been surprised (but I was!) when I loosened the cake from the spring-form tin and the whole thing went frisbee-like, straight into the nearby sink of dirty washing up water! But I persevered and made it again because this recipe is thoroughly deserving of its title: it’s the best tasting apple cake I’ve ever had the pleasure of eating, it’s quick to prepare using the food processor, it’s rich in flavour and quite good to look at without any real effort. If you’re not a fan of marzipan, don’t be put off by the small amount required – it melts all through the cake upon cooking and contributes to the sweetness and nuttiness of the cake without leaving isolated bits of it in your mouth. And do feel free to use tinned apples in this cake, though fresh ones taste a fair bit nicer and are not much work at all if you can use a slinky apple machine to do the hard work of peeling and slicing for you. Costing just under $6 to make, this cake serves 12 people and is delightful on its own for morning or afternoon or becomes a wonderful dessert with a dollop of cream or icecream. Thanks for sharing this one Nicola, and thanks for inventing it, Mary Berry (whoever you are!). 

  • 225g grams flour
  • 1 level teaspoons baking powder
  • 225g sugar
  • 2 large eggs
  • half teaspoon almond extract
  • 150g butter, melted
  • 250g apples (approximately 3 medium sized), cored, peeled and sliced
  • 50g marzipan
  • 25g flaked almonds
  • 2 tablespoons raw sugar for the top
  1. Preheat oven to 170 degrees or 160 degrees for fan-forced. Grease and line a deep, loose bottomed tin. 
  2. In a food processor or mixer, combine flour, baking powder, sugar, eggs, almond extract and melted butter for 1 minute. Spread half the mixture in the bottom of the pan. 
  3. Slice apples and lay them on top of the mixture, dice and scatter marzipan over the top of the apples. Spread the remaining cake mixture over the top of the apples and marzipan, trapping them inside. Scatter the flaked almonds and raw sugar on top. 
  4. Bake for 1.25 to 1.5 hours, though start checking earlier. Cake is cooked when a skewer comes out clean of batter but moist from the apples. Cool in the tin and dust with icing sugar if doing so appeals. 

No Cook Chocolate Hedgehog

Standard

Image

Image

There’s lots to love about this chocolate hedgehog recipe, picked up by my husband from an former colleague. Unfortunately we’ve lost touch with Taleah, who first made it for Steve and a bunch of others for a work morning tea over ten years ago, but we still remember her fondly, partly because of this yummy slice! And it’s a terrific summer option because it’s chilled rather than baked and tastes great cold from the fridge or at room temperature. All the ingredients are easily kept in the pantry and quite literally this slice can be made in around ten minutes – a great option for last minute hospitality or as a quick addition to a meal being given away. Costing around $4 to make, this slice makes at least 21 slices.

  • 1 x packet Nice Biscuits (or other plain biscuits)
  • 125g butter, melted
  • 125g sugar
  • 1 egg
  • 2 tablespoons cocoa
  • Dash of vanilla

 Icing

  • 1.5 cups icing mixture
  • 2 tablespoons cocoa
  • a blob of butter
  • dashes of hot water
  1. Line a 30x25cm lamington tin with baking paper
  2. Blitz biscuits to a rough crumb in food processor (don’t go too far – you want lumps of biscuits!). Remove the blade of the processor, and all other ingredients. Combine well and press mixture into the tin evenly, using the back of a dessert spoon. Refrigerate.
  3. While base is getting cold, mix icing mixture, butter and little hot water to make icing that isn’t especially runny or thick. Spread over biscuit base and sprinkle with sprinkles. Cut once cold and set.