Tag Archives: Gluten Free

Tray Bake Chicken with Feta and Olives

Standard

Tray Bake Chicekn Plated

Tray Bake Chicken

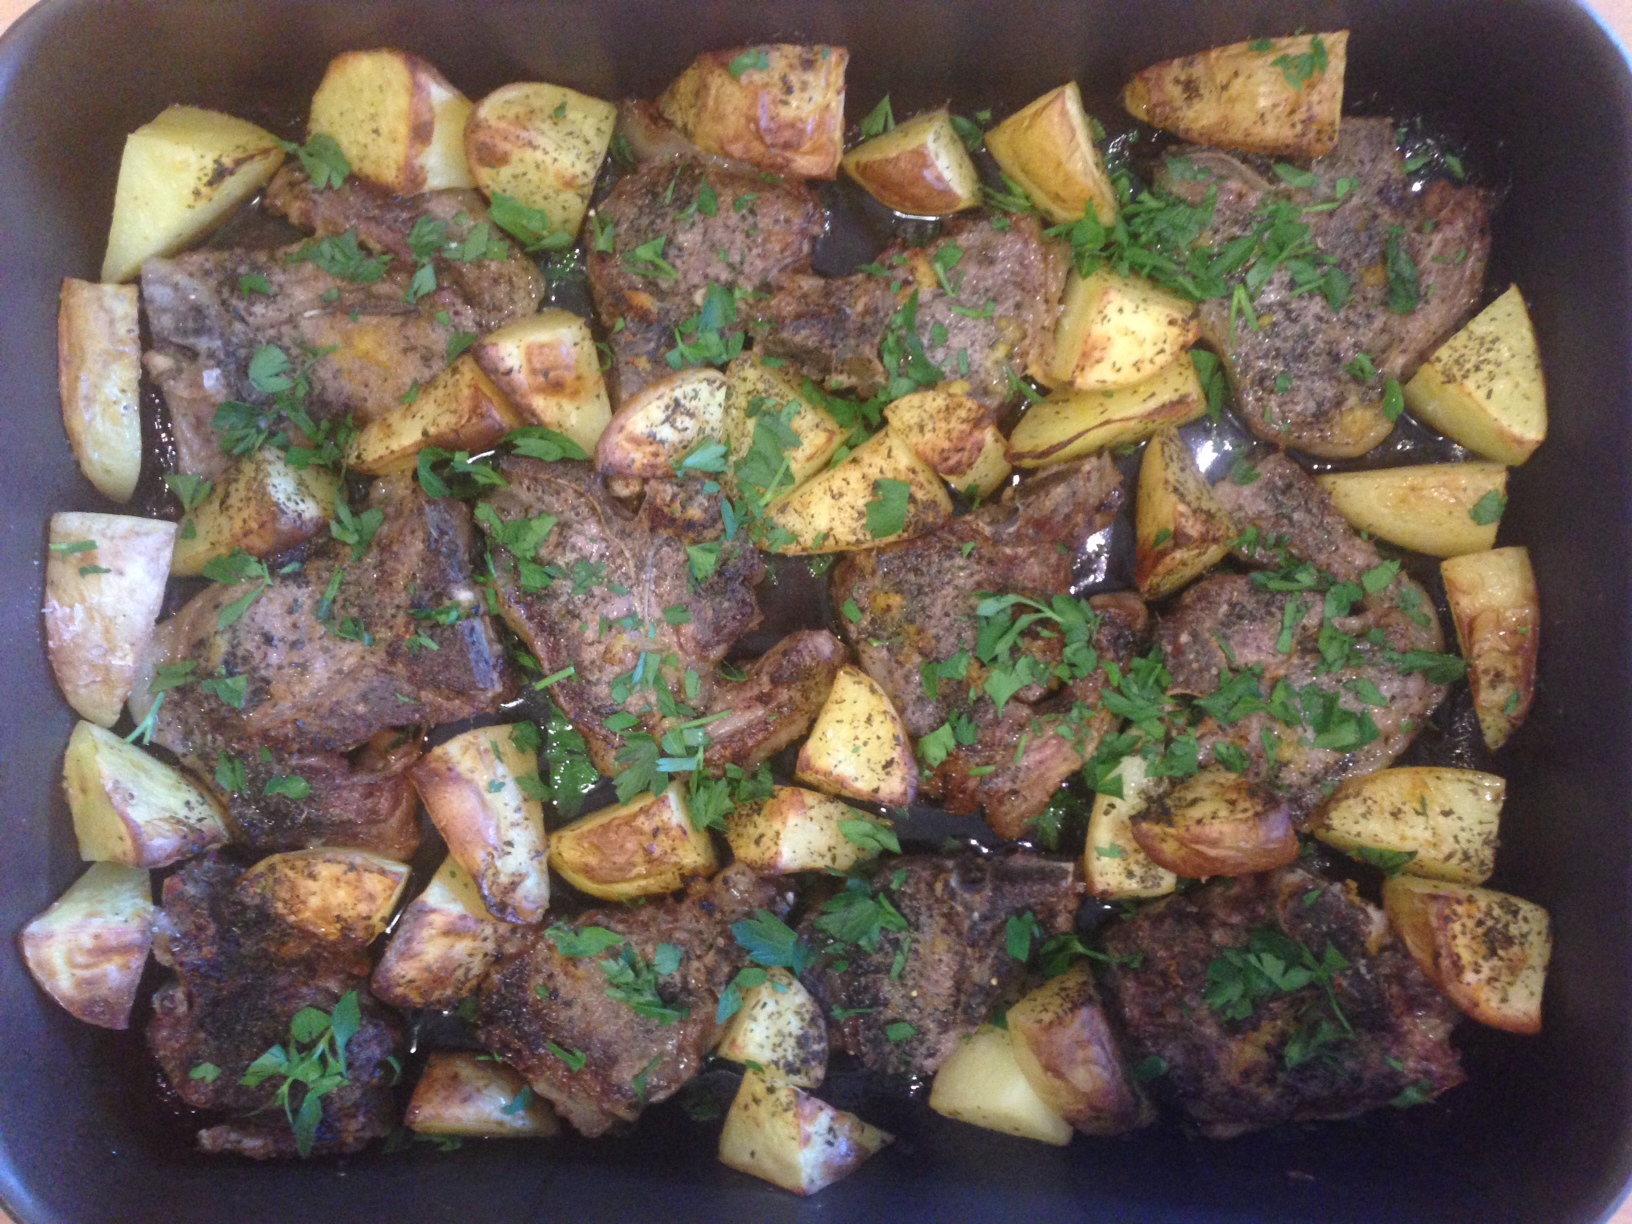
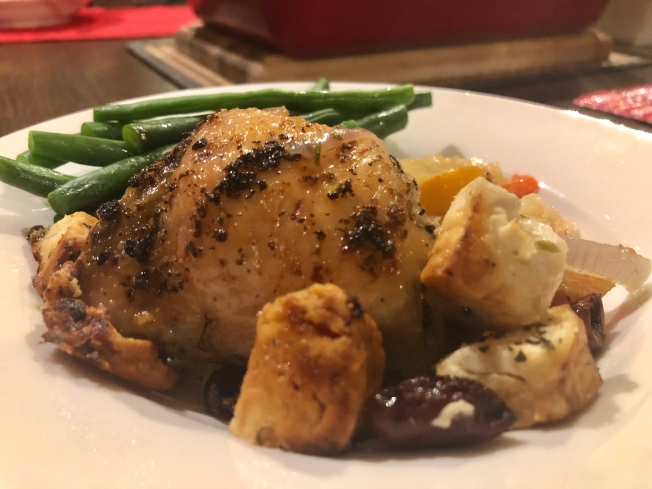
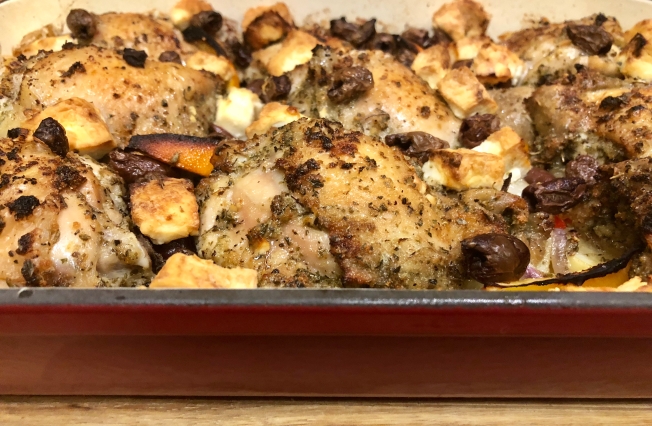
In recent years, tray bake dinners have been the solution to many a mid-week meal problem at my place. And my friend Amy keeps me in great supply of new tray bake recipes to try. Or try for me – by which I mean, she makes enough for her family and mine and then sends me home from Small Group with the next night’s dinner, plus the recipe. Yep, she’s a keeper. And so is this recipe. Everything in it is inexpensive, easily sourced and fast to make. And with my lemon tree once again going bananas, this dish is the very definition of doable. If you need a low-carb option, just ditch the wedges of potato, like the original recipe suggests here. Apart from the ease and affordability of this gluten-free dish, it must be said that it just tastes so good – the chicken skin goes nice and crispy in the hot oven, the cubes of feta don’t melt but they brown up nicely and the flavour made by the lemon and oregano is homely, satisfying and not too out there for the kids. This dish serves 6-8 people easily and costs less than $20 to make. And if your need is for a smaller group, the quantities halve nicely. Thanks, Amy, for this recipe and much more.

  • 8 chicken thigh cutlets, bone in, skin on
  • 200g Greek or Australian feta
  • 1/2 cup Kalamata olives, pitted
  • 4 tablespoons olive oil
  • 1 red capsicum
  • 4 medium sized potatoes, cut into wedges (not too thickly)
  • 1 red onion
  • 2 lemons
  • 2 tablespoons dried oregano
  • 4 tablespoons garlic powder (not garlic salt)
  • 2 teaspoons salt
  • cracked black pepper

1. Pre-heat oven to 200 degrees Celsius/ 390 degrees Fahrenheit

2. Cut the capsicums and onion into thick wedges. 

3. Cut the feta cheese into large cubes.

4. Cut the potatoes into wedges, not too thickly or they won’t cook in time with the rest of the dish.

5. Place the chicken thighs and the cut vegetables into a large bowl.

6. In a small bowl, combine the oregano, garlic, salt, pepper and olive oil and stir until combined.

7. Pour the olive oil mixture into the large bowl with the chicken thighs and vegetables. Toss to make sure all the chicken and vegetables are coated in the olive oil mixture.

8. Place the chicken mixture into a large baking dish or a rimmed baking tray. Make sure the chicken is skin side up on the tray. You will also want the vegetables to be at the bottom of the tray. Some juices may collect in the cooking process so it is better if there is a small rim on the tray or dish. Add the olives, feta and lemon wedges around the chicken pieces. Try not to place them on top of the chicken skin. 

9. Place the baking tray into the oven and cook for 30 minutes, then increase the temperature to 220 degrees Celsius/430 degrees Fahrenheit for a further  10-15 minutes or until the skin is golden brown. 

Advertisement

Italian Amaretti with Freckles

Standard

Amaretti

Some of the people I love most in my life are gluten intolerant or suffer from coeliac disease, and seeing as hospitality is about bringing people together, I like to have yummy options up my sleeve that they can enjoy without having to go for something different to everyone else. Even better when something is dead easy, fast to make and freezer friendly too. And you don’t need to have special dietary requirements to enjoy these beautiful little buttons of goodness – everyone can enjoy these dense, chewy and nutty numbers with a kiss of chocolate on top for good measure. With ingredients at full price, this recipe from taste.com.au costs $18 to make, and while that’s a bit on the dear side for a batch of bikkies, the recipe makes an enormous 48 and isn’t at all disappointing like gluten-free biscuits tend to be.

  • 500g almond meal
  • 400g caster sugar
  • 4 egg whites
  • 1 tablespoon vanilla
  • half a large packet of Allen’s freckles

1. Preheat oven to 160°C. Line two baking trays with non-stick baking paper. Place almond meal, sugar, egg whites and vanilla essence in a large bowl. Beat with a wooden spoon until well combined.

2. Roll teaspoonfuls of the mixture into balls. Place on the trays. Press a freckle onto the top of each ball.

3. Bake for 15-18 minutes or until light golden. Set aside to cool slightly on the trays before transferring to a wire rack to cool completely.


Oven-baked Bolognese

Standard

This bolognese sauce is my new addiction. My friend Corinne made dinner for the kids and I last week saying “We’re just having bolognese, I’ll bring some over.” But there’s nothing “just” or ho-hum about this bolognese, which is hinted at by its somewhat random ingredients list, and twice cooked methodology. But man, is it worth it. Corinne’s bolognese is hands down the best I’ve ever tasted. I think perhaps she was well aware of our family’s penchant for Weetbix and porridge dinners, especially when dad’s away. But we so appreciated her kindness in sharing with us some of what she and her family were having for dinner that night, which just so happened to be amazingness masquerading as ordinary. To me, this best ever bolognese is called Bacony Kindness Bolognese, and I thank God for my friend and for hers. First published by Delicious Magazine, (photo credit too) this lovely gluten free and freezer friendly recipe costs under $20 to make and easily serves 10.

  • 30g unsalted butter
  • 2 tablespoons olive oil
  • 200g bacon, any kind, finely chopped
  • 1 large onion, finely chopped
  • 2 celery stalks, finely chopped
  • 1 small carrot, finely chopped
  • 2 garlic cloves, finely chopped
  • 500g each beef and pork mince
  • 2 cups (500ml) milk
  • 1/4 teaspoon freshly grated nutmeg
  • 2 tablespoons tomato paste
  • 1 1/2 cups (375ml) dry red wine (I just use a cheap clean skin)
  • 800g canned chopped tomatoes
  • 2 cups (500ml) beef stock (I use powdered, but use a gluten free variety if needed)
  • 2 bay leaves
  • 2 tablespoons chopped basil leaves
  1. Preheat the oven to 160 degrees celcius.
  2. Melt the butter and olive oil in a large flameproof casserole over medium heat. Add the chopped bacon and cook, stirring, for 3-4 minutes until it starts to crisp. Add the onion, celery, carrot and garlic and cook, stirring, for 5 minutes or until softened. Add the beef and pork mince and cook for 8-10 minutes, breaking the meat up with a wooden spoon, until browned.
  3. Add the milk and nutmeg and simmer over medium heat for 4-5 minutes until the milk evaporates. Add the tomato paste and stir for 2-3 minutes until combined, then add the wine and allow to simmer for 10 minutes. Add canned tomatoes, stock and herbs. Season with salt and pepper. Cover, then cook in the oven for 2 hours or until thickened and reduced. Skim any fat from the surface, then serve with pasta.

Carrot & Tomato Soup

Standard

Carrot & Tomato SoupMum & Dad's View

Last week our family came home from holidays with a gastro bug, my dear husband suffering the worst of it. Overwhelmed and tired after a terrific break, but a long return journey, we were feeling rather ordinary and just so thankful to be home. Our weary hearts were made even more thankful by the countless expressions of care we received – more than one friend brought meals around for the days ahead in Vomit Land and we had countless offers to pick up milk and food for us, as well as prayers offered to our Heavenly Father on our behalf. On one hand, things like this happen pretty frequently among all sorts of people, but I’m still just struck by the fact that these kinds of everyday miracles are just how God rolls. Whether or not we realise it, he cares for us and provides what we need through the people he’s made us to be. In his letter to the scattered early church, James writes:

“Every good and perfect gift is from above, coming down from the Father of the heavenly lights, who does not change like shifting shadows.” – James 1:7

God is good, though it’s sometimes hard for me to see. He doesn’t change, he isn’t moody and I don’t need to catch him at a good time. He gives good and perfect gifts. One of them was this flavoursome and refreshing soup provided that night by our friends Ben & Renee for my green-feeling husband. It hit the spot. Renee shared the recipe with me which has come in handy this week, cause some of us are sick again, this time with colds and flus. Oh well, that’s life. But this yummy comfort food is also just what we feel like at the moment: It’s autumn, the weather has turned crisp and the kids and I are using up some school holidays visiting family in the Snowy Mountains (check out the view!). Not a bad time and place to be sick and snuggly with soup. This recipe is freezer friendly and a great option for those with special dietary needs (just use gluten free stock and leave out the cream if need be), and cheap to cook costing less than $5 to make more than 2L. We’re having it tonight with oven-ready bread and real butter. Thanks, Ben & Renee for the soup, and much more. 

  • 125g butter (half a block)
  • 2 large onions, finely chopped
  • 2 x 400g tins crushed tomatoes
  • 1 x 500g bag carrots, peeled and roughly chopped
  • 8 cups chicken stock (I use powdered, reconstituted with water)
  • salt, pepper and pinch of sugar
  • cream for drizzling, if desired
  1. In a large soup pot melt butter and saute onion until golden. Add carrots and cook until soft and golden (this preliminary cooking step add lots of extra flavour to the end result).
  2. Add the remaining ingredients (except the cream) to the carrot, butter and onion mixture, and simmer for 45 mins.
  3. Blend with a stick blender in the cooking pot and serve with or without drizzled cream and crusty, buttery bread. Serves 8.

One Pot Chicken and Basil Pasta

Standard

onepotchickenandbasilpasta

This recipe comes directly from the kitchen of my dear friend Lisa, who found it in One Handed Cooks magazine. Lisa is such a wonderful old soul – she carefully loves the people around her, thinks hard about everything that’s important in life and wastes no time on what isn’t. She looks after her family simply but diligently, with a heart full of wonder at all God’s given her. She put me onto this tasty, simple, and affordable meal and in addition to all these things, it’s so very her: warm, generous, and hearty. Once cooked, this crowd-pleasing one pot dish can be pureed with a stick blender for babies and frozen for future baby meals – no need to make the little ones a separate meal. And if you need a gluten free meal, simply exchange pasta for the gluten free variety. This dairy free recipe costs around $7 to make and serves 6. Thanks Lis, when I grow up I wanna be just like you.

  • 2 tablespoons olive oil
  • 1 red onion thinly sliced
  • 1 clove garlic crushed
  • 340g dried linguini (any pasta is fine though)
  • 1 x 400g can diced tomatoes
  • 1 large chicken breast, diced very small
  • 4.5 cups chicken stock (powdered is fine, but check for gluten if need be)
  • ½ cup basil leaves (but dried is totally fine too)
  1. Heat oil in a large pot/frypan. Sauté onion and garlic together over low heat. Gently fry chicken pieces in this mixture.
  2. Add all the other ingredients and simmer for 20 minutes, or until pasta is cooked through and liquids have reduced to a risotto-like consistency. Enjoy with crusty bread and/or salad.

Smashed and Roasted Jacket Potatoes

Standard

smashed and roasted jacket potatoes

potato toppings

Whether you need a cheap meal for a crowd, or a slack dinner at home or an easy way to satisfy a Zambrero’s-type craving, these yummy Mexican style jacket potatoes are a great choice. They’re wonderful for satisfying other catering needs too: they can easily be served as vegetarian and are wonderfully gluten free too. Cheap to make, easy to whack together and super yummy, 8 of these fat babies with the ingredients pictured cost less than $10 to make and serves 6 people.

  • 8 large and clean roasting potatoes
  • 300g streaky bacon, chopped finely
  • 4 shallots, chopped finely
  • 1 lebanese cucumber chopped finely
  • 2 roma tomatoes, chopped finely
  • 1 can corn kernels, drained
  • small tub sour cream
  • 200g grated cheese
  • 1 red or green capsicum, chopped finely
  1. Preheat oven to 200 degrees. Prick potatoes all over and par-boil in a large pot of water until soft, (the time this takes will depend on the size of potatoes), drain water.
  2. Place each potato inside a large roasting dish, and using a potato masher, press down gently but firmly on each one until it squashes/smashes nicely. Cover in spray oil and what in the oven until golden, about 20 minutes.
  3. Organise whatever toppings you’ve decided on – chop and fry bacon and quickly chop up vegetables of choice.
  4. Take all ingredients to the table and allow friends and family to assemble their potatoes as desired.

Peanut Butter and Choc-chip Slice

Standard

Peanut Butter Slice

Often my dislike of baking biscuits sees me attempting to turn a biscuit recipe into one for a slice, and yesterday my friend Charmaine’s Facebook photo of her Peanut Butter Biscuits had me once again starting down this path. And yay – I think it worked! What follows is a slight variation (I added choc-chips) on the original recipe by Paula Deen, which results in a mouth-watering and chewy slice. It took me all of 5 minutes to mix up and whack this gluten free dessert option into a tin and then into the oven – just in time for a friend popping in for afternoon tea. Using the quantities below, this slice makes 24 pieces and costs under $6 to make, less if you prefer to leave out the chocolate. Thanks for the recipe, Charmaine. 

  • 500g good quality peanut butter
  • 400g caster sugar
  • 2 eggs
  • 150g choc chips (homebrand are fine)
  • dash of vanilla extract
  • 2 tablespoons raw sugar
  1. Preheat oven to 180 degrees
  2. Combine all ingredients except raw sugar in a bowl and box well. Press into a lined 20 x 30cm slice tin using clean, wet hands. Sprinkle raw sugar evenly across the top of slice.
  3. Bake for 35-40 minutes (slice should be brown on top, firm around the edges and fudgey in the middle. If slice browns quickly, cover in foil for remainder of cook time. and allow to cool before cutting. Boil the kettle for tea and enjoy. 

Honey Joys

Standard

Image

I can’t really believe I’m blogging about Honey Joys. They’re such an Australian baking classic, yet I often forget about them as an option when needing to make a quick sweet something. My 7 year old son reminded me about them the other day, when he came home from a party asking if we could make them at home and I found myself wondering why I don’t make them more often.The recipe that follows is straight off the back of the Kellogg’s Cornflakes box and it really is dead easy and very cheap to do. If you need to make these gluten free, just exchange the cornflakes for the gluten free variety in the health food section of the supermarket, and do feel free to use homebrand flakes when making these as you really cannot tell the difference. The quantities below make 24 patty cake sized Honey Joys and costs around $2.

  • 90g butter
  • 1/3 cup sugar
  • 1 tablespoon honey
  • 4 cups cornflakes or gluten free cornflakes
  • 24 patty papers
  • sprinkles on top (if desired)

1. Preheat oven to 150 degrees celcius/130 degrees if fan forced. Distribute patty papers among the patty cake tins.

2. In a microwaveable bowl or small saucepan melt together all the ingredients except cornflakes.

3. Put cornflakes in a larger bowl and pour over sticky butter syrup, combining gently but well.

4. Distribute mixture with 2 dessert spoons among the patty papers. Sprinkle with sprinkles if desired. Bake in the oven for 10 minutes. Allow to cool before eating.

Donna Hay’s Thai Lime and Lemongrass Chicken with Noodles

Standard

Image

“Do you have plans tonight? Wanna come over, make me dinner, and watch a movie?”. That was my text to my old friend Sheridan one Sunday night at the end of last year. My husband was away and all the end of year ‘lasts’ – functions/events/things, had left me exhausted. And although normally under such circumstances, breakfast cereal is the dinner time option of choice around here, I couldn’t face another such dinner for the 5th time that week. Generous and hospitable as she is, even at my place rather than hers, Sheri came over and made this delightfully easy and tasty Donna Hay dish, which just happens to be gluten, egg, wheat and dairy free. Her food, good company and contentment with not much chit-chat that night were real blessings to me. And we’re still laughing about how from now on she’s going to have to read my sms invitations carefully to check who’s doing the cooking! Super simple to make, fresh and healthy too, this noodle dish is perfect for cooking for yourself or friends straight after work and can easily be multiplied for a larger group. And all of the preparation can be done quickly and hours ahead of people coming over – once they’ve turned up and have a cold drink in their hand, just stir fry everything from start to finish in 10 minutes. If you purchase your herbs from a grocer rather than a supermarket, this dish costs no more than $10 to make and serves 4. Thanks for this terrific recipe, Sheri.

  • 2 teaspoons vegetable or sesame oil
  • 1 tablespoon grated ginger
  • 1 stalk lemongrass, finely chopped (or, as I do, a good squeeze of Gourmet Garden lemongrass in a tube)
  • 1 teaspoon chilli flakes
  • 500g chicken mince
  • 1/4 cup lime juice (I use lime squeeze from the fridge)
  • 1/4 cup fish sauce
  • 1 tablespoon sugar
  • 3/4 cup coriander (cilantro) leaves
  • the stalks of the coriander leaves, washed and chopped finely
  • 3/4 cup basil leaves
  • 4 green onions, shredded
  1. Put a large pot of water on the stove and bring the boil for cooking egg noodles.
  2. Heat a frying pan or wok at high heat. Add the oil, ginger, coriander stalks, lemongrass and chilli and cook for 1 minutes. Add the chicken mince and cook, stirring for 6-7 minutes or until cooked through, breaking up any large lumps of chicken as you go.
  3. Add rice noodles to the boiling water and cook according to instructions on the packet and when soft, drain in a colander.
  4. Stir through the lime juice, fish sauce, sugar, coriander, basil and green onions. Serve stir-fry in bowls on top of freshly cooked rice noodles.

Nigella Lawson’s Greek Lamb Chops with Lemon and Potatoes

Standard

Image

Image

Today is Australia Day so I’m pretty excited to be sharing this lovely lamb recipe with you, not only because in my family Australia day equals eating a good deal of lamb, but because this dish, adapted from a terrific one by Nigella Lawson, pointed in my direction by my friend Amy, is all the things this blog is about: easy, tasty, affordable and delightfully do-able when having people over. Using either lamb loin or chump chops, simply place all the ingredients in a roasting dish at the same time and stick it in the oven. You don’t even need to turn anything! Just add something green to eat it with, perhaps a salad or steamed green beans, and whack the lot, straight out of the oven, onto the middle of the table with a fresh loaf of bread for mopping up the yummy juices. The lamb turns out oh so tenderly and the chopped fresh parsley makes the flavours come alive. This recipe is easily doubled using two roasting dishes and which can both go in the oven together – no problem: that’s 12-16 people fed for the cost of one at a nice restaurant! Even better is the fact that this delicious one-pot feast is gluten, egg, wheat and diary free. Using the quantities below, this recipe serves 6-8 and costs no more than $15 to make. Thanks for this one, Amy.

  • 12 lamb chops, either loin or chump
  • 3 baking potatoes, adding up to approximately 650g
  • 45ml olive oil (approximately three tablespoons)
  • 2 teaspoons dried mint
  • 1 teaspoon dried chilli flakes (a little less if substituting with chilli powder)
  • salt and pepper
  • 2 lemons
  • small handful of roughly chopped parsley
  1. Preheat oven to 200 degrees celcius. Put the lamb into a roasting dish
  2. Cut clean potatoes into wedges (don’t bother peeling them) and place them in the gaps around the lamb.
  3. Drizzle the oil over the lamb and potatoes and sprinkle with the dried mint, chilli flakes and salt.
  4. Zest 1 lemon over the roasting tin and then juice both lemons and pour the juice over everything in the tray.
  5. Season well with salt and pepper and cook in the oven for 1 hour, not bothering to turn anything over. Pull the tray out of the oven when everything looks quite brown (don’t let anything burn), and if it looks like it’s very brown before the end of the cooking time, cover the tray in foil and return to the oven.
  6. Serve everything in the middle of the table for a yummy and casual feast.