Category Archives: Sweets

Big Batch Triple Chocolate Muffins

Standard

triplechocolatemuffins

Sometimes you just need recipe for a big batch of something sweet – church morning teas, a terms worth of kids’ little lunches in the freezer or munchies for a group weekend away. These fudgey muffins hit the spot in many ways are super easy to make. You’ll notice this recipe deliberately calls for home brand choc-chips – this is because they are much smaller than the more expensive ones and go much further through the batter. Which results in much more chocolatey muffins overall – and they just happen to be the cheapest option! Using the quantities below, this recipe makes 70+ muffins and costs $17 to make, which is under 25c per muffin. Enjoy!

  • 7 1/2 cups self raising flour
  • 1 1/2 cups cocoa
  • 2 cups brown sugar 
  • 3 x 250g packets home brand dark choc chips
  • 1 x 375g packets white choc melts
  • 1 1/2 cups vegetable oil
  • 3 eggs 
  • 3 cups milk 
  1. Preheat oven to 180 degrees (170 degrees if fan-forced) and distribute muffin cases among two 12 hole muffin trays.
  2. Combine dry ingredients in a large mixing bowl or a large, plastic all-purpose basin.
  3. In a separate bowl, combine eggs, vegetable oil and milk with a whisk and pour into the dry ingredients.
  4. Mix the dry and wet ingredients together, but don’t over-mix – everything should be only just combined.
  5. Use two dessert spoons to half fill each muffin hole and place trays in oven for 20 minutes – although if you, like I do, prefer them a bit uncooked in the middle, start checking earlier.
Advertisement

Coconut Poached Pears

Standard

Image

Image

I love a dessert recipe that can be whipped up on the spot when having people over – the sort that take only a little time to make and for which the components need not be prepared beforehand at all. This recipe for delicate and tasty poached pears was given to me by my friend Emma and it was a lovely light finish to dinner – the short cooking time having allowed for mains to settle a little. For a large group of people, Emma suggests doubling the recipe and making them ahead of time, so they can be quickly warmed in the microwave and served whenever you need them. You’ll notice I didn’t bother trying to keep my pears whole, but of course if you’d like them so, use a deeper saucepan than the stovetop roasting dish I opted for, so that the pears sit deeply in the liquid when cooking. The quantities below serve 4 and costs less than $5 to make. Thanks for this wonderful recipe, Em!

  • 2 cups Coconut Milk
  • 1/3 C Caster Sugar
  • 1 Cinnamon Stick 
  • 4 Ripe Pears, peeled, halved
  1. Place coconut milk, sugar and cinnamon into a saucepan over med-low heat until sugar dissolves. Do not let the milk boil as it will separate. 
  2. Add the pears and cook 15 mins, or until soft, but not falling apart. Turn once.
  3. To serve, place pears in bowls and serve with the liquid and vanilla ice-cream. Delish!

Belinda Jeffery’s Most Fabulous Banana Cake

Standard

Image

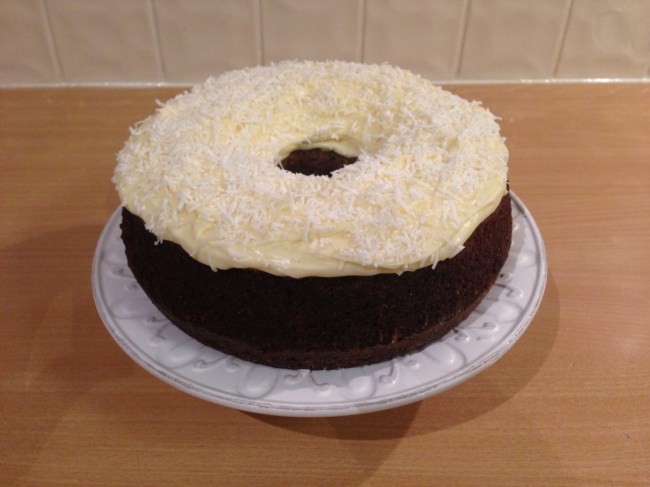
When I was growing up, my mum’s favourite sweet was Banana Cake, so for as long as I can remember, it’s been my favourite too. To this day, I still prefer a carrot, apple or banana cake over the richness of their various chocolate counterparts (but hey – they’re all good, cause they’re all cake). So when I first started working my way through Belinda Jeffery’s Mix & Bake, this amazing recipe was the first cab off the rank, and I found it well-deserving of its name. Apart from the actual baking, every part of this recipe is made in the food processor which makes everything easy. And if you don’t already know this, I’ll share with you a tip my sister-in-law Jo taught me years ago: when bananas go off, you can throw them in the freezer whole – skins and all. When you want to use them, defrost them in the sink and stick the insides straight into whatever you’re baking. The freezing and thawing process causes the still edible insides to go to mush which means you don’t need to do any mashing. And over-ripe bananas make the best choice for banana cake anyway. This lovely big cake serves between 10 and 12 people and costs around $7.  

Cake Mixture

  • 1 1/2 (225g) cups plain flour 
  • 3 teaspoons baking powder 
  • 3/4 teaspoon salt
  • 1/2 teaspoon bicarb soda
  • 2-3 large very ripe bananas 
  • 1 2/3 (370g) cups caster sugar 
  • 2 eggs 
  • 125g butter, at room temperature, cut into smallish chunks 
  • 100ml butter milk (or a 100ml mixture of half yoghurt and half milk – I do this all the time) 
  • 1 1/2 teaspoons vanilla extract

Cream Cheese Icing

  • 125g cream cheese, at room temperature, cut into smallish chunks (homebrand is fine)
  • 75g butter, at room temperature, cut into smallish chunks 
  • 250g icing mixture 
  • 1 teaspoon vanilla extract

1. Preheat oven to 180 degrees (170 for fan forced) and line or grease and flour a deep 26 cm ring tin. Because this is a quite a large cake, if your round or ring tin isn’t very deep, you might like to cook the leftover mixture in a loaf tin – if so you’ll need to line/grease that too. 

2. Put the flour, baking powder, salt and bicarb soda in the food processor and blitz briefly. Tip the mixture into a spare bowl and set aside.

3. Stick the bananas in the food processor and blitz until smooth. Add in sugar and eggs and process again for one minute. Add the butter and process again until mixture is thick and creamy. Add buttermilk or yoghurt and milk mixture and vanilla extract and blitz in quick spurts until combined. Add the flour mixture and continue this process until just combined – don’t overdo it.

4. Pour mixture into the ring tin and smooth out the mixture. Bake for 30-35 minutes or until a fine skewer comes out clean. The cake won’t have risen much as its quite a dense and moist cake. Cool the cake in the tine for 7 or so minutes and then loosen the inside and outside circles of the cake from the tin using a sharp knife. Turn onto a wire rack to cool completely.

5. For the cream cheese icing blitz the cream cheese and butter together until smooth. Add all the other ingredients and process again until you have a smooth, thick but spreadable icing. Ice the cake according to your preference once it’s completely cooled.

Honey Joys

Standard

Image

I can’t really believe I’m blogging about Honey Joys. They’re such an Australian baking classic, yet I often forget about them as an option when needing to make a quick sweet something. My 7 year old son reminded me about them the other day, when he came home from a party asking if we could make them at home and I found myself wondering why I don’t make them more often.The recipe that follows is straight off the back of the Kellogg’s Cornflakes box and it really is dead easy and very cheap to do. If you need to make these gluten free, just exchange the cornflakes for the gluten free variety in the health food section of the supermarket, and do feel free to use homebrand flakes when making these as you really cannot tell the difference. The quantities below make 24 patty cake sized Honey Joys and costs around $2.

  • 90g butter
  • 1/3 cup sugar
  • 1 tablespoon honey
  • 4 cups cornflakes or gluten free cornflakes
  • 24 patty papers
  • sprinkles on top (if desired)

1. Preheat oven to 150 degrees celcius/130 degrees if fan forced. Distribute patty papers among the patty cake tins.

2. In a microwaveable bowl or small saucepan melt together all the ingredients except cornflakes.

3. Put cornflakes in a larger bowl and pour over sticky butter syrup, combining gently but well.

4. Distribute mixture with 2 dessert spoons among the patty papers. Sprinkle with sprinkles if desired. Bake in the oven for 10 minutes. Allow to cool before eating.

Belinda Jeffery’s Coconut and Caramel Slice

Standard

Image

Belinda Jeffery’s Mix & Bake is one of my all-time favourite cookbooks and it is the delightful original source from which I’ve adapted this Coconut and Caramel Slice. Pretty much every recipe in this book is a taste winner and it makes a wonderful gift for those who love to bake. This easy slice is excellent for hospitality because it makes a large quantity in one baking effort (so you can cater for more than one event in one baking session) and the coconutty caramel flavour atop the crumbly vanilla base it so very hard to go past. The quantities below make a very large slice and costs $8 to make (up to 40 pieces), though if you don’t need such a large amount, simply halve all the quantities and you will have a slice that neatly fits into a standard 28x18cm sized lamington tin for around $4. Easily freezable and with a refrigerated shelf-life of over a week, this is a great option to keep ahead of a busy week of hospitality opportunities or for even just a moments quiet rest with a cuppa and a good book.

Base

  • 2 1/4 cups/335g plain flour
  • 1/2 cup/80g icing sugar
  • 250g cold butter
  • 1 teaspoon vanilla extract

Topping

  • 3 eggs
  • 2 tablespoons coconut cream
  • 1 tablespoon milk
  • 2 teaspoons vanilla extract
  • 45g butter, melted and cooled
  • 1 cup/220g firmly packed brown sugar
  • 1 tablespoon plain flour
  • 1 1/2 cups/105g shredded coconut
  • 50g flaked almonds for topping
  • icing sugar for dusting (optional)
  1. Preheat oven to 180 degrees, (170 if fan forced) and line a large 32x24cm slice tin with baking paper.
  2. Combine all the ingredients for the base in a food processor and press evenly into the bottom of the tin. Set food processor aside and don’t wash it up yet. Bake the base for 20-25 mins until slightly golden. Set aside to cool. Reduce oven to 150 degrees, (140 if fan forced).
  3. While the slice is cooling slightly, put sugars and flour in the already used food processor and process together. Pull out the blade and gently stir in the shredded coconut. Set aside.
  4. In a large bowl, combine eggs, coconut cream, vanilla extract and melted butter using a whisk. Gently fold dry ingredients from the food processor into this wet mixture. Gently tip the whole topping mixture over the base and spread evenly. Sprinkle over the flaked almonds and bake for around 45 minutes, though start checking earlier. Slice is cooked when the topping feels set and the whole thing is evenly golden.
  5. Cool to room temperature and cut into squares or fingers as desired. This slice cuts especially well when cut with a large, sharp straight-edged knife and after spending some time in the fridge. Enjoy!

Mary Berry’s Jolly Good Apple Cake

Standard

Image

Image

The first time I made this cake, my husband was away and my delightful friend Catherine was staying for a few nights with her delightful children. As is not unusual for me, I was trying to do too much in the kitchen at once – baking a cake, cooking dinner and parenting my own kids all at the same time. I probably shouldn’t have been surprised (but I was!) when I loosened the cake from the spring-form tin and the whole thing went frisbee-like, straight into the nearby sink of dirty washing up water! But I persevered and made it again because this recipe is thoroughly deserving of its title: it’s the best tasting apple cake I’ve ever had the pleasure of eating, it’s quick to prepare using the food processor, it’s rich in flavour and quite good to look at without any real effort. If you’re not a fan of marzipan, don’t be put off by the small amount required – it melts all through the cake upon cooking and contributes to the sweetness and nuttiness of the cake without leaving isolated bits of it in your mouth. And do feel free to use tinned apples in this cake, though fresh ones taste a fair bit nicer and are not much work at all if you can use a slinky apple machine to do the hard work of peeling and slicing for you. Costing just under $6 to make, this cake serves 12 people and is delightful on its own for morning or afternoon or becomes a wonderful dessert with a dollop of cream or icecream. Thanks for sharing this one Nicola, and thanks for inventing it, Mary Berry (whoever you are!). 

  • 225g grams flour
  • 1 level teaspoons baking powder
  • 225g sugar
  • 2 large eggs
  • half teaspoon almond extract
  • 150g butter, melted
  • 250g apples (approximately 3 medium sized), cored, peeled and sliced
  • 50g marzipan
  • 25g flaked almonds
  • 2 tablespoons raw sugar for the top
  1. Preheat oven to 170 degrees or 160 degrees for fan-forced. Grease and line a deep, loose bottomed tin. 
  2. In a food processor or mixer, combine flour, baking powder, sugar, eggs, almond extract and melted butter for 1 minute. Spread half the mixture in the bottom of the pan. 
  3. Slice apples and lay them on top of the mixture, dice and scatter marzipan over the top of the apples. Spread the remaining cake mixture over the top of the apples and marzipan, trapping them inside. Scatter the flaked almonds and raw sugar on top. 
  4. Bake for 1.25 to 1.5 hours, though start checking earlier. Cake is cooked when a skewer comes out clean of batter but moist from the apples. Cool in the tin and dust with icing sugar if doing so appeals. 

No Cook Chocolate Hedgehog

Standard

Image

Image

There’s lots to love about this chocolate hedgehog recipe, picked up by my husband from an former colleague. Unfortunately we’ve lost touch with Taleah, who first made it for Steve and a bunch of others for a work morning tea over ten years ago, but we still remember her fondly, partly because of this yummy slice! And it’s a terrific summer option because it’s chilled rather than baked and tastes great cold from the fridge or at room temperature. All the ingredients are easily kept in the pantry and quite literally this slice can be made in around ten minutes – a great option for last minute hospitality or as a quick addition to a meal being given away. Costing around $4 to make, this slice makes at least 21 slices.

  • 1 x packet Nice Biscuits (or other plain biscuits)
  • 125g butter, melted
  • 125g sugar
  • 1 egg
  • 2 tablespoons cocoa
  • Dash of vanilla

 Icing

  • 1.5 cups icing mixture
  • 2 tablespoons cocoa
  • a blob of butter
  • dashes of hot water
  1. Line a 30x25cm lamington tin with baking paper
  2. Blitz biscuits to a rough crumb in food processor (don’t go too far – you want lumps of biscuits!). Remove the blade of the processor, and all other ingredients. Combine well and press mixture into the tin evenly, using the back of a dessert spoon. Refrigerate.
  3. While base is getting cold, mix icing mixture, butter and little hot water to make icing that isn’t especially runny or thick. Spread over biscuit base and sprinkle with sprinkles. Cut once cold and set.

Ice-cream Slice

Standard

 Image

Image

Image

Many a Moore College family between the years 2008 and 2011 will remember Julie Morrow’s Ice-cream slice, often served up at the weekly-free-for-all college playground dinners. Always a hit, several people have mentioned how great the recipe is for hospitality and have replicated it many times long since their time at college has come to an end. And for good reason: it’s really fast to make, tastes terrific and serves at least 21 people for a total cost of $13, though much less if you stock up on biscuits and chocolate bars when on special. Thanks for a great recipe Julie, and thanks for reminding me to give it a go, Jess!

  • 1 x 375g tin condensed milk
  • 600ml cream
  • 3 x 52g chocolate bars of your choice (I used cherry ripe), roughly chopped
  • your choice of food colouring (I chose to keep mine white this time)
  • 1 1/2 packets of plain biscuits such as Malt-O-Milk (I used Morning Coffee)
  1. Line a 20x30cm slice tin with foil and put down a layer of biscuits wrong side up. Make sure they fit in the tin nice and snugly.
  2. Whip cream until thick, add condensed milk and whip again. Gently stir through chopped chocolate bar and food colouring, if using. Spread cream mixture evenly over biscuit base and then top with another layer of biscuits, right side up this time.
  3. Cover with foil and freeze overnight. When ready to serve, tip slice out using a board to keep it stable when up-ending it. Remove the last layer of foil and cut into biscuit sized portions using a large sharp knife. Eat and enjoy immediately!

TIP: If you don’t eat it all when you first serve it, cut slices into individual portions before returning left-overs to the freezer. This will make it easier to access and serve next time round.

Peppermint Delight

Standard

Image

Image

Years ago, in another life before having kids, my husband and I lived in Queensland and made friends with a couple called Sacha and Leigh-anne after we joined the Bible study group they hosted. Sacha and Leigh-anne were down to earth, funny, outdoorsy types who loved to go camping and listen to Garth Brooks in the car (Steve could only just tolerate the Garth Brooks bit, but I loved it). Each week we’d all bring our takeaway dinner to their house, share the highs and lows of the week, study the Bible and pray together. Their home was always open, they never bunged anything on for any of us (Sacha was often in the bath when we arrived) and they didn’t mind one little bit if you made yourself a cup of tea. In that season of life, we all grew lots spiritually and had lots of fun times together. These days we all live a long way from each other, but some friends from the town we now live in, Gavin & Chantell, have moved to their town – and to our delight have found good friends in each other. Last week, while on holidays we got to have the second annual Three Family Get-together, and just like old times shared with both families, it was delightful: a relaxed catch-up, fun and games as Sacha kept us entertained with his stories, all the while sharing simple but yummy food. Chantell brought this tasty dessert that went down a treat with everyone and I had to give it a go myself and share it with you. Hardly ‘cooking’ at all: it’s more like assembling a salad from a bunch of ingredients, this versatile dessert costs about $17 to make, but it does serve 15 people. For a smaller group, simply halve the quantities, which also halves the cost. As all the ingredients (except the cream) can be stored in the pantry for when you want them, I recommend buying them up when on special to make this even more affordable. Thanks for the recipe, Chantell.

  • 4 Peppermint Crisp chocolate bars, chopped roughly
  • 1 can of Nestle Caramel Top’n’fill
  • 2 x packets of Nice biscuits (or other plain biscuits)
  • 900ml cream, whipped
  1. Choose a medium sized casserole/pie/oven dish, and spread a thin layer of caramel on the bottom. Place a layer of evenly spaced biscuits over the top of the caramel, followed by a layer of cream. Sprinkle 1/4 of the peppermint crisp over the layer cream. Repeat this series of layers until all the ingredients are finished or the dish is full.
  2. End the layers with cream and the remaining peppermint crisp. I had some leftover malteasers in the pantry so popped them on top too – feel free to improvise.
  3. Place in the fridge for 24 hours to allow for softening and setting. Enjoy with ice-cream or without.

Pauline’s Chilled Lemon Cheesecake

Standard

Image

Image

Yesterday was my husband’s birthday and he requested this lovely cheesecake for birthday cake. It’s a recipe my mother-in-law Pauline gave me when Steve and I were first married and it has become something of an identity marker for our little family, a tradition that we’ve made our own for special celebrations. What we have always loved about this chilled cheesecake, is the light but creamy texture of the filling that comes from not using gelatine and its faint taste of lemon. And it’s so versatile flavour-wise: yesterday we enjoyed it topped with fresh mango pieces and raspberry sauce and in the past it’s been lovely with drizzled melted chocolate on top. These extra serving options are totally unnecessary though, because the cheesecake is just delightful all by itself. There are a couple of simple but essential tricks to making this cheesecake successfully: the first is not to forget the fresh lemon juice – it’s what makes the filling set and unfortunately, this won’t happen if you replace it with lemon squeeze either; and the second is not use lite versions of cream, cream cheese or condensed milk – the setting factor of the filling is determined by interaction of the citric acid, fat and sugar content. But with these factors in mind, this cheesecake is super simple to make because it doesn’t require baking, and cost-effective because it easily serves 10-12 people – Pauline’s cheesecake costs around $10 to make.

  • 250g cream cheese, full fat, softened to room temperature
  • 1 x 395g tin sweetened condensed milk, full fat, (home brand is fine)
  • 300ml thickened cream, full fat
  • 1 x 250g packet of Nice biscuits
  • 190g butter, melted
  • Juice of 1 fresh lemon, yielding 60ml of juice
  1. Select a loose-bottomed pie tin or springform cake tin, 20-25 cm in diameter and spray lightly with canola spray.
  2. Place biscuits into the bowl of a food processor and blitz until a rough crumb. The biscuits need to be well and truly crushed, but don’t go too fine with them.  Remove blade and add melted butter, mixing through. Using clean hands and spoon for pressing down firmly, place biscuit mixture into the tin to form the base, which should come up the sides 3/4 of the tins height. Place in freezer to set.
  3. Using electric beaters, beat the cream cheese to a paste, continue mixing and add the condensed milk. When thoroughly combined, continue mixing and add the cream and lemon juice. Beat a little longer to ensure the mixture is well-combined. Remove the now set base from the freezer and gently fill the base with creamy filling. Place the cheesecake in the fridge for 4-6 hours to set.