Tag Archives: cream

Ice-cream Slice

Standard

 Image

Image

Image

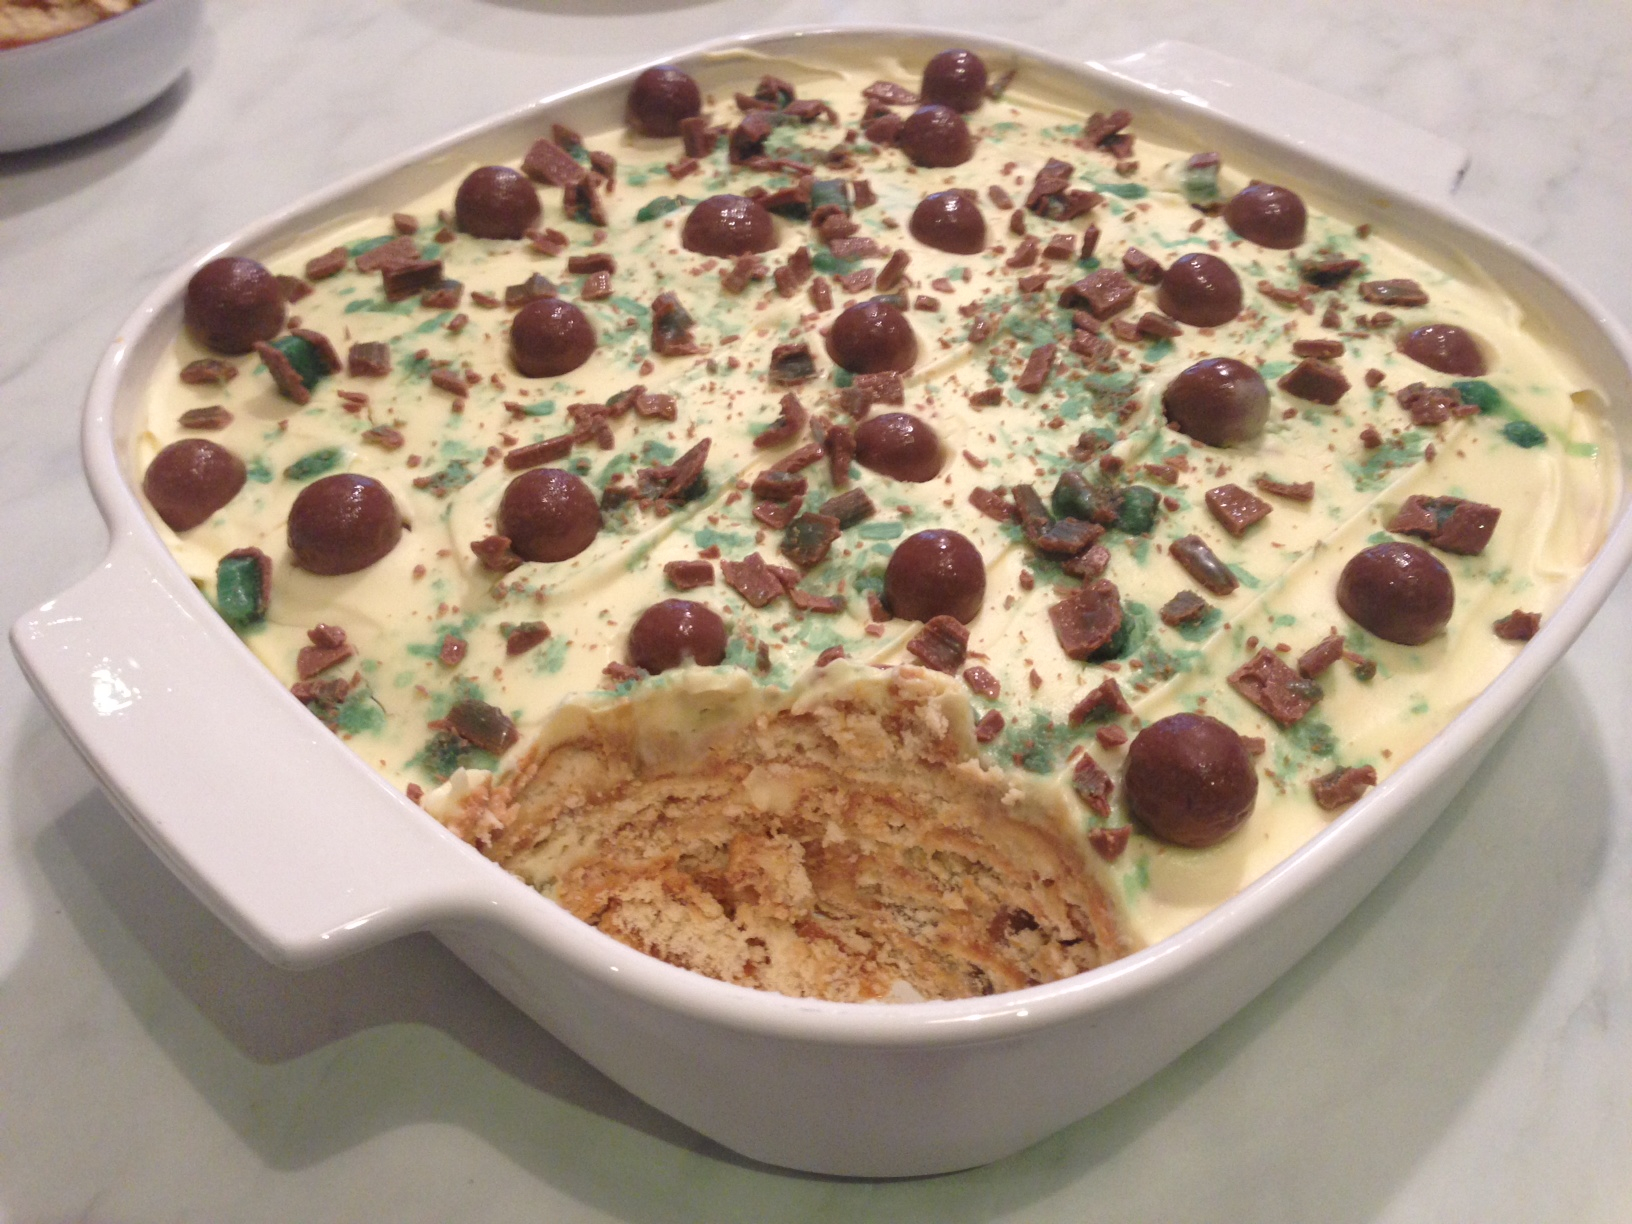
Many a Moore College family between the years 2008 and 2011 will remember Julie Morrow’s Ice-cream slice, often served up at the weekly-free-for-all college playground dinners. Always a hit, several people have mentioned how great the recipe is for hospitality and have replicated it many times long since their time at college has come to an end. And for good reason: it’s really fast to make, tastes terrific and serves at least 21 people for a total cost of $13, though much less if you stock up on biscuits and chocolate bars when on special. Thanks for a great recipe Julie, and thanks for reminding me to give it a go, Jess!

  • 1 x 375g tin condensed milk
  • 600ml cream
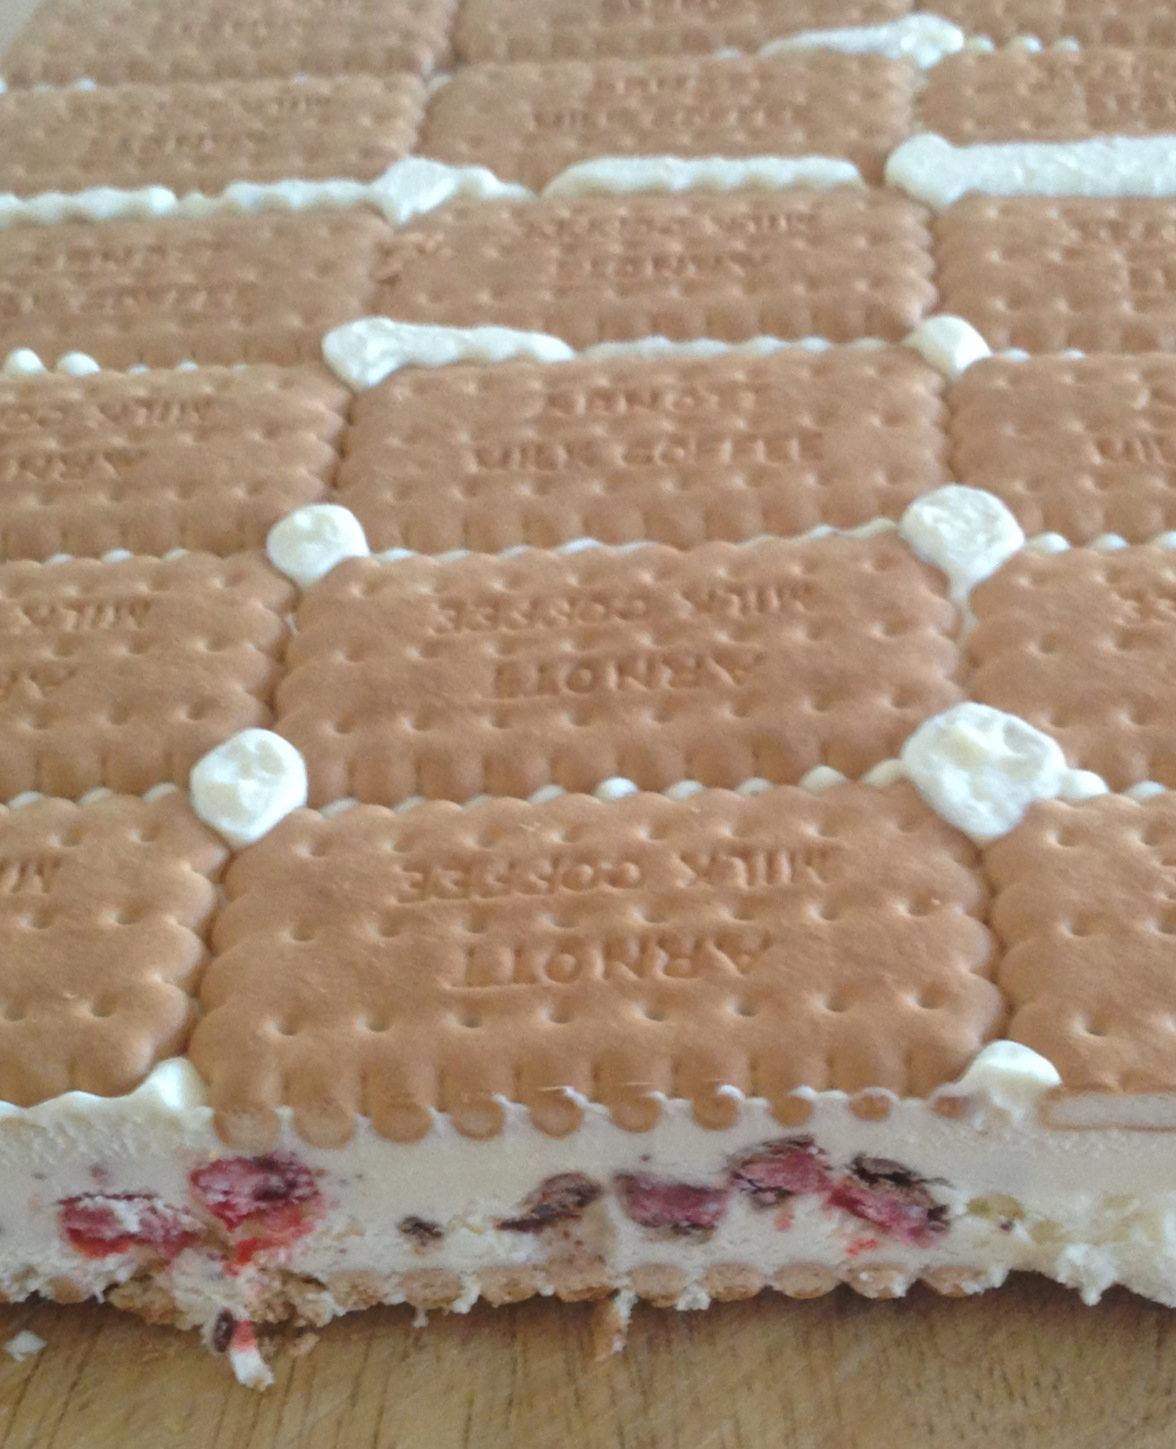
  • 3 x 52g chocolate bars of your choice (I used cherry ripe), roughly chopped
  • your choice of food colouring (I chose to keep mine white this time)
  • 1 1/2 packets of plain biscuits such as Malt-O-Milk (I used Morning Coffee)
  1. Line a 20x30cm slice tin with foil and put down a layer of biscuits wrong side up. Make sure they fit in the tin nice and snugly.
  2. Whip cream until thick, add condensed milk and whip again. Gently stir through chopped chocolate bar and food colouring, if using. Spread cream mixture evenly over biscuit base and then top with another layer of biscuits, right side up this time.
  3. Cover with foil and freeze overnight. When ready to serve, tip slice out using a board to keep it stable when up-ending it. Remove the last layer of foil and cut into biscuit sized portions using a large sharp knife. Eat and enjoy immediately!

TIP: If you don’t eat it all when you first serve it, cut slices into individual portions before returning left-overs to the freezer. This will make it easier to access and serve next time round.

Advertisement

Peppermint Delight

Standard

Image

Image

Years ago, in another life before having kids, my husband and I lived in Queensland and made friends with a couple called Sacha and Leigh-anne after we joined the Bible study group they hosted. Sacha and Leigh-anne were down to earth, funny, outdoorsy types who loved to go camping and listen to Garth Brooks in the car (Steve could only just tolerate the Garth Brooks bit, but I loved it). Each week we’d all bring our takeaway dinner to their house, share the highs and lows of the week, study the Bible and pray together. Their home was always open, they never bunged anything on for any of us (Sacha was often in the bath when we arrived) and they didn’t mind one little bit if you made yourself a cup of tea. In that season of life, we all grew lots spiritually and had lots of fun times together. These days we all live a long way from each other, but some friends from the town we now live in, Gavin & Chantell, have moved to their town – and to our delight have found good friends in each other. Last week, while on holidays we got to have the second annual Three Family Get-together, and just like old times shared with both families, it was delightful: a relaxed catch-up, fun and games as Sacha kept us entertained with his stories, all the while sharing simple but yummy food. Chantell brought this tasty dessert that went down a treat with everyone and I had to give it a go myself and share it with you. Hardly ‘cooking’ at all: it’s more like assembling a salad from a bunch of ingredients, this versatile dessert costs about $17 to make, but it does serve 15 people. For a smaller group, simply halve the quantities, which also halves the cost. As all the ingredients (except the cream) can be stored in the pantry for when you want them, I recommend buying them up when on special to make this even more affordable. Thanks for the recipe, Chantell.

  • 4 Peppermint Crisp chocolate bars, chopped roughly
  • 1 can of Nestle Caramel Top’n’fill
  • 2 x packets of Nice biscuits (or other plain biscuits)
  • 900ml cream, whipped
  1. Choose a medium sized casserole/pie/oven dish, and spread a thin layer of caramel on the bottom. Place a layer of evenly spaced biscuits over the top of the caramel, followed by a layer of cream. Sprinkle 1/4 of the peppermint crisp over the layer cream. Repeat this series of layers until all the ingredients are finished or the dish is full.
  2. End the layers with cream and the remaining peppermint crisp. I had some leftover malteasers in the pantry so popped them on top too – feel free to improvise.
  3. Place in the fridge for 24 hours to allow for softening and setting. Enjoy with ice-cream or without.

Eton Mess

Standard

Image

The heatwave continues in our neck of the woods, the perfect time to try this no cook summer dessert, suggested to me ages ago by my friend Amy. And what a winner! Each component is able to be purchased or made ahead of serving time with almost no fuss: all that needs to be done beforehand is to make the simple berry sauce and whip the cream – both of which just go straight back into the fridge until you’re ready for dessert. Not only are these individual possets of cool berry yumminess easy to make, all of the ingredients can be kept close at hand for dessert at short notice: frozen berries in freezer, packet meringues in the pantry, and cream and yoghurt are constants in my fridge. The recipe that follows is my adaptation of Valli Little’s, originally published in Delicious magazine, but do whatever you like with the ingredients: more or less of each item according to what you like to taste most of. The residents at my place have requested more meringue next time! Similarly, the yoghurt can be completely left out, just increase the amount of cream to replace it, which also lowers the cost a little. Using fresh strawberries and the quantities below, this recipe serves 6 and costs less than $10 to make. Assemble just before serving in whatever takes your fancy: tumblers, ramekins or martini glasses – whatever, and enjoy some stress free time with your guests.

  • 150g frozen raspberries, thawed
  • 1/4 cup caster sugar
  • 1 punnet of strawberries, hulled and thinly sliced (use when affordably in season, otherwise frozen mixed berries work well and are cheaper)
  • 200ml cream, whipped
  • 200ml greek yoghurt, (optional, and any kind is fine)
  • 50g mini meringues, roughly crumbled (half a 100g box)

1. In a small bowl add sugar to defrosted raspberries and mix through. Using a stick blender, puree the mixture and pass through a sieve and discard seeds. Add sliced strawberries to raspberry liquid and mix through.

2. In another bowl, whip cream, again using a stick blender. Just before serving, add crumpled meringues, yoghurt and berry mixture to the cream, gently combining each ingredient, but don’t over mix!

3. Divide mixture evenly among the six glasses and eat immediately.

Cinnamon Scrolls

Standard

Image

Image

I stumbled upon this sensational recipe on Cath’s blog the other day and was immediately taken with it. So very easy, so very cheap, so very yummy. And seeing as I’m on a bit of a scroll making wave right now, I was keen to give them a go. And although I’m not really meant to be eating sugar at the moment, these have caused me to make some exceptions. These delicious cinnamon scrolls are not much harder to make than scones and pretty much the same cost as the cream goes in the mixture, and not on top. This recipe makes more than a roasting dish worth of scrolls (I had to use another smaller tin, just for the four that wouldn’t fit in!) so would be a great option for Bible study morning tea, afternoon tea playdates, church morning tea or any time at all really. The smell as they were baking was only topped only by the actual enjoyment of eating them. Approximate cost is $3.50 and makes 24 scrolls. Thanks for your blog Cath, and thanks for sharing this recipe with us.

Scroll Mixture:

  • 4 cups Self Raising Flour
  • 300ml cream
  • 300ml milk

Inside Mixture:

  • 1/2 cup butter, softened
  • 1 cup brown sugar
  • 1 tablespoon cinnamon
  • Good dash vanilla essence or extract

Icing Mixture:

  • 1 cup icing mixture
  • enough warm water to make a runny icing
  • extra cinnamon if you like (I did!)
  1. In a bowl, mix self-raising flour with milk and cream.
  2. The mixture will be quite sticky still, but turn it out onto a well-floured board or bench, and turn it over a few times to flour it well.
  3. Roll it out into an oblong shape so it is quite thin – the thinner the better, but not so thin that it will tear when you move it.
  4. In a small bowl, mix together soft butter with brown sugar and cinnamon. Add a hearty dash of vanilla sugar, or vanilla essence. Spread this mixture over the rolled out pastry. Don’t wash the bowl – you will need it later for the icing.
  5. Using a spoon or pastry brush, spread this inside mixture all over scroll mixture. Roll it up from the long end until you have a log.
  6. Cut the roll into pieces about 1 inch thick, and lay them in a greased or lined oven tray, close together but not packed in. Sprinkle them with vanilla sugar if you have some.
  7. Bake them in the oven at 180deg. for 15-20 minutes, or until they are starting to brown nicely.
  8. In the bowl where you mixed the sugar and butter, mix 1 cup of icing sugar with enough water to make it go runny. The butter and spice left around the edge of the bowl is sufficient to give it a slight flavour, though you might like to add extra cinnamon. Using a dessert spoon, drizzle this over the scrolls while they are still warm.
  9. Enjoy! Best eaten the same day, though a quick zap in the microwave brings them back to freshness should they need it a day or two later (but they won’t last that long, anyway!).