Tag Archives: Freezer Friendly

Muffins That Taste Like Doughnuts

Standard

Image

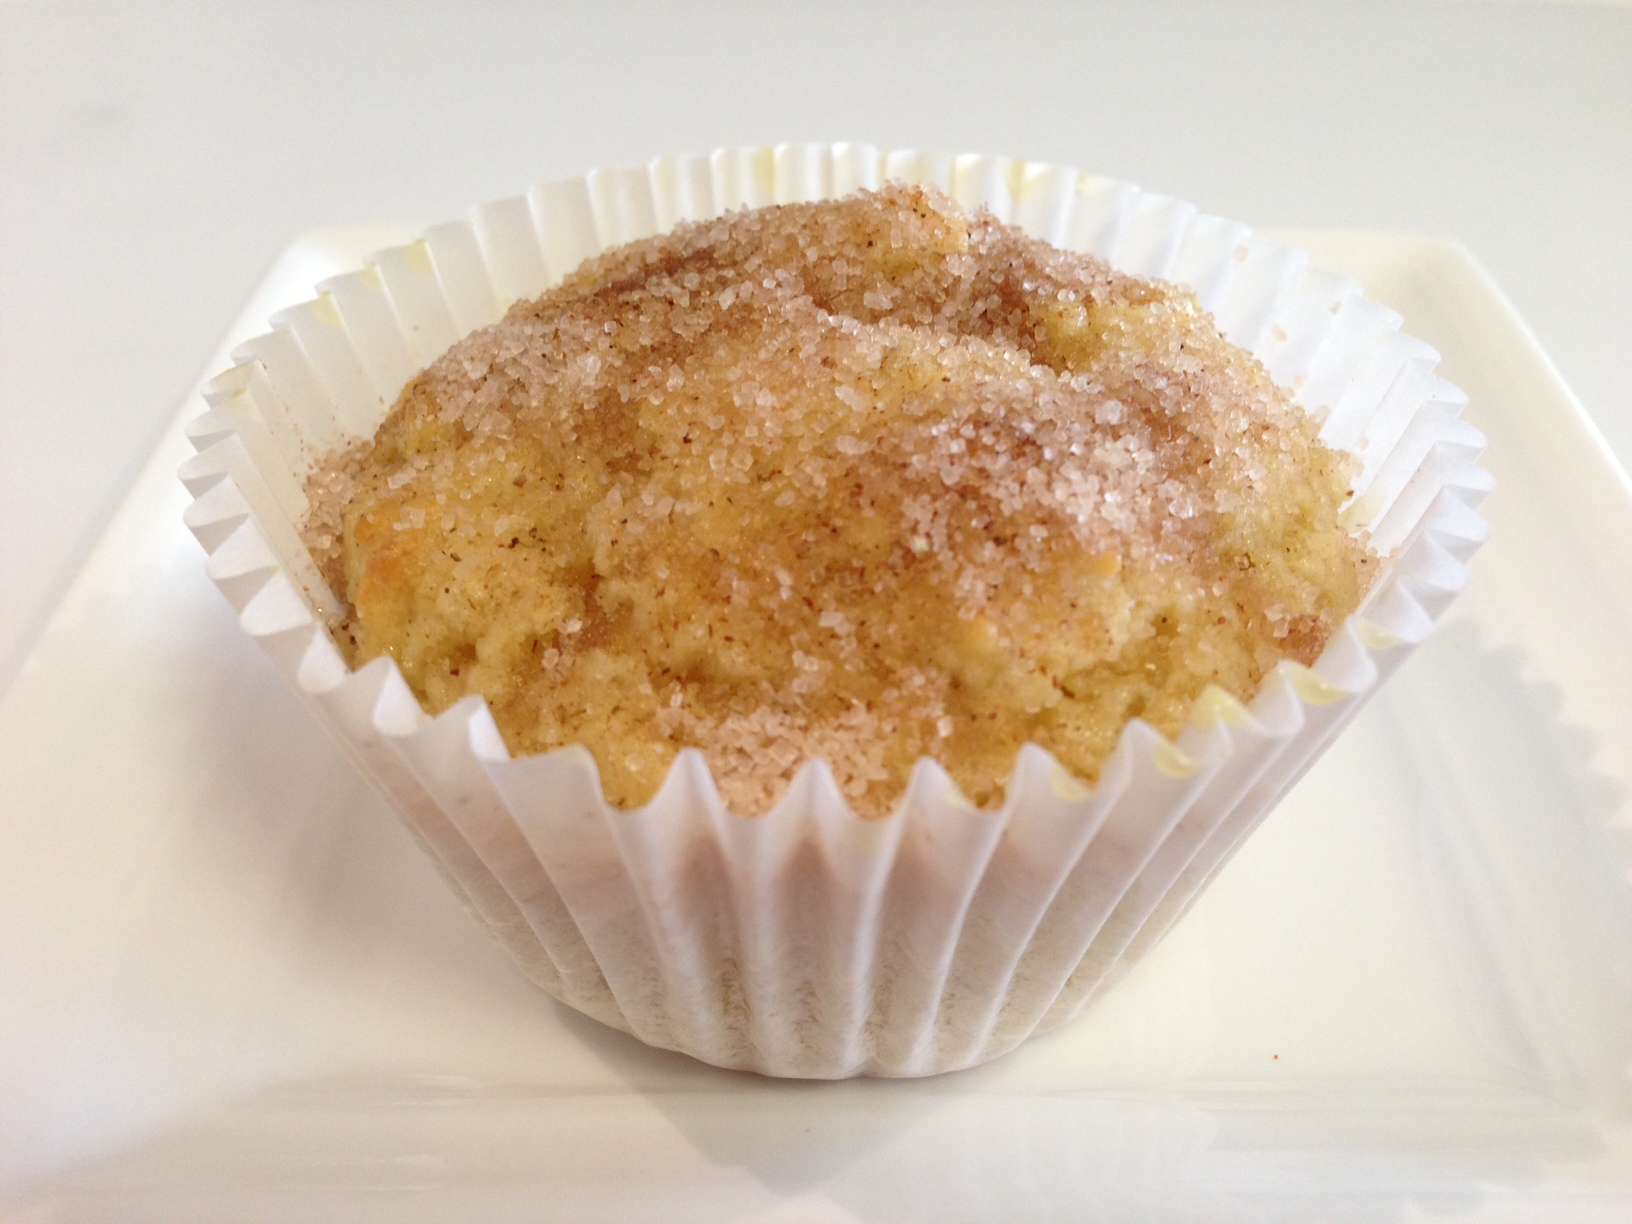
I saw this recipe floating around on Facebook a couple of weeks ago and it really grabbed me – who wouldn’t want to try a recipe promising muffins that taste like cinnamon doughnuts? These muffins delivered on their promise in taste, were simple to make from basic pantry ingredients that are readily on-hand and cost no more than $1.50 to make. Make these quick and easy muffins for last minute friends dropping by or for a quick solution for empty lunch boxes at the end of a busy week. Like all muffins, these don’t have an especially long shelf life, but they are freezer friendly and if you’re eating them after a day or two, a quick zap for 10-20 seconds in the microwave brings back a fair bit of freshness and restores them to something more like a warm cinnamon doughnut. For those avoiding sugar, simply replace the caster sugar measure for measure with dextrose (available from the beer brewing section at K-Mart or Big W). If you’re not too heavy-handed with the mixture it will make 12 muffins. Enjoy!

  • 1 3/4 cup plain flour
  • 1 1/2 teaspoons baking powder
  • 3/4 cup caster sugar
  • 1/2 teaspoon salt
  • 1/2 teaspoon nutmeg
  • 1/4 teaspoon cinnamon
  • 1/3 cup vegetable or canola oil (I use rice bran)
  • 1 egg
  • 3/4 cup milk

Sugar Topping

  • 1/2 cup melted butter
  • 1/4 cup caster sugar
  • 1/4 tsp cinnamon

1. Preheat oven to 180 degrees celcius and distribute 12 paper cases in a 12 hole muffin tray.

2. Combine dry ingredients in a large bowl. Mix liquids in separate bowl or pyrex jug. Add liquids to dry ingredients and combine together well, without over beating. Spoon mixture into prepared muffin tins using two soup spoons (but don’t overload them). Bake for 15 mins though start checking at 10. When muffins spring back a little, they’re ready.

3. While muffins are baking prepare sugar topping: combine sugar and cinnamon in a small bowl and melt butter in yet another bowl. As soon as muffins come out of the oven, dip each one into melted butter and roll into sugar & cinnamon mixture, or brush with butter and top with sugar mixture if muffins are too hot to handle.

Advertisement

Zucchini Slice

Standard

Image

Zucchini Slice has got to be one of my favourite money saving meals and it gets a regular workout around here in the summer months. Rather than spending money on expensive meat for a barbeque when having people over, I often choose some good quality sausages to cook on the barbie accompanied by Zucchini Slice and a fresh salad. As well as being so affordable, this little number has two other benefits: first, from dicing the onions to chopping the bacon, to whisking the eggs and grating the cheese, it can all be made using various blades of the food processor. Second, it can be made up to a couple of days ahead and stored in the fridge to avoid cooking stress on the day your guests come over. To make this slice, originally from the Women’s Weekly, using the quantities that follow, costs around $6 and serves 6+. The photo above is a double quantity which neatly fits a roasting sized dish.

  • 375g zucchini, grated
  • 1 large onion, diced
  • 3 rashers of bacon, sliced or chopped
  • 1 cup grated cheese
  • 1 cup self raising flour
  • 1/2 cup oil (I use rice bran oil)
  • 5 eggs
  • salt and pepper
  1. Grate unpeeled zucchini coarsely, finely chop onion and bacon. Combine zucchini, onion, bacon, cheese, SR flour, oil and lightly beaten eggs, season with salt and pepper.
  2. Pour into a well-greased or baking paper lined lamington tin 16cm x 26cm, bake in a moderate oven for 30-40 minutes or until set and browned.

Butter Chicken

Standard

My friend Cathy is a great example of someone who practices hospitality. She knows how to make food taste good and she cares for others by unashamedly choosing do-able meals that aren’t trying to impress, but instead hit the spot in ways that don’t break the bank. Recently Cathy sent me a number of her favourite recipes that do all these things and I’m excited to share the first of these with you. The Butter Chicken recipe that follows is delightfully easy – choose to cook this crowd pleasing favourite in either the slow cooker or in a sealed casserole dish for a few hours in the oven. Doubling the measurements listed below neatly fills a 5.5L slow cooker, and doing so is my favourite time saver, fulfilling more than one purpose with just one venture in the kitchen. If you decide to make extra to freeze, here’s a tip I read in a magazine years ago: spray the inside of plastic containers with olive or canola spray before filling. This will create a film that protects the containers from the stain of the red coloured sauce. The quantities that follow serves 10 people and costs under $15 to make.

  • I kg chicken thighs, chopped into chunks
  • I onion, roughly chopped
  • I jar of Patak’s Butter Chicken paste (not the sauce)
  • I x 400g tin of diced or crushed tomatoes
  • I x 420g tin of chickpeas, drained
  • 150ml cream
  • Handful of chopped coriander
  1. Brown chicken and onion in frypan.
  2. Put in a slow cooker or a heavy based casserole dish (covered) with the whole jar of butter chicken paste, tin of tomatoes and chickpeas.
  3. Cook for 2 hours in the oven, or 3 hours on high in the slow cooker or most of the day if set to low.
  4. Season with salt and pepper and add cream and coriander just before serving.
  •  Serve with basmati rice and microwaved pappadums.
  • Raita (natural yoghurt mixed with grated or chopped cucumber) is also a yummy accompaniment.

Big Batch Banana Choc-Chip Muffins

Standard

Image

More often than not these days, I find myself in need of inexpensive and simple recipes that can be made in massive quantities. I’ve realised this is because I don’t have enough time to bake or cook for just one purpose: whatever is on the go has to meet the need of a freezer requiring a terms worth of school little lunches, morning tea for church or suppers for Bible study. I also find it’s much more cost-efficient. So when my friend Kim gave me this bumper recipe for 60 banana choc-chip muffins I was over the moon. Now that bananas have come down in price (it seems it’s not too hard to get them for $2 per kg), now is a great time to make these moist and fudgey treats. If you don’t need 60, this recipe is easily halved. An important tip about these muffins: feel free to use homebrand choc-chips. They’re much smaller than their more expensive counterparts and actually work better in this recipe. Depending on the price of bananas, all up this huge batch of deliciousness costs approximately $20. Thanks for sharing, Kim!

  • 15 very ripe bananas (approx. 4kg)
  • 3 1/2 cups sugar (700g)
  • 5 eggs, slightly beaten
  • 375g butter, melted
  • 5 teaspoons baking soda
  • 2 1/2 teaspoons salt
  • 7 1/2 cups self raising flour (1.2kg)
  • 4 x 250g packets choc-chips (1kg)
  1. Preheat oven to 180 degrees celsius and distribute muffin cases across as many muffins trays as you have and will fit in your oven.
  2. Put all the bananas in the bowl of a food processor and blitz until creamy.
  3. Put all dry ingredients in a huge bowl or plastic 6L all-purpose basin (see picture).
  4. In a large mixing bowl combine mashed bananas, sugar, eggs and melted butter. Tip this wet mixture into the dry ingredients and mix until combined, but don’t over do it.
  5. Using two dessert spoons, dollop one heaped spoon worth of mixture in each muffin case. Bake for 15-20 minutes until brown and cooked through. Enjoy!

Massive Massaman Curry

Standard

Image

My friend Julie contributed this lovely mild curry recipe and I’m so pleased with the result! Originally from Charmaine Solomon’s Hot & Spicy Book, the whole thing was very easy to make and so tasty. It cooks on the stove for quite a while but pretty much uses just the one pot – and it was no trouble to do other jobs around the place while this yummy curry simmered away. The recipe that follows cost around $25 to make but made no less than 3L, which, served with rice serves approximately 15 people. This recipe is delightfully freezer friendly and can be made in advance for church dinners, weekend hospitality or keeping in the freezer. Thanks for sharing, Julie!

  • 2 kg of chuck steak, cut into chunks
  • 2 tins of coconut milk
  • 5 tbsp massaman curry paste
  • 10 baby potatoes or 1kg potatoes peeled and cubed, whole OR 1 kg of pumpkin peeled and cubed
  • enough small onions for one per person or 4 large, cut into chunks
  • 4 tabs fish sauce
  • 4 tabs lemon or lime juice
  • 1 1/2 tbsp palm sugar (at all Asian grocers) or 4 tabs brown sugar
  • 1 cup unsalted peanuts (easily left out in the case of allergy)
  • 1 cup fresh basil leaves

1. Put chuck steak in large saucepan or stovetop casserole pot with one tin of coconut milk and one tin of water. Add more water if the steak is not covered. Simmer on very low heat with lid on for one and half to two hours, until steak is almost tender. Remove beef from saucepan and set aside. Keep all the liquid.

2. In the same pan heat one tin of coconut milk until thick and oily and slightly reduced. Add curry paste and cook until fragrant.

3. Add meat and liquid back in with sauces, sugar, onions and potatoes and cook approximately 45 mins until potatoes are cooked and liquid has reduced and thickened slightly (If using pumpkin, don’t add until 20 minutes before serving).

4. Add peanuts and basil leaves just before serving. Serve on rice with green beans or broccoli.

Banana Bread (with no added sugar)

Standard
Image
Having had some requests for some sugar free recipes, I thought I’d share this one. I make this modified banana bread (originally another Nigella recipe) in muffin sizes for my kids lunches all the time and the best part is I know that the only sugar in it comes from the bananas themselves. This recipe calls for stevia instead of sugar and you can buy it in a variety of granulated brands in the sugar aisle next to the artificial sweeteners. The exciting thing about stevia is that it’s totally natural so there’s no bad after taste and it’s also much sweeter than sugar so you really only need 1/4 of the amount you might normally use when baking with sugar.
  • 250g plain flour
  • 2 teaspoons baking powder
  • 1/2 teaspoon bicarbonate of soda
  • 1/2 teaspoon salt
  • 125g unsalted butter, melted
  • 50-75g stevia (add enough to suit your desire for ‘sweetness’)
  • 2 large eggs
  • 4 small, very ripe bananas (about 300g weighed without skin), mashed
  • 1 teaspoon vanilla extract
  • 23 x 13 x 7cm loaf tin, buttered and floured or with a paper insert
  1. Preheat the oven to 170ºC/gas mark 3 and get started on the rest. Put the flour, baking powder, bicarb and salt in a medium-sized bowl and, using your hands or a wooden spoon, combine well.
  2. In a large bowl, mix the melted butter and stevia and beat until blended. Beat in the eggs one at a time, then the mashed bananas. Then, with your wooden spoon, stir in the vanilla extract. Add the flour mixture, a third at a time, stirring well after each bit. Scrape into the loaf tin and bake in the middle of the oven for 1-11/4 hours. When it’s ready, an inserted toothpick or fine skewer should come out cleanish. Leave in the tin on a rack to cool, and eat thickly or thinly sliced, as you prefer.

Donna Hay’s Pumpkin, Ricotta and Basil Lasagne

Standard
Image
Yesterday I was the grateful recipient of a ‘day off’ by myself. My husband ordered me to ‘go to a cafe and read a book’ which I readily agreed was a wonderful way to use some of the day. Beforehand, I found a copy of Donna Hay’s No Time To Cook, and having used it a number of times, sat down to read it like a novel, page by page. By the end I was inspired by a number of the recipes, especially this one. Normally a yummy vegetarian dish, I knew my husband would prefer it with the addition of mince, and the result was a less stodgy and much healthier lasagne. With 750g of mince added to the passata sauce this dish costs around $16 and around $11 if you keep it vegetarian. Serves 10.
  • 1.2kg ricotta (buy it from the deli, not the fridge section, much cheaper!)
  • 160g grated parmesan
  • 6 tbsp chopped chives (if you have it)
  • 8 tbsp shredded basil (if you have it)
  • 1 rounded tbsp finely grated lemon rind
  • sea salt and cracked black pepper
  • 4 tbsp coarsely chopped oregano leaves (if you have it)
  • 1.25 litres tomato passata
  • 450g-600g lasagne sheets
  • 1.5kg pumpkin peeled, seeded and sliced thinly (2-3mm)
  • 100g grated mozzarella
  1. Preheat oven to 180C/160C fan/gas 4.
  2. Combine ricotta, half the grated parmesan, chives, basil, lemon rind, salt and pepper in a bowl and mix well. Stir oregano into passata.
  3. Place a layer of lasagne sheets into the base of a greased 20cm x 35cm baking dish (about 7cm deep, 3.5-4 litre capacity). Top with a third of the pumpkin and spoon over a third of the passata mixture. Top with a third of the ricotta mixture and another layer of lasagne sheets. Repeat layers, ending with a layer of lasagne sheets and the remaining ricotta mixture.
  4. Sprinkle with mozzarella and the remaining parmesan, cover with aluminium foil and bake for 1½ hours.

Hearty Chicken and Vegetable Soup

Standard

Image

Katrina put me onto this soup recipe a few weeks back and I thought I’d give it a go today. I tried it today because we’ve got a big week ahead (one of our kids is having their tonsils and adenoids out tomorrow), I wanted a meal to give away and I wanted to put the rest in the fridge for the number of lunches and dinners we’ll need quickly in the days to come. For all these reasons, I doubled the quantities and I really enjoyed the ease of this recipe – it only took around 20 minutes of peeling and chopping before sticking it on the stove to simmer. The ingredients list tells you to use chicken lovely legs, but today at my butcher, drumsticks were on special and lovely legs were not. I decided the saving in cost was worth the 5 extra minutes to remove the skin from each drumstick, and seeing as the recipe requires the removal of bones, I figured it didn’t matter that each leg was not shortened. The end result was yummy, full of good meat and healthy vegetables. Total cost, less than $8 and feeds 6-8. Thanks for the link, Katrina and thanks taste.com for the recipe and photo.

  • 2 tablespoons olive oil
  • 1 leek, halved, washed, thinly sliced
  • 2 garlic cloves, crushed
  • 1 large carrot, peeled, diced
  • 2 sticks celery, diced
  • 2 small zucchini, diced
  • 1 swede or turnip, peeled, diced
  • 1 1/4 cups dry soup mix, rinsed
  • 8 cups chicken stock (I use powder cause it’s cheaper)
  • 1kg skinless chicken lovely legs (or drumsticks)
  1. Heat oil in a large saucepan over medium heat. Add leek and garlic. Cook, stirring, for 2 minutes or until soft but not coloured. Add carrot, celery, zucchini and swede. Cook for 2 minutes. Stir in soup mix, stock, chicken and 1 cup cold water. Increase heat to high. Bring to the boil.
  2. Reduce heat to low. Simmer, partially covered, stirring occasionally, for 1 hour or until soup mix and vegetables are tender.
  3. Remove chicken legs from soup. Allow to cool slightly. Remove meat from bones. Roughly chop chicken meat and add to soup. Season with salt and pepper. Ladle soup into warmed bowls. Serve with bread if desired.
  • Packet dry soup mix is a combination of split peas and lentils. You can find it near the chickpeas in the supermarket.

Donna Hay’s Oven Baked Parmesan Risotto

Standard

ImageImage

I first came across this recipe in Donna Hay’s Instant Entertaining and it’s now one of my favourites for large group catering, freezing for later or giving away when someone needs a meal. It’s such a hands-off recipe and is so versatile, allowing you to add whatever flavours you like. Tonight I’ve added chicken, sun-dried tomato and mushroom, though I’m keen to try it with ham, roast pumpkin and pine nut. The possibilities here are endless, so go with whatever you like or what needs using up in your fridge. For this variation, I added the sun-dried tomato strips to the stock and rice at the beginning so that they were nice and tender to eat and allowed about 50g of chicken per person. Total cost less than $10 and these quantities feed 12.

  • 3 cups arborio rice
  • 8 cups chicken stock (I use powdered, reconstituted with boiling water)
  • 2 cups finely grated parmesan cheese
  • 80g butter
  • salt and pepper
My additions
  • 500-600g chicken thigh fillets
  • 1 small jar sun-dried tomatoes (cut into strips)
  • half a bag of mushrooms, sliced
  • parsley and or shallots (if you have them)
  1. Preheat the oven to 180 degrees.
  2. Place rice and stock (and sun-dried tomatoes) in a large roasting dish and stir to combine. Cover tightly with foil or a lid and bake for 45 mins or until most of the stock is absorbed.
  3. While the rice is cooking, cook up whatever add-in elements you like (in this case, fry the pieces of chicken and saute sliced mushrooms).
  4. Pull rice out of the oven, stir in the parmesan, butter and salt and pepper. Stir for 3-4 minutes until the risotto is thick and creamy. Add in extra elements and stir again. Add extra flavour with a handful of finely chopped parsley and spring onion. Serve with a side salad or top with steamed greens.

Donna Hay’s Simmered Tomato & Basil Chicken

Standard

I first tried this recipe when a lovely friend provided us with this meal after the birth of our daughter. I’ve adapted it a little and added beans for a little extra nutrition. This is a quick recipe to make and costs around $7. Serves 4+ and is really easy to adapt for bigger groups by allocating 100g of chicken per person (thanks for this maths tip, Cynth!). This recipe is also dairy, egg and gluten free if you go with white wine instead of stock.

  • 2 chicken thigh fillets or 1 large breast fillet (total 400g), thinly sliced
  • 1 tablespoon olive oil
  • 1 onion, thinly sliced
  • 400ml can crushed tomatoes
  • 60ml white wine or chicken stock
  • 1 teaspoon sugar
  • 1/2 cup roughly chopped basil leaves
  • 1/2 cup pitted kalamata olives
  • handful fresh green beans, head and tailed
  • salt & pepper to taste
  • shaved parmesan cheese (to serve on top)
  1. Heat oil in a large frying pan over high heat. Add the onion and garlic and cook for 2 mins until soft.
  2. Add the chicken and cook until brown in colour. Add the tomatoes, wine/stock and sugar. Simmer over low heat for around 10 mins so chicken cooks all the way through.
  3. Add a handful of green beans and simmer a further 5 minutes.
  4. Just before serving, throw in the basil and olives. Season with salt & pepper.
  5. Serve on rice or mashed potato.