Pulled Pork and Apple Slaw Lunch for 10

Standard

Image

My friend Wendy recently sent in this amazing recipe and having tried it out, I think I’ll be making it time and time again. Utilising all the benefits of a slow cooker, this affordable and tasty meal is just so easy to do. Just put the meat and marinade in a slow cooker 8 hours before your guests arrive. The accompanying apple slaw takes no longer than a standard salad to make and your guests can put it all together themselves during the meal. Wendy made this pork-tastic dinner en-masse for a church dinner recently using two slow cookers and was able to feed everyone affordably in a cinch. I recommend purchasing the pork from a butcher as mine was half the price of my local Woolworth’s. Serving 10 people easily, this recipe costs around $20, when pork is on special. Thanks Wendy!

  • 2kg pork shoulder
  • 1 x 375g bottle BBQ marinade (whatever is cheap, even standard BBQ sauce will do)

Apple Slaw

  • 1/2 small savoy cabbage, shredded
  • 2 carrots, grated
  • 2 small apples, grated
  • 1 cup mint leaves, finely chopped (if you have it – if not, don’t stress)
  • 3/4 cup mayonnaise
  • 1 tablespoon dijon mustard
  • 2 tablespoons of lemon squeeze or juice of 1 lemon
  • salt and pepper to taste
  • 20 bread rolls or french stick/baguette equivalent
  1. Place pork in a slow cooker and empty all the marinade over it. Replace lid, switch to low and cook for 8 hours.
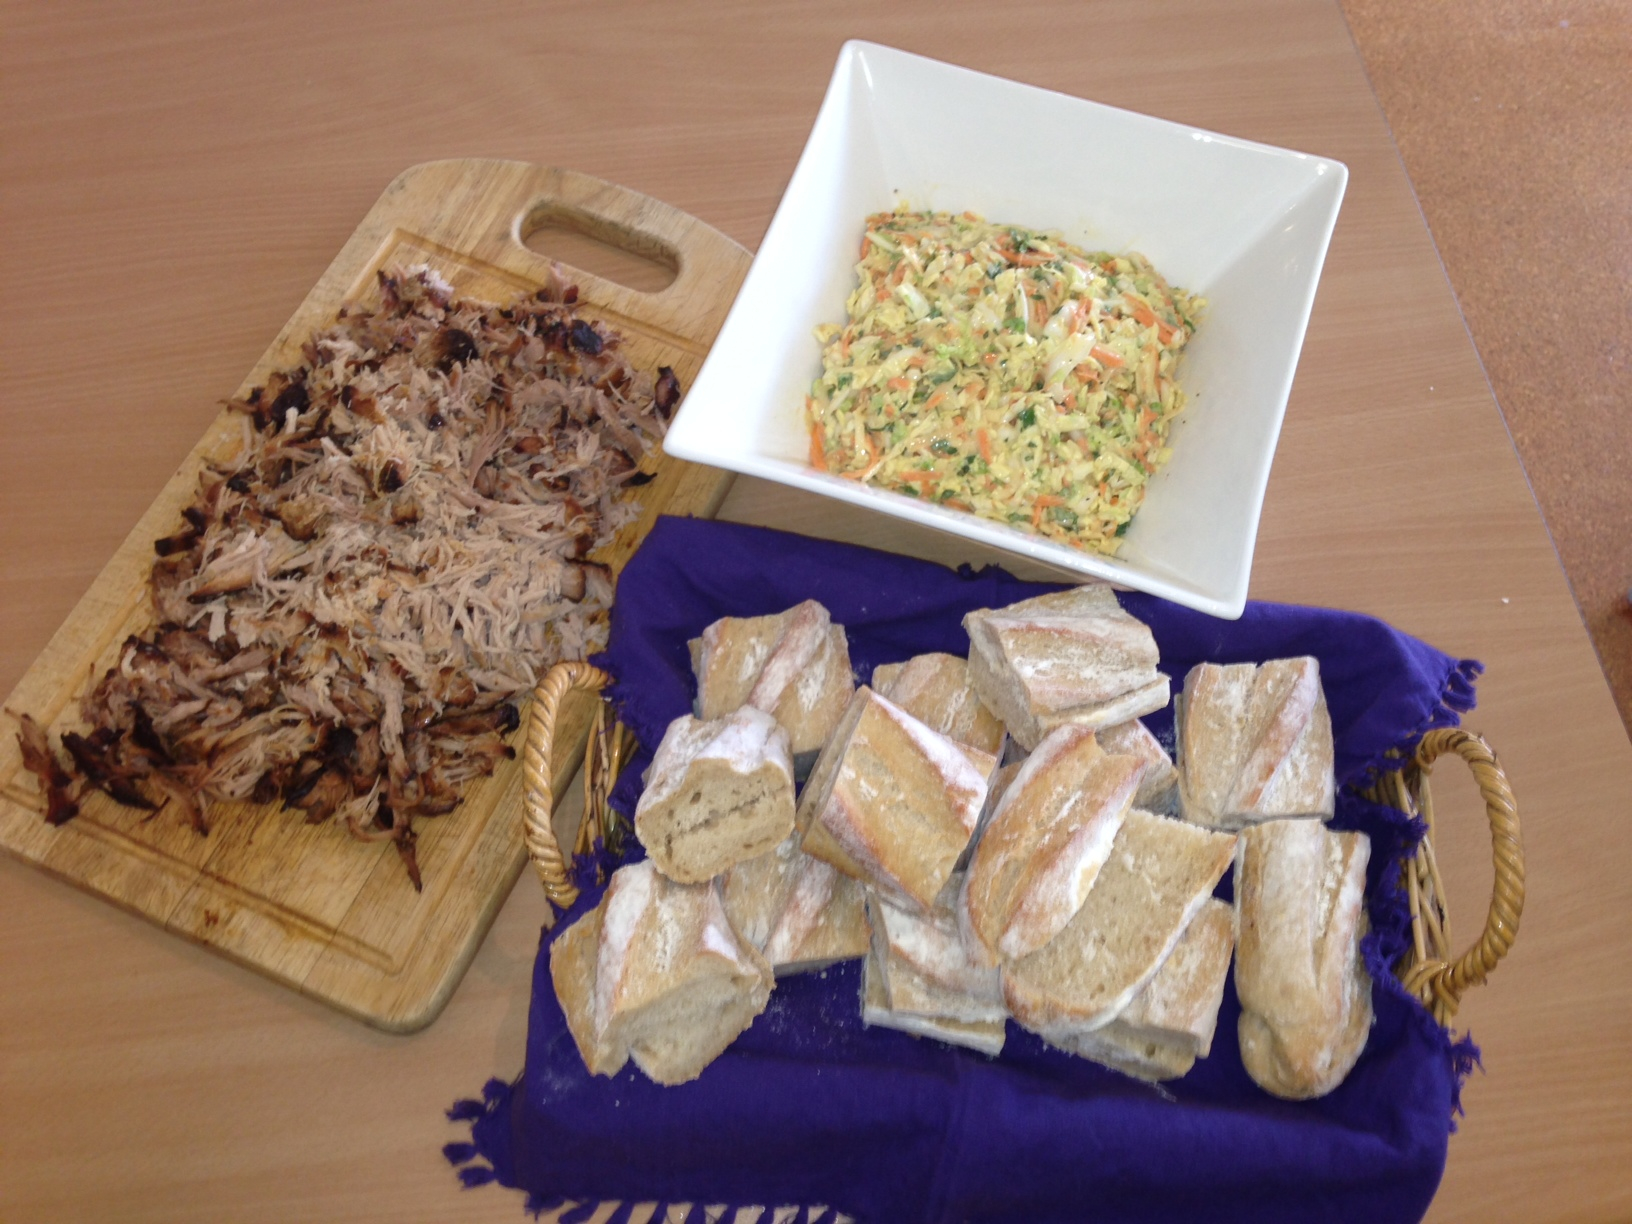
  2. Combine cabbage, carrot, apple and mint in a salad bowl. In a separate measuring jug, combine mayonnaise, dijon and lemon juice. Dress slaw mixture with the dressing and toss well.
  3. Remove pork from slow cooker, and using 2 forks pull the tender pork apart
  4. Place fresh rolls, pork and apple slaw in the centre of the table, allowing people to put together their own pork and apple slaw rolls.

Chicken and Bacon Ranch Macaroni

Standard

Image

I’m a bit of a sucker for macaroni cheese and have loved it since I was a kid. Recently Steve went away for a week for work, which, for the sake of my sanity, proved to be the perfect time to try this recipe – I made it one of the first nights he was away and then the kids and I ate it every night for the rest of the week. Having long loved mac’n’cheese, I think I can safely say this is my favourite version of it – the ‘secret’ ingredient of chicken soup in the cheese sauce takes this family favourite to a new level. If you’ve got left-over barbeque chicken from Sunday lunch, this recipe is a great way to use it up. Quick and simple to make this recipe makes enough to serve 10 and costs around $12 to make.

  • 500g uncooked elbow macaroni
  • 3 rashers bacon, finely chopped
  • 250g skinless, boneless chicken breast, cut into 1/2-inch pieces
  • 2 tablespoon canola oil
  • 2 tablespoon plain flour
  • 3 cups milk
  • 1 cup condensed cream of mushroom or cream of chicken soup, undiluted
  • 2 cups grated cheese + 1 cup extra
  • 1 onion
  • 1 capsicum, diced
  • 1 can of corn kernels, drained
  • 2 cloves of garlic, crushed
  • salt and pepper to taste
  1. Preheat oven to 180 degrees celcius and cook pasta according to package directions, omitting salt and fat; drain.
  2. Cook bacon, onion and garlic in a large nonstick frypan over medium heat until crisp. Remove bacon from pan, reserving drippings in pan. Increase heat to medium-high. Add chicken to drippings in pan; sauté 6 minutes or until done.
  3. Heat oil in a large saucepan over medium heat; sprinkle flour evenly into pan. Cook 2 minutes, stirring constantly with a whisk. Combine milk and soup, stirring with a whisk; gradually add milk mixture to saucepan, stirring with a whisk. Bring to the boil; cook 2 minutes or until thick. Remove from heat. Add cheese, capsicum, corn kernels, frozen peas and salt, stirring until cheese melts. Stir in pasta, two thirds of cooked bacon and chicken.
  4. Spoon mixture into a large roasting or lasagne dish coated with a little cooking spray. Sprinkle evenly with reserved bacon and extra grated cheese. Bake in oven for 5-10 minutes or until cheese melts, but no longer or it will start to dry out.

Muffins That Taste Like Doughnuts

Standard

Image

I saw this recipe floating around on Facebook a couple of weeks ago and it really grabbed me – who wouldn’t want to try a recipe promising muffins that taste like cinnamon doughnuts? These muffins delivered on their promise in taste, were simple to make from basic pantry ingredients that are readily on-hand and cost no more than $1.50 to make. Make these quick and easy muffins for last minute friends dropping by or for a quick solution for empty lunch boxes at the end of a busy week. Like all muffins, these don’t have an especially long shelf life, but they are freezer friendly and if you’re eating them after a day or two, a quick zap for 10-20 seconds in the microwave brings back a fair bit of freshness and restores them to something more like a warm cinnamon doughnut. For those avoiding sugar, simply replace the caster sugar measure for measure with dextrose (available from the beer brewing section at K-Mart or Big W). If you’re not too heavy-handed with the mixture it will make 12 muffins. Enjoy!

  • 1 3/4 cup plain flour
  • 1 1/2 teaspoons baking powder
  • 3/4 cup caster sugar
  • 1/2 teaspoon salt
  • 1/2 teaspoon nutmeg
  • 1/4 teaspoon cinnamon
  • 1/3 cup vegetable or canola oil (I use rice bran)
  • 1 egg
  • 3/4 cup milk

Sugar Topping

  • 1/2 cup melted butter
  • 1/4 cup caster sugar
  • 1/4 tsp cinnamon

1. Preheat oven to 180 degrees celcius and distribute 12 paper cases in a 12 hole muffin tray.

2. Combine dry ingredients in a large bowl. Mix liquids in separate bowl or pyrex jug. Add liquids to dry ingredients and combine together well, without over beating. Spoon mixture into prepared muffin tins using two soup spoons (but don’t overload them). Bake for 15 mins though start checking at 10. When muffins spring back a little, they’re ready.

3. While muffins are baking prepare sugar topping: combine sugar and cinnamon in a small bowl and melt butter in yet another bowl. As soon as muffins come out of the oven, dip each one into melted butter and roll into sugar & cinnamon mixture, or brush with butter and top with sugar mixture if muffins are too hot to handle.

Chorizo Pilaf

Standard

Image

Boredom with cooking drove me to trawl through the budget section of taste.com today and this three step, all-in-one dish caught my attention in the process. The flavours appealed to me lots: onion, garlic, chilli, cumin and paprika, and the effort level was just right for how tired I was feeling! Sausages of any kind go down a treat with my kids so I decided to give this a try – and I’m glad I did. The kids came back for seconds and the spicy – but not too spicy -flavours warmed us all up just as the evening started to chill. While the original recipe calls for six chorizo sausages, I thought this was a little over the top – four is plenty and you could even get away with three. If spicy food isn’t so much for you, simply halve the amount of chilli listed below. This yummy, simple and cheap recipe costs less than $10 and serves 6. Serve with steamed greens or a side salad.

  • 2 tablespoons olive oil
  • 4 chorizo sausages, sliced
  • 2 brown onions, halved, thinly sliced
  • 2 garlic cloves, crushed
  • 1 red chilli, deseeded, sliced
  • 2 teaspoons paprika
  • 1 tablespoon ground cumin
  • 2 cups basmati rice
  • 4 cups chicken stock (I use powdered)
  • 1/2 cup flat-leaf parsley leaves, chopped (if you have it)
  1. Heat 1 tablespoon of oil in a large saucepan over medium heat. Cook chorizo for 2 to 3 minutes each side or until golden. Cut into circles and drain on paper towels.
  2. Heat remaining tablespoon of oil in saucepan over medium heat. Add onions. Cook, stirring, for 2 minutes. Add garlic, chilli, paprika and cumin. Cook for a further 2 minutes, stirring, or until soft.
  3. Stir in rice. Add stock and chorizo. Bring to the boil. Reduce heat to medium-low. Cover. Simmer for 10 minutes. Remove from heat. Stand, covered, for 5 minutes. Stir through parsley, and salt and pepper. Serve.

Nigella Lawson’s Chocolate Croissants

Standard

Image

Image

Image

We recently enjoyed the pleasure that is old friends coming for an impromptu dinner. We’d had a lovely day taking things slowly: sleep ins; going for a drive in the country; and coming home for afternoon rests followed by feeling recharged enough to feel like cooking for the evening ahead. Still, I didn’t want to lose the sense of relaxation the day had brought so wanted to stick to a simple offering for dinner and dessert. A quick flick through Nigella Lawson’s Nigella Express produced this recipe for Chocolate Croissants and the simplicity of just three ingredients grabbed me immediately. And they turned out to be all the things I love: fast, tasty, cheap to make and easy to prepare. I made these in the late afternoon, but didn’t bake them until we’d finished our main course, which turned out to be delightful timing – allowing dinner to ‘sit’ and then consuming them at their warmest and freshest. Serve stacked up on a platter for a free-for-all feast, or in bowls with cream or icecream. Alternatively these could be made in a more miniature form for church morning teas or a finger food dessert for a larger crowd. The quantities listed below serves 8 and costs around a total of $5.

  • 4 sheets of ready rolled puff pastry, thawed and cut once each diagonally to create two large triangles per square
  • 1 x 230g bag of Cadbury Choc Bits (I used milk, but use dark chocolate if you prefer)
  • 1 egg, whisked in a cup
  1. Preheat oven to 220 degrees
  2. Evenly distribute choc-chips along the long end of each triangle of pastry and press them in firmly
  3. Starting with the long end of the triangle, roll pastry until you have all the choc-chips trapped inside. Then fold each end in to keep chocolate trapped. Then continue rolling into a log shape until all the pastry is rolled up.
  4. Shape the log of pastry and chocolate into a pretzel shape or whatever shape you like
  5. Place each on an oven tray with enough space between them to grow a little
  6. Using a pastry brush, cover each croissant in egg-wash
  7. Bake for around 15 minutes until brown on outside and mostly cooked through. Enjoy!

Cinnamon Scrolls

Standard

Image

Image

I stumbled upon this sensational recipe on Cath’s blog the other day and was immediately taken with it. So very easy, so very cheap, so very yummy. And seeing as I’m on a bit of a scroll making wave right now, I was keen to give them a go. And although I’m not really meant to be eating sugar at the moment, these have caused me to make some exceptions. These delicious cinnamon scrolls are not much harder to make than scones and pretty much the same cost as the cream goes in the mixture, and not on top. This recipe makes more than a roasting dish worth of scrolls (I had to use another smaller tin, just for the four that wouldn’t fit in!) so would be a great option for Bible study morning tea, afternoon tea playdates, church morning tea or any time at all really. The smell as they were baking was only topped only by the actual enjoyment of eating them. Approximate cost is $3.50 and makes 24 scrolls. Thanks for your blog Cath, and thanks for sharing this recipe with us.

Scroll Mixture:

  • 4 cups Self Raising Flour
  • 300ml cream
  • 300ml milk

Inside Mixture:

  • 1/2 cup butter, softened
  • 1 cup brown sugar
  • 1 tablespoon cinnamon
  • Good dash vanilla essence or extract

Icing Mixture:

  • 1 cup icing mixture
  • enough warm water to make a runny icing
  • extra cinnamon if you like (I did!)
  1. In a bowl, mix self-raising flour with milk and cream.
  2. The mixture will be quite sticky still, but turn it out onto a well-floured board or bench, and turn it over a few times to flour it well.
  3. Roll it out into an oblong shape so it is quite thin – the thinner the better, but not so thin that it will tear when you move it.
  4. In a small bowl, mix together soft butter with brown sugar and cinnamon. Add a hearty dash of vanilla sugar, or vanilla essence. Spread this mixture over the rolled out pastry. Don’t wash the bowl – you will need it later for the icing.
  5. Using a spoon or pastry brush, spread this inside mixture all over scroll mixture. Roll it up from the long end until you have a log.
  6. Cut the roll into pieces about 1 inch thick, and lay them in a greased or lined oven tray, close together but not packed in. Sprinkle them with vanilla sugar if you have some.
  7. Bake them in the oven at 180deg. for 15-20 minutes, or until they are starting to brown nicely.
  8. In the bowl where you mixed the sugar and butter, mix 1 cup of icing sugar with enough water to make it go runny. The butter and spice left around the edge of the bowl is sufficient to give it a slight flavour, though you might like to add extra cinnamon. Using a dessert spoon, drizzle this over the scrolls while they are still warm.
  9. Enjoy! Best eaten the same day, though a quick zap in the microwave brings them back to freshness should they need it a day or two later (but they won’t last that long, anyway!).

Pork Stir-Fry

Standard

Image

Last week on My Kitchen Rules Jake and Elle won the People’s Choice Award with this yummy dish in the Budget Challenge. The show itself gets on my nerves for lots of reasons, but still, I find myself watching it with some regularity. I was so glad I saw this episode! It was easy to find the recipe online and it truly was a fast, easy and cheap meal to make. And the whole family loved it. I love how it uses mince rather than pieces of expensive meat which I always seems to murder in the stir-frying, resulting in tough bits of meat that are hard to eat. But this pork mince stir-fry is wonderfully forgiving – a great one, I imagine, to teach teenagers to cook for themselves when necessary. At the most, this tasty stir fry will take 15 minutes to prepare and another 15 to cook, and using the quantities listed below will cost around $10 to make. Serves 4, though I stretched it out to serve 6 by adding more noodles and it worked a treat.

  • 400g egg noodles
  • 1/3 cup kecap manis
  • 1½ tbs fish sauce
  • 2 tsp vegetable oil
  • 1 onion, peeled, finely chopped
  • 2 garlic cloves, peeled, crushed
  • 500g pork mince
  • ½ bunch coriander, chopped
  • 1 bird’s-eye chilli, finely chopped
  • 1cm-piece fresh ginger, finely chopped
  • 2 carrots, julienned
  • 1 bunch bok choy, chopped
  • Coriander, to garnish

1. Cook noodles in a saucepan of salted boiling water according to packet instructions. Drain noodles and set aside.

2. Combine kecap manis and fish sauce in a small jug.

3. Heat oil in a wok or large deep frying pan over high heat. Add onion and cook for 2 minutes or until onion softens. Add garlic and cook for a further 1 minute. Add pork mince and sitr-fry, stirring with a wooden spoon to break up any lumps, for 5 minutes or until browned. Add remaining ingredients and cook, stirring, for 2-3 minutes. Add sauce and noodles and stir through for 2-3 minutes or until heated through.

4. Garnish with coriander to serve.

Notes:

• You can also use chicken or turkey mince in this dish.

• For variety, this spiced pork mixture would also be great served in lettuce cups or with rice.

• You can add any type of extra vegetables to this dish – try sliced red capsicum, baby corn or bean sprouts.

2 Ingredients Pizza Scrolls (well, almost)

Standard

Image

Image

No sooner had I posted Kath’s contribution of 2 ingredients Cookies, did she sent me this next 2 ingredients recipe of Pizza Scrolls. Tonight I found myself trying it out, and oh my goodness, if I put on weight this winter it will be because of these super fast, delicious and comforting pizza delights. And I suppose I should come clean – the 2 ingredients in the title refers only to the amazing bread-like, not-scone-like, base for the scrolls. But I think this is forgiveable as the fillings come from whatever veggies and bits of deli meat you have lying around in your fridge, and although they’re necessary, they’re incidental in ways that keep the food bill down. Rapidly going off in my fridge was some pre-grated cheese, 3 slices of short cut bacon, 4 mushrooms, 4 rings of tinned pineapple and half a red capsicum. So that’s what went in! We enjoyed our scrolls for dinner (and the kids loved them), but they’d be terrific as a weekend lunch option when having friends over and, cut into quarters, would make a yummy and affordable church morning tea option. I didn’t bother costing these cause it wasn’t worth it, given how they came into being. Thanks again, Katherine!

Base

  • 2 cups Self Raising Flour
  • 1 1/2 cups Natural or Greek Yoghurt

Filling

  • Pizza sauce/tomato sauce/crushed tinned tomatoes/pasta sauce, enough to cover the mixture when rolled out to 2cm thick
  • Grated cheese, about 2 cups
  • 1 onion, diced finely
  • Whatever meat and/or veggies you have to use up. Make sure you chop everything finely so that they get caught up in the rolling of the scroll without falling out too much.
  1. Preheat oven to 200 degrees. Mix flour and yoghurt together. I did mine really quickly using my bench mixer, but this is not at all necessary.
  2. Knead on a well-floured bench top, adding extra flour to aid in process. Roll the dough out to about 30cm x 20cm, which should end up being around 2cm thick. Don’t stress at all about this – these scrolls are meant to be rustic looking, almost free-form.
  3. Spread tomato base, sprinkle with whatever fillings you’ve chosen, and using a rubber spatula or egg flip, start rolling at the end closest to your waist, using the spatula underneath the dough to encourage it off the bench and into the roll. Again – don’t worry how lumpy or uneven it is, just aim to get it rolling together.
  4. Cut your log in the middle using your biggest knife, cutting each section into halves until you have 16 scrolls, each about 2 cm wide. Spread out biscuit style, on lined baking trays, ingredients showing upwards, giving plenty of room for them to rise. Bake at 200 degrees for 10-12 mins. Enjoy immediately or later – whichever you need.

2 Ingredients Cookies

Standard

Image

Image

So it seems I’m slowly being converted out of my anti-biscuit baking funk by some contributors and their awesome recipes. My old uni friend Katherine has sent in this fantastic contribution – cookies with just two ingredients + whatever mix-ins you might like. There’s so much to love about this recipe: no butter, no eggs, no refined sugar, minimal mixing, less than 5 minutes prep before they go in the oven, they’re much healthier than their mainstream counterparts, they taste terrific and the oatey substance of them is so homely. But since this is a blog about easy and affordable hospitality, I should mention too that they’re a great option to make for last minute guests who drop in (no rolling mixture, just dollop the mixture on the trays using 2 dessert spoons), a yummy addition to a meal provided for folks in need or freezing in advance for the never-ending stock needed for healthy school lunches. Originally from a terrific blog called The Burlap Bag – all credit is given to its author, Lauren who invented these. Using the quantities listed below, with choc-chips used as my mix-in of choice, these little babies will cost you no more than $6 to make 40+ cookies and less if you get bananas cheaper than $3/kg. Thanks for sharing, Katherine and thanks for inventing, Lauren!

  • 8 bananas, mashed (or blitzed in food processor)
  • 4 cups quick cooking oats (homebrand is fine)
  • My mix in: 1 x 230g bag cadbury choc-chips

Mix ingredients together. Old bananas are amazing for this, but you can use fresh ones too. I buy a bunch of bananas, let them get old on my counter, giving the family the opportunity to eat them and then stick what remains in the freezer – whole with the skin on.

Then add in what sounds yummy to you (or nothing!) Lauren suggests these:
– a handful of chocolate chips
– crushed walnut pieces
– cinnamon
– raisins

Lauren’s tip: Since all bananas are different sizes, the needed measurements can vary. If it seems too runny and the cookies would flatten out too much, add in more oatmeal. And make sure to not add in TOO many mix-ins as the cookies won’t hold together very well. Dollop onto trays using dessert spoons and flatten before baking with a fork. Bake in a moderate oven for around 15 mins. Enjoy!

Chilli Beef & Bean Pasta Bake

Standard


Image

Image

Oh my goodness life is busy at the moment. My five year old has started school and there’s so much to get my head around (news, library books, computers, home readers, buddies, making friends at the school gate, getting out the door on time and the endless cycle of making lunches – I could go on). The uni year which has been amping up began to reach one of its crescendoes with O week which started today (exciting times!). There’s been lots of slack dinners lately but thankfully my friend Belinda shared this recipe with me and it lasted us three nights in a row – economical on both time and money. And it’s a sensational tasting dish too. This mexican beef and pasta bake was scoffed down by my kids (perhaps because it wasn’t Weet-bix?) and us grown ups loved it just as much. And don’t worry, it’s not hot in the spicy sense at all. The pictures above represent a double quantity and using those listed below this dish will set you back between $10-12. Serves 6. Thanks Belinda – this one’s already part of our family.

  • 200g spiral pasta
  • 1 tablespoon olive oil
  • 1 brown onion
  • 1 red capsicum
  • 400g beef mince
  • 2 garlic cloves, crushed
  • 30g packet Taco Spice Mix (generic is fine)
  • 1/2 cup water
  • 400g can diced tomatoes (generic is fine)
  • 2 zucchinis, chopped
  • 400g can red kidney beans, drained (generic is fine)
  • 310g can corn kernels, drained (generic is fine)
  • 1/2 cup grated cheese
  1. Preheat oven to 180 degrees or 160 degrees fan-forced. Lightly spray a 2L oven-proof dish with oil. Cook pasta in a large saucepan of boiling salted water until just tender. Drain.
  2. Meanwhile, heat oil in a large non-stick frying pan over medium heat. Add onion and capsicum and cook, stirring for 5 minutes until softened. Add mince and cook, breaking up any lumps, for 5 minutes or until browned. Add garlic and cook, stirring, for 1 minute or until fragrant.
  3. Stir in taco spice mix and cook, stirring for 1 minute. Add tomatoes, zucchini and 1/2 cup water and bring to the boil. Reduce heat and simmer, uncovered for 5 minutes or until zucchini is just tender and mixture has thickened. Add pasta, beans, corn and mix to combine.
  4. Combine mixture into prepared dish, sprinkle with cheese and bake for 20 minutes or until cheese is golden.